-
Welcome to Tacoma3G.com, a free resource for 2016-2023 Toyota Tacoma owners!
Tacoma3G is a beginner-friendly 3rd Generation Toyota Tacoma forum (2016-2023 model-year specific). We are a small community of people who are focused on good information and good vibes. More about us....
You are using an out of date browser. It may not display this or other websites correctly.
You should upgrade or use an alternative browser.
You should upgrade or use an alternative browser.
What have you done to, or with, your Tacoma today?
- Thread starter MMoreno16
- Start date

drizzoh
6️⃣ Aficionado
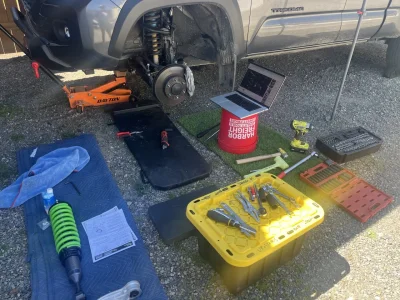
After installing the HH's my 22" rear brake lines were too short to allow my shocks to fully extend, so 25" Crown rear brake lines installed this weekend along with a set of Durago BD92010402 electrophoretic coated drums to replace the stock ones that hate staying painted. Hopefully these will stay black.
![[IMG]](/proxy.php?image=https%3A%2F%2Fi.imgur.com%2FkpxzGQvh.jpg&hash=cfbe5b531784ac33434f6c3ddba040fb "[IMG]")
Last edited:
Big overland rally in Oregon last weekend I helped organize. High Desert Overland 2023 (or Hi De O!) was largely a success. Had to do anything in May in the desert due to the heat, then wind, then lightening, then rain and in some cases hail! It was a wild weekend and I got to visit a lot of places out there that I had never been to. Also got to see a lot of my old friends and make new ones.

Last edited:
pnw_taco_time
2️⃣ Bronze
I have got to figure out this rear end squeak. It's about to drive me crazy. Had it on the lift last week for an oil change and inspected everything. Sounds like it coming from the rear shock area. It started about 3 months ago, I've been lifted since Mar 2022. Not sure if something worked loose or a bushing is bad.
Tomahawk Dog
6️⃣ Aficionado
Get silicone clear spray with a red straw and hit one spot at a time that maybe the cause.
If you spray everything ...................... you will not isolate it.
If you spray everything ...................... you will not isolate it.
Bed bushing is worth checking.I have got to figure out this rear end squeak. It's about to drive me crazy. Had it on the lift last week for an oil change and inspected everything. Sounds like it coming from the rear shock area. It started about 3 months ago, I've been lifted since Mar 2022. Not sure if something worked loose or a bushing is bad.
Now that you mention it, I do notice quite a bit of bed flex. I'll start with a re-torque of the bed bolts. Guess I'll go searching today to find torque specs for that stuff.Bed bushing is worth checking.
Tomahawk Dog
6️⃣ Aficionado
From Tyler in 2020Now that you mention it, I do notice quite a bit of bed flex. I'll start with a re-torque of the bed bolts. Guess I'll go searching today to find torque specs for that stuff.
https://tacoma3g.com/3rdGenTacomaServiceManual.pdf
Now that you mention it, I do notice quite a bit of bed flex. I'll start with a re-torque of the bed bolts. Guess I'll go searching today to find torque specs for that stuff.
I remember there were some where the front of the bed was moving. Some wear and the composite mount wears away. The metal bushing inside remains the same length. So now the bolt isn't securing anything. Just retaining things together. Maybe this is rubbing? Hopefully it's just this. I would go between frame and bed. Not on the bolt.
Something random I came across while trying to level my bed... Never got it done and being lazy.
Some some made spacers with composite.
Some stacked crap on the bolt.
UHMW Washers
Some went Poly. https://www.mcmaster.com/94045K371/


Nice. Use any chemicals?Cleaned the engine bay. Not a full detail just getting the mud and crud out. Installed new KC FE 3 lights on front bumper.


Just simple green concentrate diluted 10:1 w/water.Nice. Use any chemicals?
I figured it out last night. Checked some bed bolts and all where torqued. It was difficult to assess where the noise was coming from by my self. Turns out the squeak is from where my leafs bolt to the axle. My middle leaf specifically, which it thought was strange. So I double checked ubolt torque and everything checked out. Hit is with some spray, gave it a couple more ft/lbs on the torque wrench. Nice and quiet on the way to work today.I remember there were some where the front of the bed was moving. Some wear and the composite mount wears away. The metal bushing inside remains the same length. So now the bolt isn't securing anything. Just retaining things together. Maybe this is rubbing? Hopefully it's just this. I would go between frame and bed. Not on the bolt.
Something random I came across while trying to level my bed... Never got it done and being lazy.

Some some made spacers with composite.

Some stacked crap on the bolt.

UHMW Washers

Some went Poly. https://www.mcmaster.com/94045K371/

Hope it stays that way.I figured it out last night. Checked some bed bolts and all where torqued. It was difficult to assess where the noise was coming from by my self. Turns out the squeak is from where my leafs bolt to the axle. My middle leaf specifically, which it thought was strange. So I double checked ubolt torque and everything checked out. Hit is with some spray, gave it a couple more ft/lbs on the torque wrench. Nice and quiet on the way to work today.
How did you apply it?Just simple green concentrate diluted 10:1 w/water.
Just filled a spray bottle, apply liberally, let it soak for about 10 minutes or so and then rinse and repeat as necessary (Remove engine skid prior to this so as not to accumulate crud on skid).How did you apply it?
Dried with leaf blower and let sit for 20 minutes before reinstalling my battery. Total process takes less than an hour with dry time.
Thx.Just filled a spray bottle, apply liberally, let it soak for about 10 minutes or so and then rinse and repeat as necessary (Remove engine skid prior to this so as not to accumulate crud on skid).
Dried with leaf blower and let sit for 20 minutes before reinstalling my battery. Total process takes less than an hour with dry time.
drizzoh
6️⃣ Aficionado
That looks hella fun!Spent some time playing in the mud at Citrus WMA FL


drizzoh
6️⃣ Aficionado
Got the KDMax Pro 10 tune early and am now able to report that it is just better all around than 9 was. Tip-ins and shifts are much smoother, and somehow my mpg actually seems to be going up. Awesome upgrade, definitely worth flashing over 9. +33ft/lbs isn't bad either.
Took advantage of the Memorial day sale and picked up these sweet Charvonia Designs billet tie downs. These things are stout. I ordered them in the textured black powdercoat. They are a nice upgrade from the wimpy factory pieces. The only downside is they came with polished hardware which stood out way too much against the black, so I painted all the hardware black with frame paint before installing.
![[IMG]](/proxy.php?image=https%3A%2F%2Fi.imgur.com%2Fy2ObaNqh.jpg&hash=d26d87b3318b37fdb2413d1ce1261662 "[IMG]")
I think they're the last mod I'm doing to the bed and they finish it off pretty nicely. I flipped them to hide the branding as it was a little too busy for my taste. They aren't very noticeable from the rear, but they look significantly beefier when you see them from the side view (alsoooo mmmmmm that storage compartment tho).
![[IMG]](/proxy.php?image=https%3A%2F%2Fi.imgur.com%2FsPPeXx0h.jpg&hash=9b175fff50647f091bad2a6183a377ec "[IMG]")
While the paint was drying, I thought it would be the perfect time to yank out the most obnoxious speaker in the world. No more beep when opening the door now! This was the last super annoying thing about this truck. The silence is beautiful.
![[IMG]](/proxy.php?image=https%3A%2F%2Fi.imgur.com%2FQP5jzFNh.jpg&hash=e5ecc42f30e7f4d108d458e14b9104d2 "[IMG]")
Beep speaker removal vid: How to Remove Warning Beeper From a Tacoma - YouTube
Took advantage of the Memorial day sale and picked up these sweet Charvonia Designs billet tie downs. These things are stout. I ordered them in the textured black powdercoat. They are a nice upgrade from the wimpy factory pieces. The only downside is they came with polished hardware which stood out way too much against the black, so I painted all the hardware black with frame paint before installing.
I think they're the last mod I'm doing to the bed and they finish it off pretty nicely. I flipped them to hide the branding as it was a little too busy for my taste. They aren't very noticeable from the rear, but they look significantly beefier when you see them from the side view (alsoooo mmmmmm that storage compartment tho).
While the paint was drying, I thought it would be the perfect time to yank out the most obnoxious speaker in the world. No more beep when opening the door now! This was the last super annoying thing about this truck. The silence is beautiful.
Beep speaker removal vid: How to Remove Warning Beeper From a Tacoma - YouTube
Last edited:
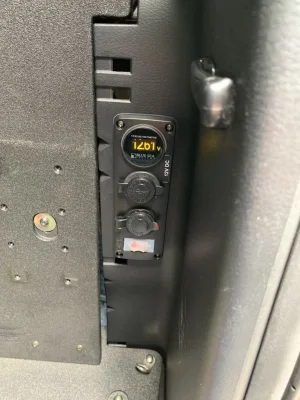
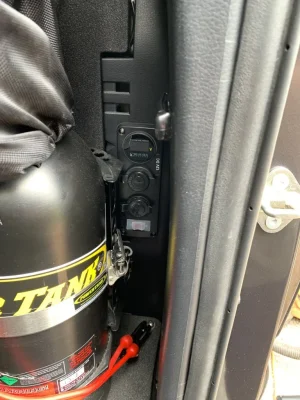
After buying a dometic fridge, I wanted to hookup a constant 12v supply source in the backseat area. Insert the blue sea accessory panel. Already comes pre-wired, just need to run power and ground. Powertrays actually offers a harness for this panel and it’s very well made so I opted to go with that. Ran the harness from my blue sea circuit breaker panel under the hood, into the firewall and down under all the plastic panels to the back wall. Was a bit of a pain to get the panel to mount back up. There’s a metal re-enforcement bar on the back wall that needed to be notched out a bit to let the panel sit back all the way. That and I was too lazy to pull out the goose gear seat delete lol. Took some finagling but I got it to fit and I think it came out perfect.
Attachments
drizzoh
6️⃣ Aficionado
Had a free day this weekend so was able to knock out some small front end mods I've been meaning to do.
The first was to finally throw on the WarFab tie rod sleeves that I got with the group buy like a year ago over on TW. I widened the inner ends of these with my step bit and they threaded on beautifully over the inner tie rod hump. These are heavy, stout pieces, and although they don't completely prevent the tie rods from having issues, they for sure beef it up from stock and should give a bit of protection as well. I think the newer design of these have been shortened a bit to prevent them needing to be modified.
![[IMG]](/proxy.php?image=https%3A%2F%2Fi.imgur.com%2FwNnBEkrh.jpg&hash=244cd630cee6eff6b6887cc5468c1844 "[IMG]")
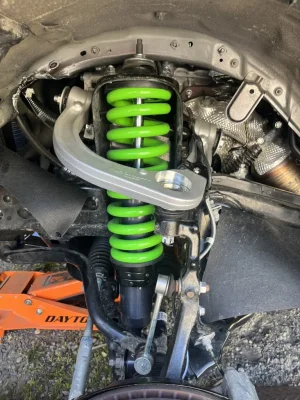
Then I replaced the lower shock bolts with the OEM ones from the 4Runners that have a solid shaft instead of a tapered one. P/N: 90105-14104. Hoping they help extend the life of my misalignment bushings.
![[IMG]](/proxy.php?image=https%3A%2F%2Fi.imgur.com%2FQc6L7Umh.jpg&hash=3f27ddbdcd1b196cd3770478dbf0b1df "[IMG]")
And lastly, I finally pushed my front splash shields forward a bit to cut down on the rubbing when turning while flexing. Gained about 1/2" - 3/4" of clearance from this and it looks like it fixed the rubbing on the front side of the wheel well. I still have a bit of rubbing on the back of the fender area under the same conditions, so I get to figure that out next. Thinking the pinch welds might need some persuasion. Pretty successful weekend though.
![[IMG]](/proxy.php?image=https%3A%2F%2Fi.imgur.com%2Fn0ZjGoJh.jpg&hash=49ab923821dfb80913692799684293d2 "[IMG]")
The first was to finally throw on the WarFab tie rod sleeves that I got with the group buy like a year ago over on TW. I widened the inner ends of these with my step bit and they threaded on beautifully over the inner tie rod hump. These are heavy, stout pieces, and although they don't completely prevent the tie rods from having issues, they for sure beef it up from stock and should give a bit of protection as well. I think the newer design of these have been shortened a bit to prevent them needing to be modified.
Then I replaced the lower shock bolts with the OEM ones from the 4Runners that have a solid shaft instead of a tapered one. P/N: 90105-14104. Hoping they help extend the life of my misalignment bushings.
And lastly, I finally pushed my front splash shields forward a bit to cut down on the rubbing when turning while flexing. Gained about 1/2" - 3/4" of clearance from this and it looks like it fixed the rubbing on the front side of the wheel well. I still have a bit of rubbing on the back of the fender area under the same conditions, so I get to figure that out next. Thinking the pinch welds might need some persuasion. Pretty successful weekend though.
dannyvermin
3️⃣ Silver
First oil change and tire rotation at 6100 miles. was shooting for 5k but our trip to Texas put me over.
Also installed Victory roof rack and light bars a few days ago. will post up some pics when i get a chance to take some.
Also installed Victory roof rack and light bars a few days ago. will post up some pics when i get a chance to take some.
drizzoh
6️⃣ Aficionado
Realllly smolllll update (literally) but I'm geeking out about it too much to wait to post it with other things.
Last night I swapped out the white cubby light for one that comes on the RAV4 that matches the rest of the blue interior lighting. It's way cooler than it should be and it is a direct swap. Took about 5 min to install, but if you have sausage fingers you will not have a good time. Worth it though.
P/N: 81080-42040
Took out the cb and put in a gmrs. Woo woo


Just an FYI that I make hidden small ($23) and full size ($33) replacement front license plate brackets that replace the 3G ugly plastic one which, over time, will cut grooves in the painted bumper cover. I also make hidden full size brackets ($35) that mount in the fairlead opening for those with aftermarket bumpers that do not run a winch. Each one uses stainless mounting and license plate hardware with rubber isolators to keep aluminum bracket from contacting the painted bumper. Small one also works on 2nd gen. Large ones are tongue and groove fitted machined assemblies.


