• Welcome to Tacoma3G.com, a free resource for 2016-2023 Toyota Tacoma owners!

    This website is the passion-project of a USMC veteran/mechanic, @Tyler. I created Tacoma3G.com to share my knowledge of this subject with others and to provide like-minded folks with a comfortable space to ask questions and create 'build threads' within our Tacoma Forums. Now, if the format of this website is confusing to navigate for you, or if you're interested in my full mission and T3G's history, check out the Help and About pages.

Solved Seat Heater (heated seats) installation using factory fuse and relay

Asmara

3️⃣ Silver
Tacoma3G Supporter
Joined
Jun 25, 2021
Messages
48
Reaction score
51
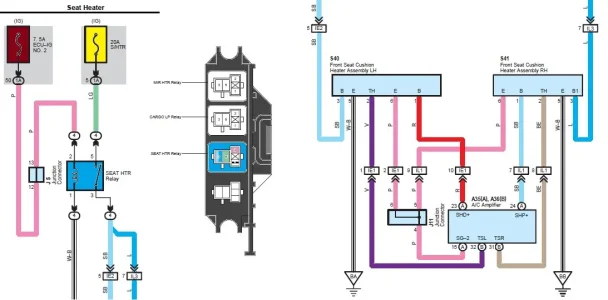
There are several threads on installing seat heaters aka heated seats but the ones I have seen, have you tap into the fuse box. I like to keep my installs looking stock so I decided to pull the wiring diagram and trace the seat heater wiring to see what I could find.

It turned out that in my Tacoma ('21 SR5) it is pre-wired for seat heaters. A little more sleuthing and I found that the factory installed a seat heater fuse but no relay. With the relay installed, the factory wiring worked as expected i.e. the circuit was hot when the truck was running and turned off when the truck was off.

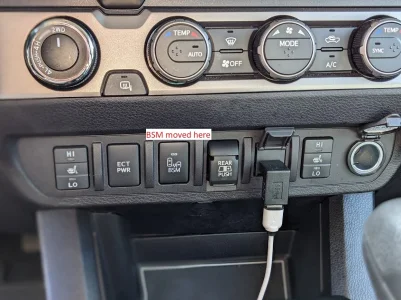
I took some pictures along the way that are attached. The switches look factory except for the fact that the blue light is always on (not controlled by the headlights) and the low/high indicators are orange instead of the green used everywhere else. I've already ordered some green LEDs and plan to change them out to make the switches look even more factory.

What you need to know:
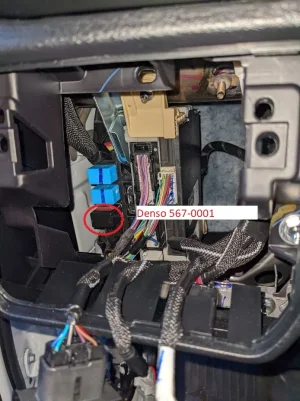
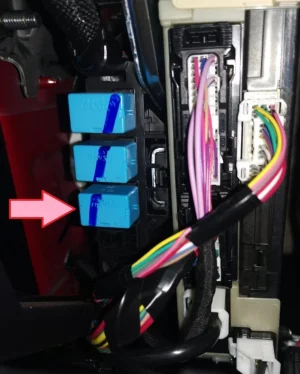
The empty relay location is behind the switches to the left of the steering wheel. You can just reach up behind there and pop out the switch plate to see where the relays go. I bought a genuine 4 pin Denso relay (567-0001) from Amazon but there are tons of cheaper off brands as well. I couldn't find the part number for the factory relay but the 567-0001 supports 20amps which is what the fuse is so I don't anticipate any problems. When I bench tested the seat heaters it pulled about 4 amps a seat on high. Install this relay and the seat heater circuit will be live.

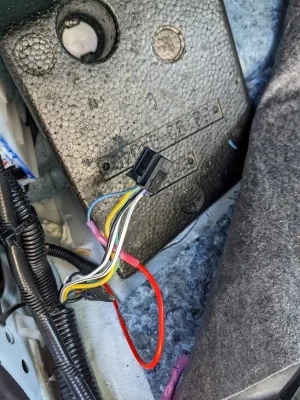
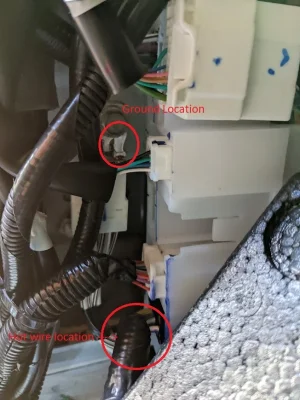
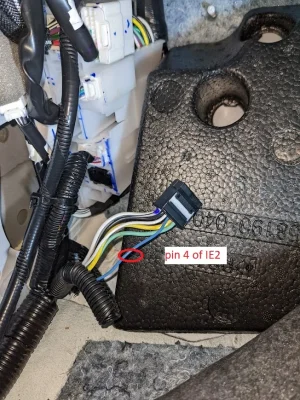
Next I located IE2 which is the junction for the seat heater going to the driver's seat. It is behind the driver's side kick panel. Per the factory diagram, the seat heater is on pin 5 of IE2. During testing, I determined it is actually on pin 4 of IE2. I cut the wire coming out of pin 4 and spliced in my seater heater wiring. I only needed one connection for both seats because I combined the two wiring harnesses behind the switches.

I knew I would need a ground point and, fortunately, there is one right next to IE2.

I wired everything together and the seat heaters work great.

I'd note that you could use this circuit to power any high current device you want (lighting for example) and just re-label the fuse panel. Also, when enabled you have +12v going to both seats so there might be something else you could do with that that might be useful.

I hope this helps some people. I know it will save some time on wiring up a seat heater install.

edit: added term heated seats to help with searching.
 

Attachments

  • hot installed.jpg
    hot installed.jpg
    207.6 KB · Views: 1,704
  • original locations.jpg
    original locations.jpg
    164.9 KB · Views: 1,731
  • Relay installed.jpg
    Relay installed.jpg
    208.6 KB · Views: 2,051
  • switches.jpg
    switches.jpg
    347.9 KB · Views: 2,007
  • Wire to cut.jpg
    Wire to cut.jpg
    299.2 KB · Views: 1,916
Last edited:
I have a 21 trd sport and would love this. what kind of heated seat are you using or did you retro fit your seats?
 
Upvote 0
I just bought a kit off of Amazon. Specifically this Water Carbon brand kit. Customer service was really good but they are in China and shipping is slow.

I pulled the cloth covers off my seats and installed the heated seat pads. To be more specific, I removed the bottom seat cover and reattached it (get hog rings and hog ring pliers), and just pulled the back cover forward enough to slide the heating pad up the back of the seat.

I used wire loom to get the wiring from the seat to the dash and just followed the existing wire routing path. I did change the included wiring harness because I wanted everything accessible. The harness relay went under the seat. I removed the included fuse since I was using the factory fuse and I wired the hot and negative leads from the switches together and just hooked up one wire to where I connected to the factory harness.
 
Upvote 0
I'd assume that this wiring would also terminate at a connector under the seats?
 
Upvote 0
I'd assume that this wiring would also terminate at a connector under the seats?
From the factory, it is a long continuous wire from the switches to the seats. There is a connector at the switches and two connectors (top, bottom) at the seats. I actually redid the wiring to add one more connector under the seats because I thought it would help with running the wires. In the end, it probably isn't necessary.
 
Upvote 0
From the factory, it is a long continuous wire from the switches to the seats. There is a connector at the switches and two connectors (top, bottom) at the seats. I actually redid the wiring to add one more connector under the seats because I thought it would help with running the wires. In the end, it probably isn't necessary.
Where did you find the wiring diagram for this? I am going to be doing it on monday can you possibly share any pics of the diagram? I am trying to find out with each wire for that connector is for.
 
Upvote 0
As far as finding the diagrams, I paid for access to TIS and looked around the web. Now I don't remember what I got where but I'm attaching everything I saved for the project.
 

Attachments

  • Seat Heater (drawing).pdf
    84.9 KB · Views: 582
  • Seat heater Parts Location.pdf
    267.7 KB · Views: 393
  • Seat Heater.pdf
    125.2 KB · Views: 378
  • Seat Heater upload_2021-10-24_21-32-13.jpg
    Seat Heater upload_2021-10-24_21-32-13.jpg
    72.1 KB · Views: 951
  • Seat Heater System diagram.pdf
    164.5 KB · Views: 368
  • Seat Heater Relay (both seats) upload_2021-10-25_19-57-10.jpg
    Seat Heater Relay (both seats) upload_2021-10-25_19-57-10.jpg
    112.1 KB · Views: 904
Upvote 0
I got the heated seats from Clazzio, so there's two extra wires. I have those going to switches in the left panel, one is for backlighting and I forget the other one. I assume I still need to run these after I use the hot wire and install the relay like you, right?
 
Upvote 0
It depends on what they are for. I looked at the Clazzio page and they claim there are only two wires, hot and ground. Did they give you a wiring diagram? Otherwise, take a photo and I may be able to figure out what is going on.
 
Upvote 0
OP, thank you so much for this. I'm trying to install the same kit into my '21 Tacoma SX (SR). The black plug I have at IE2 only has black and white wires in pins 2 and 3 respectively. This looks to be the same as your photo above.

I'm trying to figure out what these black and white wires are for, and if there is still a way I can use this circuit for my heaters. Do you have any advice?
 

Attachments

  • PXL_20220529_173125935.jpg
    PXL_20220529_173125935.jpg
    130.6 KB · Views: 795
Upvote 0
OP, thank you so much for this. I'm trying to install the same kit into my '21 Tacoma SX (SR). The black plug I have at IE2 only has black and white wires in pins 2 and 3 respectively. This looks to be the same as your photo above.

I'm trying to figure out what these black and white wires are for, and if there is still a way I can use this circuit for my heaters. Do you have any advice?
First figure out if the seat heater relay is wired up. It may not be. Or it may be partially wired up. Does your fuse box have a seat heater fuse?

I'd start there because if the relay isn't wired, then you are looking at a completely different install.
 
Upvote 0
First figure out if the seat heater relay is wired up. It may not be. Or it may be partially wired up. Does your fuse box have a seat heater fuse?

I'd start there because if the relay isn't wired, then you are looking at a completely different install.
I believe so. I have a 20 amp fuse in the cabin fuse box labeled "S/HTR" and the same empty space for the relay that you showed. Otherwise, how can I tell if the circuit is there? The area is a tight weave of wires, as you know.
 
Upvote 0
Look at where you plug in the relay. You should see the female portion (metal) of the connector in each of the four slots.

If so, double check that the wiring is as expected at the connector. You should have one position that is always hot (from the fuse) and a second that is also hot but only when the truck is running.

If you have that then I suspect that the seat heater wiring ends on the other side of IE2 (I've seen this in a 4Runner I installed heated seats in).

You can check this by installing the relay and check for voltage on IE2 pin 4 when the truck is running. Check pin 5 too just in case the error in the manual is due to SR and SR5 wiring differences (or variences due to year)

If that is the case (you have power at IE2), the easiest thing to do is cut the wire from the backside of the connector and wire directly into it.
 
Upvote 0
2021 SR reporting in. Huge success! Seriously thank you so much for the guidance.

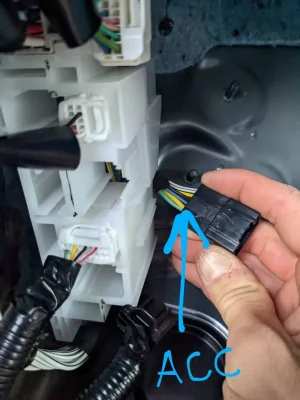
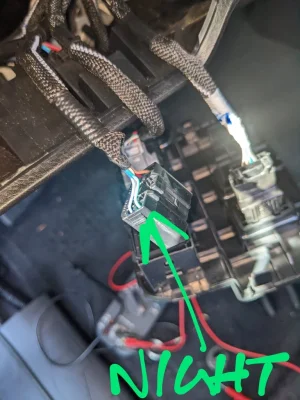
I grabbed the "night light" from an unused plug behind the dash, so the blue indicator lights come on with marker/headlights.

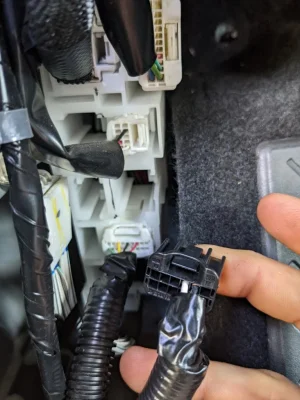
I used the same main power line as OP above (with the same added relay) but I had to use it from the *back* of the IE2 junction. The blue wire did not exist coming from the front of the IE2 junction. I unscrewed the foam dead pedal and popped out the white junction box to get back there. I considered buying the little pin and only adding a wire to the front of IE2, which would have been really slick.

I tied the "always on" and "accessory power" lines in the heater harness together. This way I cut into two dash wires total for both seats. I used the same ground as shown above. YA HOO!
 

Attachments

  • PXL_20220605_015511704~2.jpg
    PXL_20220605_015511704~2.jpg
    116.5 KB · Views: 730
  • PXL_20220602_133117779~2.jpg
    PXL_20220602_133117779~2.jpg
    132.8 KB · Views: 845
Last edited:
Upvote 0
Hello OP!
I am trying to do something very similar. Except I have stock heated seats in my Tacoma (so all the wiring/relay is there) but I have swapped in Scheel Mann seats, which also have heating.


My main confusion right now, is while there are two wires going to the top part of stock Tacoma seat (presumably power and ground), there are 3 wires going to the bottom cushion. The Scheel Mann seats have a 2-wire plug going to both the top and bottom cushion.

I am trying to keep everything from the stock heated seat circuit (dash switches w/ 3 positions, factory relay, and factory heating amp, factory seat plug so that it won't throw any codes). Except the last mile of wire that goes into the cushion will be now in the Scheel Mann, instead of the stock seat.
 
Upvote 0
I would try and use a meter to see if you can find the two wires for the heater itself. I looked at some of the schematics and *I think* one of the wires might be for a temperature sensor. My interpretation is the sky blue (SB) wire and the White with black stripes wire (W-B) are the two that run the heating element. The beige wire is for the temp sensor. Using a meter, you should see voltage between the SB and W-B wires when the seat heater is energized.
 
Last edited:
Upvote 0
Will do - thanks!
I noticed the 3 wires to the lower seat cushion, all meet in a single removable white "heating pad" that is stapled to the corners of the seat cover. This pad sits between the cushion and the seat cover. I think I can just remove it and have my upholstery guy place it carefully into the Scheel Mann seat bottom between the cushion and the cover. Then I would just need to solve for the upper seat back with 2 wires. Maybe the two wires from the stock upper seat would be plug and play with the two wires in the upper Scheel Mann seat back. Definitely gonna need some multi-meter time to validate and establish a final "plan". Thanks for the help so far!
 
Upvote 0
...
Next I located IE2 which is the junction for the seat heater going to the driver's seat. It is behind the driver's side kick panel. Per the factory diagram, the seat heater is on pin 5 of IE2. During testing, I determined it is actually on pin 4 of IE2. I cut the wire coming out of pin 4 and spliced in my seater heater wiring. I only needed one connection for both seats because I combined the two wiring harnesses behind the switches.
...

Could you elaborate on how you combined the wiring harnesses behind the switches and how you spliced in the connections from IE2 to the heating elements? I have the heated seat kit from Clazzio which, I'm guessing, is the same as yours based on the switches. I've spent the last three hours going through the diagrams and looking at the harnesses and I can't logic out how the IE2 circuit is able to control the heating elements independently.
 
Upvote 0
Could you elaborate on how you combined the wiring harnesses behind the switches and how you spliced in the connections from IE2 to the heating elements? I have the heated seat kit from Clazzio which, I'm guessing, is the same as yours based on the switches. I've spent the last three hours going through the diagrams and looking at the harnesses and I can't logic out how the IE2 circuit is able to control the heating elements independently.
Mine was not Clazzio but rather an Amazon vendor. The way the circuit works is the switch controls a relay that doesn't work like you think a relay normally works. If you switch it to low, the relay passes +12v to both elements but wired in series. If you switch it to high, the relay passes +12v to both elements but wired in parallel. The switch gets the +12v from IE2. So the wiring is IE2, switch, relay then heating elements (series or parallel).
 
Upvote 0
Interesting. So they’re using the resistance of the elements to effectively lower the amount of current through the circuit. In turn, the elements run at a lower wattage. If they run them in parallel, the resistance of the elements isn’t factored in because the elements are being driven independent of one another. That’s smart—credit where credit is due.

The Clazzio kit looks similar to yours; I’d bet they’re the same manufacturer. I modified my harness today and I think I understand what you mean about connecting the switches together. For me, there’s an illumination wire and a switch power wire. As opposed to having two connections that run to vehicle circuits, you can have one if you tie these two connections together at the switch. This is ultimately what I ended up doing.

After much consideration, I think I’ll pull the switch power from the in-cab fuse block—likely Power Outlet 1 or 2. The illumination wire I can find behind the radio I believe. The main power for the elements will come from an in-cab electrical distribution panel I have installed.

Thanks for the reply. That tidbit about how the elements work is very enlightening.
 
Upvote 0
There are several threads on installing seat heaters aka heated seats but the ones I have seen, have you tap into the fuse box. I like to keep my installs looking stock so I decided to pull the wiring diagram and trace the seat heater wiring to see what I could find.

It turned out that in my Tacoma ('21 SR5) it is pre-wired for seat heaters. A little more sleuthing and I found that the factory installed a seat heater fuse but no relay. With the relay installed, the factory wiring worked as expected i.e. the circuit was hot when the truck was running and turned off when the truck was off.

I took some pictures along the way that are attached. The switches look factory except for the fact that the blue light is always on (not controlled by the headlights) and the low/high indicators are orange instead of the green used everywhere else. I've already ordered some green LEDs and plan to change them out to make the switches look even more factory.

What you need to know:
The empty relay location is behind the switches to the left of the steering wheel. You can just reach up behind there and pop out the switch plate to see where the relays go. I bought a genuine 4 pin Denso relay (567-0001) from Amazon but there are tons of cheaper off brands as well. I couldn't find the part number for the factory relay but the 567-0001 supports 20amps which is what the fuse is so I don't anticipate any problems. When I bench tested the seat heaters it pulled about 4 amps a seat on high. Install this relay and the seat heater circuit will be live.

Next I located IE2 which is the junction for the seat heater going to the driver's seat. It is behind the driver's side kick panel. Per the factory diagram, the seat heater is on pin 5 of IE2. During testing, I determined it is actually on pin 4 of IE2. I cut the wire coming out of pin 4 and spliced in my seater heater wiring. I only needed one connection for both seats because I combined the two wiring harnesses behind the switches.

I knew I would need a ground point and, fortunately, there is one right next to IE2.

I wired everything together and the seat heaters work great.

I'd note that you could use this circuit to power any high current device you want (lighting for example) and just re-label the fuse panel. Also, when enabled you have +12v going to both seats so there might be something else you could do with that that might be useful.

I hope this helps some people. I know it will save some time on wiring up a seat heater install.

edit: added term heated seats to help with searching.
Did you replace the led's to green? If so where did you buy them and were they hard to change?
 
Upvote 0
Did you replace the led's to green? If so where did you buy them and were they hard to change?
No. I didn't. When I was looking at the lighting, I realized that the defroster and mirror heaters were both orange so I figured it was more factory to leave them. I haven't cracked open the switches in a while but when I was playing with the blue LEDs, I bought them from www.KingbrightUSA.com. You want 4.0x4.0mm right angle LEDs. They run about 50 cents each. They are surface mounted but pretty easy to take on and off with minimal skill.
 
Upvote 0
There are several threads on installing seat heaters aka heated seats but the ones I have seen, have you tap into the fuse box. I like to keep my installs looking stock so I decided to pull the wiring diagram and trace the seat heater wiring to see what I could find.

It turned out that in my Tacoma ('21 SR5) it is pre-wired for seat heaters. A little more sleuthing and I found that the factory installed a seat heater fuse but no relay. With the relay installed, the factory wiring worked as expected i.e. the circuit was hot when the truck was running and turned off when the truck was off.

I took some pictures along the way that are attached. The switches look factory except for the fact that the blue light is always on (not controlled by the headlights) and the low/high indicators are orange instead of the green used everywhere else. I've already ordered some green LEDs and plan to change them out to make the switches look even more factory.

What you need to know:
The empty relay location is behind the switches to the left of the steering wheel. You can just reach up behind there and pop out the switch plate to see where the relays go. I bought a genuine 4 pin Denso relay (567-0001) from Amazon but there are tons of cheaper off brands as well. I couldn't find the part number for the factory relay but the 567-0001 supports 20amps which is what the fuse is so I don't anticipate any problems. When I bench tested the seat heaters it pulled about 4 amps a seat on high. Install this relay and the seat heater circuit will be live.

Next I located IE2 which is the junction for the seat heater going to the driver's seat. It is behind the driver's side kick panel. Per the factory diagram, the seat heater is on pin 5 of IE2. During testing, I determined it is actually on pin 4 of IE2. I cut the wire coming out of pin 4 and spliced in my seater heater wiring. I only needed one connection for both seats because I combined the two wiring harnesses behind the switches.

I knew I would need a ground point and, fortunately, there is one right next to IE2.

I wired everything together and the seat heaters work great.

I'd note that you could use this circuit to power any high current device you want (lighting for example) and just re-label the fuse panel. Also, when enabled you have +12v going to both seats so there might be something else you could do with that that might be useful.

I hope this helps some people. I know it will save some time on wiring up a seat heater install.

edit: added term heated seats to help with searching.

Thankyou for this! I'm all for a clean OEM looking install and this is by far the best install I've seen for heated seats! (I'm not a massive fan of an add-a-fuse)

I've got everything ordered and am about ready to install I was just wondering if you could clarify a couple of points. I'm mechanically minded but the dark arts that are electrical always send my head into a spin (it took me sometime to realize you were leaving the aftermarket relays in place and just using the factory relay and fuse as a power source!!)

I've ordered a switch T-Harness for below the head unit to get the illumination power to the seat switches.

Did your heater wiring have 4 wires in it? I have the heavy fused power, ground, illumination and a 4th wire labelled 'on wire' I guess this is for an ignition wire?

With regards to splicing the 2 power wires together did you remove the fuses, my thinking is they're redundant now it's all being powered through the factory fuse? But something is telling me the extra fuse is a good safety measure?

Thanks
Ash
 
Last edited:
Upvote 0
I removed the fused because I was using the factory fuse. You don't want redundant fusing because it makes troubleshooting really hard. You especially don't want fuses buried in your dash. Just use the factory fuse.

I didn't have wiring similar to yours. It sounds like your 'on' should be on an ACC circuit (live when the truck is running) that goes to your switch, then from the switch to the relay. That low amp 12v will be used to trigger the relay that will pass the 'heavy fused power' to the seat heaters. This is different than how my system was designed by the factory.

Thanks! Yeah I've just been looking at the wiring, you're right the 'on' goes straight into the switch, this makes sense now, I'll just tap into a wire in the T-Harness so It remains as plug and play as possible!

Thanks for the quick response!
 
Upvote 0
There are several threads on installing seat heaters aka heated seats but the ones I have seen, have you tap into the fuse box. I like to keep my installs looking stock so I decided to pull the wiring diagram and trace the seat heater wiring to see what I could find.

It turned out that in my Tacoma ('21 SR5) it is pre-wired for seat heaters. A little more sleuthing and I found that the factory installed a seat heater fuse but no relay. With the relay installed, the factory wiring worked as expected i.e. the circuit was hot when the truck was running and turned off when the truck was off.

I took some pictures along the way that are attached. The switches look factory except for the fact that the blue light is always on (not controlled by the headlights) and the low/high indicators are orange instead of the green used everywhere else. I've already ordered some green LEDs and plan to change them out to make the switches look even more factory.

What you need to know:
The empty relay location is behind the switches to the left of the steering wheel. You can just reach up behind there and pop out the switch plate to see where the relays go. I bought a genuine 4 pin Denso relay (567-0001) from Amazon but there are tons of cheaper off brands as well. I couldn't find the part number for the factory relay but the 567-0001 supports 20amps which is what the fuse is so I don't anticipate any problems. When I bench tested the seat heaters it pulled about 4 amps a seat on high. Install this relay and the seat heater circuit will be live.

Next I located IE2 which is the junction for the seat heater going to the driver's seat. It is behind the driver's side kick panel. Per the factory diagram, the seat heater is on pin 5 of IE2. During testing, I determined it is actually on pin 4 of IE2. I cut the wire coming out of pin 4 and spliced in my seater heater wiring. I only needed one connection for both seats because I combined the two wiring harnesses behind the switches.

I knew I would need a ground point and, fortunately, there is one right next to IE2.

I wired everything together and the seat heaters work great.

I'd note that you could use this circuit to power any high current device you want (lighting for example) and just re-label the fuse panel. Also, when enabled you have +12v going to both seats so there might be something else you could do with that that might be useful.

I hope this helps some people. I know it will save some time on wiring up a seat heater install.

edit: added term heated seats to help with searching.
Great post and thank you, I am right in the middle of my install and have one quick question. I am using the Denso relay you mention, but also my clazzio seat heaters came with relays in the harness, should I remove them from the circuit or keep them there? any help appreciated
 
Upvote 0
It depends on what the relays are doing. If you read through the thread, you will see that my harness uses the relays to control the wiring path to switch between low and high. Relays are more frequently used to switch high current loads that might burn up a switch.

If you have a wiring diagram, I could take a look at it. Even a picture of the wiring laid out might give me enough info.
 
Upvote 0
I will work this tonight and thank you for the reply! My issue is that I blew a fuse bing sloppy. I can confirm this works fine with the clazzios leaving all stock wiring/relays.

newtoyotadual.jpg
 
Last edited:
Upvote 0
Back
Top