• Welcome to Tacoma3G.com, a free resource for 2016-2023 Toyota Tacoma owners!

    This website is the passion-project of a USMC veteran/mechanic, @Tyler. I created Tacoma3G.com to share my knowledge of this subject with others and to provide like-minded folks with a comfortable space to ask questions and create 'build threads' within our Tacoma Forums. Now, if the format of this website is confusing to navigate for you, or if you're interested in my full mission and T3G's history, check out the Help and About pages.

Maintenance You cannot replace your rack and pinion bushings with the steering rack in the truck

Tyler

🔟 Mythical
Badministrator
Volunteer T3G Editor
Joined
Apr 12, 2018
Messages
8,591
Reaction score
17,710
Age
32
Location
Long Island, NY
Website
tacoma3g.com
2017 TRD OR DCLB Auto
Quicksand
Apparently.

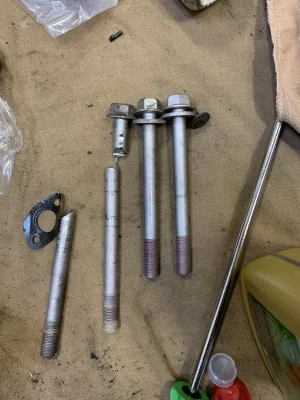
I thought you could because I’ve seen the videos of people doing this on older Tacomas and 4Runners. But on a 3rd gen, apparently you need to pull the whole steering rack first because you can’t remove either bolt:

15910922-44A7-4E2A-BC73-A8BFB05135DB.jpeg
02EC38C8-19FC-45E6-ABCB-C1DFD9C99732.jpeg


I’m also pretty sure Toyota claims you need to lift the engine to be able to get the rack out, although I know that’s not true. So I guess I’m pulling my steering rack tomorrow. :(

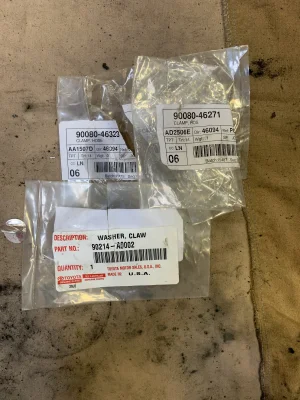
My truck does what I can only describe as “this annoying thing” where you can essentially feel and hear the rack move during stopping and accelerating. So I bought polyurethane bushings to replace the OEM ones with.

So far I’m 0 for 1. I’ll probably go 0 for 2 when I finally get the rack out and back in with the new bushings and the truck still does “the thing” because this wasn’t even the problem, lol.🙃
 
That's good to know. Seems like a silly design as well that could have been avoided. Good luck today on pulling brge rack.

Do you have a link to the bushings you ordered?
 
Upvote 0
Upvote 0
Another thing:

You can’t remove the rack without taking these bolts out and you can’t take them out without lifting the engine.

To avoid lifting the engine, I’m going to cut the heads off the bolts and let them drop through the holes to the ground. Then remove the rack without lifting the engine. Then replace the bushings. Then install it with new bolts from Toyota, but from the bottom up, instead of from the top down, to again circumvent the engine issue.
 
Upvote 0
How did the rest of this job go for you? I've had the bushings for over a year just waiting to be installed when I have a weekend I have nothing else going on.
 
Upvote 0
Upvote 0
Dang...I was hoping to do this same swap this winter. Let us know how it goes!
I’m going to film mine. Just not sure when I’ll get to it.

Maintenance on things that are broken = low priority

Upgrades that I don’t need = high priority

Am I doing it right?

Old Spice Yes GIF
 
Upvote 0
Another thing:

You can’t remove the rack without taking these bolts out and you can’t take them out without lifting the engine.

To avoid lifting the engine, I’m going to cut the heads off the bolts and let them drop through the holes to the ground. Then remove the rack without lifting the engine. Then replace the bushings. Then install it with new bolts from Toyota, but from the bottom up, instead of from the top down, to again circumvent the engine issue.
1604938982936.png
 
Upvote 0
I haven't. But I'm always willing to sacrifice bolts for convenience. Rear leaf spring bolts on many 4x4s are the same. Hit the gas tank before the springs come out? Cut em.
For sure. I was just wondering if you noticed a longer lifespan on the new bushings. Obviously they're going to be better. Just curious how long it will be until I need to do this again. Driving easy on the truck isn't an option. Bash it until something breaks, lol.
 
Upvote 0
Are you seeing a lot of play in them when you steer? That's a lot of work. I did this swap in my 4Runner and it was a PITA due to one long bolt that interfered with the front diff. I did replace with Urethane which is much stiffer. But that kinda makes me nervous too. Like when I hit a rock all that energy is going into the steering ends and rack internals...
There’s a fair amount of play, yeah. For bolts that don’t corporate, I’m pulling out the scissors.
 
Upvote 0
Ever get this done? I’m finally going to tackle this on Saturday. I had the front diff out twice when going 5.29 then back to Stock gears. Would have been a better time having that out of the way.
 
Upvote 0
Ever get this done? I’m finally going to tackle this on Saturday. I had the front diff out twice when going 5.29 then back to Stock gears. Would have been a better time having that out of the way.
I still didn't get it done but my truck has been sitting on jack stands for almost two weeks with most of the front suspension and steering linkage taken apart for various other reasons. But then I started putting all of my time into the camper because Paige had off from work all week. When she goes back to work next week, I'm going to go back to working on the frontend stuff including pulling out the steering rack.
 
Upvote 0
I held off for so long because I was going to get rid of the taco after getting a travel trailer. With the semiconductor shortage I’m not getting the Sierra I want for probably another year now so I figured I’ll throw them in and find out if that is the actual cause of the 3rd gen wander. I imagine it should make a small improvement to the towing as well.
From what I've read it makes a noticeable longterm difference. It's supposed to fix the problem and keep the problem fixed almost indefinitely. We'll see.
 
Upvote 0
From what I've read it makes a noticeable longterm difference. It's supposed to fix the problem and keep the problem fixed almost indefinitely. We'll see.
Im following too since I need to do this bad :p 
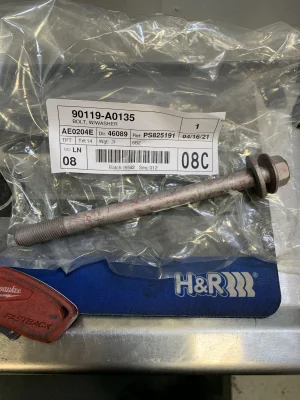
My bushings have been shot for a long time...Probably will just get the bolt like you said and slide a new one in from the bottom
 
Upvote 0
2 hours and it’s going back in. Worst part so far was cutting the bolts Carbide bits worked better then my hackzall. Probably wasted 30 mins in that alone.
D3789567-BE09-420D-A6DD-E2D5FF32A0CA.jpeg
Good stuff. I was hoping to fit a sawzall or grinder.

Any other tips?
 
Upvote 0
Air hammer for removing the old bushings. It really wasn’t bad at all. I could probably do the whole thing in 2 hours next time minus alignment. Don’t be a hack and use worm clamps or zip ties on the inner boot clamps. Plenty of room to use oetiker clamp pliers in there. The driver side clamp is larger then the passenger side. I measured tie rod thread lengths before I started and then amounts of rack shaft showing so I knew I would be close going back together before I aligned. When removing the rack from the truck, you have to swing the passenger side forward and out before the driver side
Lots of brake parts cleaner. Mark the steering shaft coupler and the rack itself with a paint pen.
Anti sieze your tie rods and ends so future alignments will go smooth.
Just about to head out for the test drive. Also did a oil change and rotate. Had to run to the Toyota dealer for the correct rack bolts. The ones I ordered from my VIN online we’re about 40mm too short.

tools needed are 15,17,19, and 22mm wrenches 10,12,14,17,19, and 22mm sockets. Proper hose clamp pliers, oetiker (pinch clamp) clamp pliers, inner tie rod tool. Will likely need a breaker bar if your ratchet selection is lacking for the rack nuts and front diff bolts. Hammer and long brass drift or striking pry bars for the lock washers for tie rods. Part numbers shown for parts needed.
 

Attachments

  • 6B20F79C-01E4-4A66-B2A7-9874C0E597F5.jpeg
    6B20F79C-01E4-4A66-B2A7-9874C0E597F5.jpeg
    797.5 KB · Views: 159
  • 13973200-2EC2-431E-BB22-1D53C827C5C8.jpeg
    13973200-2EC2-431E-BB22-1D53C827C5C8.jpeg
    511.3 KB · Views: 172
  • 11A62C9F-ACE2-415A-9E93-543B6C5F6D65.jpeg
    11A62C9F-ACE2-415A-9E93-543B6C5F6D65.jpeg
    364.2 KB · Views: 165
  • A4ED8BAD-FA55-4F35-8C10-F99E683E0B48.jpeg
    A4ED8BAD-FA55-4F35-8C10-F99E683E0B48.jpeg
    698.2 KB · Views: 149
Last edited:
Upvote 0
So after the 40mile drive home, I can say it is definitely worth it. Improvement is about 85%. Delrin would be better IMO but it’s a very noticeable improvement as is with the poly bushings.
 
Upvote 0
Air hammer for removing the old bushings. It really wasn’t bad at all. I could probably do the whole thing in 2 hours next time minus alignment. Don’t be a hack and use worm clamps or zip ties on the inner boot clamps. Plenty of room to use oetiker clamp pliers in there. The driver side clamp is larger then the passenger side. I measured tie rod thread lengths before I started and then amounts of rack shaft showing so I knew I would be close going back together before I aligned. When removing the rack from the truck, you have to swing the passenger side forward and out before the driver side
Lots of brake parts cleaner. Mark the steering shaft coupler and the rack itself with a paint pen.
Anti sieze your tie rods and ends so future alignments will go smooth.
Just about to head out for the test drive. Also did a oil change and rotate. Had to run to the Toyota dealer for the correct rack bolts. The ones I ordered from my VIN online we’re about 40mm too short.

tools needed are 15,17,19, and 22mm wrenches 10,12,14,17,19, and 22mm sockets. Proper hose clamp pliers, oetiker (pinch clamp) clamp pliers, inner tie rod tool. Will likely need a breaker bar if your ratchet selection is lacking for the rack nuts and front diff bolts. Hammer and long brass drift or striking pry bars for the lock washers for tie rods. Part numbers shown for parts needed.
This is way more in-depth that it had to be. Thank you for the cheat codes!
 
Upvote 0
Air hammer for removing the old bushings. It really wasn’t bad at all. I could probably do the whole thing in 2 hours next time minus alignment. Don’t be a hack and use worm clamps or zip ties on the inner boot clamps. Plenty of room to use oetiker clamp pliers in there. The driver side clamp is larger then the passenger side. I measured tie rod thread lengths before I started and then amounts of rack shaft showing so I knew I would be close going back together before I aligned. When removing the rack from the truck, you have to swing the passenger side forward and out before the driver side
Lots of brake parts cleaner. Mark the steering shaft coupler and the rack itself with a paint pen.
Anti sieze your tie rods and ends so future alignments will go smooth.
Just about to head out for the test drive. Also did a oil change and rotate. Had to run to the Toyota dealer for the correct rack bolts. The ones I ordered from my VIN online we’re about 40mm too short.

tools needed are 15,17,19, and 22mm wrenches 10,12,14,17,19, and 22mm sockets. Proper hose clamp pliers, oetiker (pinch clamp) clamp pliers, inner tie rod tool. Will likely need a breaker bar if your ratchet selection is lacking for the rack nuts and front diff bolts. Hammer and long brass drift or striking pry bars for the lock washers for tie rods. Part numbers shown for parts needed.
You think you could've replaced the bushings without fully removing the rack?
 
Upvote 0
Back
Top