Thanks! It has definitely come in handy already..
When I say I like that, I mean I'm stealing the idea for my truck. haha

Tacoma3G is a beginner-friendly 3rd Generation Toyota Tacoma forum (2016-2023 model-year specific). We are a small community of people who are focused on good information and good vibes. More about us....
Thanks! It has definitely come in handy already..
When I say I like that, I mean I'm stealing the idea for my truck. haha

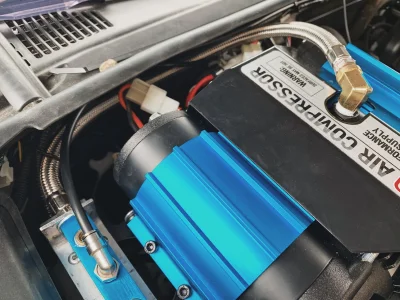

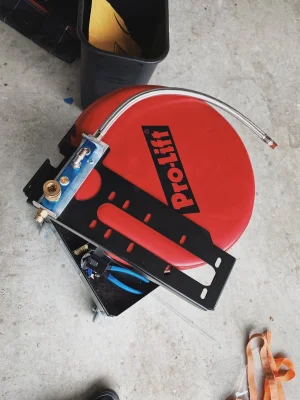
Not going to be doing a dual battery. If anything I’ll probably run a group 31Nice. That arb compressor is gonna make the dual battery set up that much harder though
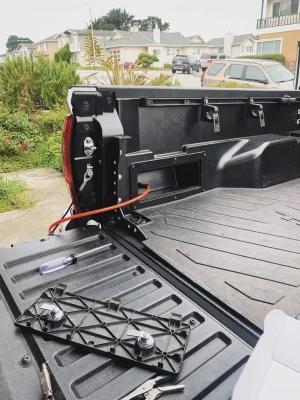
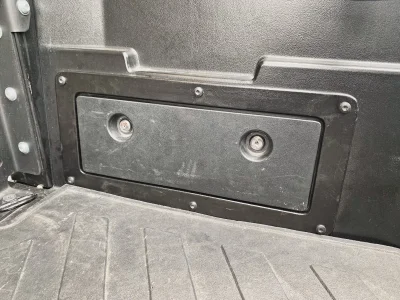
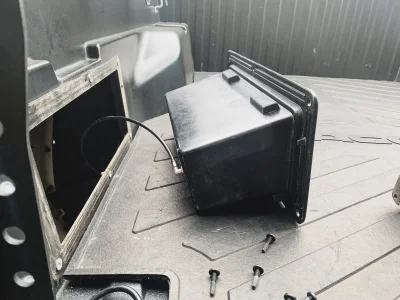
I want to install the Blue Seas 12v port in the exact location, did you just cut out a hole using a dremel/jigsaw? Any advice or anything you would have done differently @cocodataco ?Made a few electrical upgrades...
Installed a Blue Seas Below Deck, 12v Outlet and USB charger in the bed. Was super useful during our last trip. Was able to connect some cheap LED Christmas lights as well as charge some of our devices without having to leave the car in accessory mode.

I also completed my custom install of rock lights.. leaving room to add more for the front when I get a bumper and some for the rear. Also super helpful on the last trip to TepuiFest as camp scene lights..


Lastly did a small but purely aesthetic mod, to paint the center of the rear drum brakes to matte black. Was getting super annoyed of the rusted look through the TE37x's ??


I want to install the Blue Seas 12v port in the exact location, did you just cut out a hole using a dremel/jigsaw? Any advice or anything you would have done differently @cocodataco ?Made a few electrical upgrades...
Installed a Blue Seas Below Deck, 12v Outlet and USB charger in the bed. Was super useful during our last trip. Was able to connect some cheap LED Christmas lights as well as charge some of our devices without having to leave the car in accessory mode.
I also completed my custom install of rock lights.. leaving room to add more for the front when I get a bumper and some for the rear. Also super helpful on the last trip to TepuiFest as camp scene lights..
Lastly did a small but purely aesthetic mod, to paint the center of the rear drum brakes to matte black. Was getting super annoyed of the rusted look through the TE37x's ??
Any reason why my compressor will run when I hit the switch but won't release any air and shut off almost immediately?
You can Dremel it out. I actually used a box cutter and after a few passes it was out. Pretty thin material.I want to install the Blue Seas 12v port in the exact location, did you just cut out a hole using a dremel/jigsaw? Any advice or anything you would have done differently @cocodataco ?
Awesome! Looks good.Used the Dremel, works like a charm!

Haven't been online in a while..but have still made some minor changes to the rig every so often.
Most recently took advantage of the Black Friday deals with Prinsu and Pelican. Here she is at the Hella Trails 2nd Annual Toy Drive in Oakland. Also replaced the dual function light bar with a Baja Designs S8. Which I am thinking about getting amber lenses for, and potentially switching the fogs to the SAE versions.

Also took the time to readjust the front coils up 1/2" and put the overload back on in the rear.
")
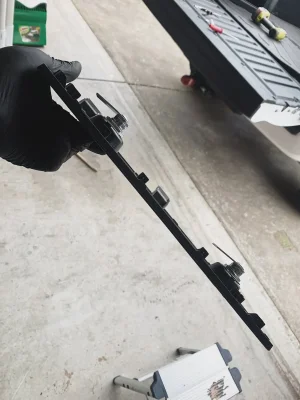
Now you gotta put them to the test.Finally got some sliders from C4 Fabrication. Took some time to get them painted and ready for the install. Love the way they came out. With the amount of different sliders out there it was tough to find one that I loved. The C4 fit the bill in many ways. They're angled with kick out, top tread plats are flat, bolt-on and super beefy.


Spent the past couple days completing a 40% rear seat delete. Still waiting for the paint to finish curing before snapping some final photos of it installed and painted.


Spent the past couple days completing a 40% rear seat delete. Still waiting for the paint to finish curing before snapping some final photos of it installed and painted.
On the daily I usually don't have any passengers and I typically store things in the back when I go to work which have been scratching my interior. This allows for a solid place for my items. If we're out camping I'd usually plan to have my camera gear placed here instead of on top of the seat.What's the plan for it? Mounting platform for a fridge or what?

I like where you're going with it so far. I'll be doing one too - anything you learned worth noting?Spent the past couple days completing a 40% rear seat delete. Still waiting for the paint to finish curing before snapping some final photos of it installed and painted.