Truck is looking awesome
-
Welcome to Tacoma3G.com, a free resource for 2016-2023 Toyota Tacoma owners!
Tacoma3G is a beginner-friendly 3rd Generation Toyota Tacoma forum (2016-2023 model-year specific). We are a small community of people who are focused on good information and good vibes. More about us....
You are using an out of date browser. It may not display this or other websites correctly.
You should upgrade or use an alternative browser.
You should upgrade or use an alternative browser.
2021 Midnight Black SR build
- Thread starter Aven2rus
- Start date
-
- Tags
- build thread
Aven2rus
7️⃣ Connoisseur
Got around to mounting the Rugged Radio I removed before selling the Jeep.
Location was a not used for anything but glasses that still fit so not going to miss the space.
Was able use mount that came with it and reach all hardware to mount or remove without removing console. Undecided on mic mount.
Went with nut inserts, added 3M exterior tape under bracket for additional hold and fill gap from insert protrusion. Be sure to buy a scoket head cap screw for use with the tool so it can handle required torque to set the insert.
Good solid mounting. On to wiring once cable, antenna and mount arrive.
Last edited:
Aven2rus
7️⃣ Connoisseur
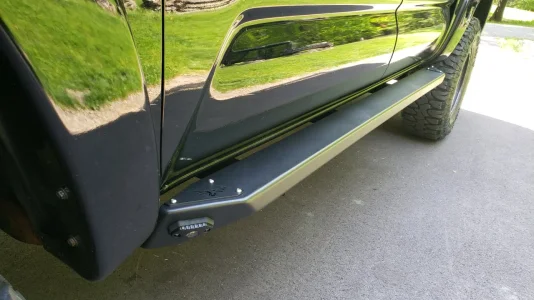
Victory 4x4 Blitz Rockers installed. Love the look, function and fitment was great. t
These are aluminum so no worries about rust while keeping the weight down and highlift jack points meets my top concerns and lighting included saves figuring out what you need and spending extra dollars.
Follow the well documented video installation with all their products for an easy install.
I drilled the optional holes they mention for increased rigidity.
Attachments
Aven2rus
7️⃣ Connoisseur
Bringing this into my build page from the Armor section.
Victory 4x4 Front Skid Plate and Mid Skid Plate installation. Went with aluminum to keep the weight down to a minimum.
Fit and finish on these was excellent and working with the reduced weight of the aluminum is a bonus. All access points are there a cover for oil filter access is a nice feature. The packaging is the best I have seen and assures the parts arrive in great shape as well. Packed in foam, all the hardware there and securely package as well.
Pro Tip: Have mechanic wire handy. Using a piece of wire is helpful to fish the plates dropped in through the cross member into place. Then push it straight through the skid/cross member/plate and through the top cross member hole. Now drop the nut down the wire as guide and move the wire around to align nut with all parts.
Press down on he nut from the top to hold in place and thread the bolt into it.
Only issue I see is that I should have and now going to order the Victory 4x4 Transfer case skid as it protects the very vulnerable exhaust. New to Taco ma coming from the Jeep world I was not aware of this vulnerability.

.jpg")

Victory 4x4 Front Skid Plate and Mid Skid Plate installation. Went with aluminum to keep the weight down to a minimum.
Fit and finish on these was excellent and working with the reduced weight of the aluminum is a bonus. All access points are there a cover for oil filter access is a nice feature. The packaging is the best I have seen and assures the parts arrive in great shape as well. Packed in foam, all the hardware there and securely package as well.
Pro Tip: Have mechanic wire handy. Using a piece of wire is helpful to fish the plates dropped in through the cross member into place. Then push it straight through the skid/cross member/plate and through the top cross member hole. Now drop the nut down the wire as guide and move the wire around to align nut with all parts.
Press down on he nut from the top to hold in place and thread the bolt into it.
Only issue I see is that I should have and now going to order the Victory 4x4 Transfer case skid as it protects the very vulnerable exhaust. New to Taco ma coming from the Jeep world I was not aware of this vulnerability.
Aven2rus
7️⃣ Connoisseur
So I have not shown much with the wiring in regards to the Bumper Light, Rocker lights and TRD driving lights I installed as I ran to switches installed to the dash and was not happy with the scattered locations as a result of using the Toyota open location. That and wanted a shutoff for the GMSR Rugged Radio and see a rear light location in the future for prepping meals on the tailgate.
After speaking with several folks who used the below switch panel with no issue in 3-4 years I went with this economical choice ($85).
Started the installation with getting the switch mounted.
I removed the switches I had installed, sawed with my air saw a slot in one of the blanks and ran the wire through it.
There is another blank under the new panel. There was a clearance groove for the wire at bottom only, so not an option to run through the covered blank. Went this route over drilling a hole in dash to hide it. Still fell it is good clean look.
I mounted with 3M tape, use a heat gun to warm everything and clean with alcohol for a best adhesion.
Last edited:
Aven2rus
7️⃣ Connoisseur
Victory 4x4 Bed Stiffeners installed.
Simple task really. Removed Headlight & OE hardware, scribbed the holes, center punched them and used a step drill until the scribe disappeared.
De-burred the holes and painted them, installed the new hardware.
I also placed the hoops I removed from the OE location on the top bolt to provide an extra position that is rope and bungy friendly.
I like that they take up minimal space compared to many and the cost was cheaper than most.
Quality fit and finish.
.webp")
.webp")


Simple task really. Removed Headlight & OE hardware, scribbed the holes, center punched them and used a step drill until the scribe disappeared.
De-burred the holes and painted them, installed the new hardware.
I also placed the hoops I removed from the OE location on the top bolt to provide an extra position that is rope and bungy friendly.
I like that they take up minimal space compared to many and the cost was cheaper than most.
Quality fit and finish.
Aven2rus
7️⃣ Connoisseur
Completed the switch installation and very please with this, economical priced, function and quality.
Used a fuse tap to grab power out of the fuse box, drilling the hole so the wire is forced through to maintain a seal. Always use shrink wrap connectors and a second layer of shrink wrap for a solid life long splice. These fuse taps you place the removed fuse in the lower slot and the accessory fuse in the top slot for a tidy and safe steal of ignition power. Left plenty of slack for removal of cover.

Drilled the mounting pattern for the new accessories switch panel box in the cover and mounted studs for attaching. Sealed with a tin rubber washer on the inside and locked down on the outside with a locking flange nut.


I cut the power harness down (see earlier post for original form) and spliced the battery connection back on rather than roll it up for much cleaner installation. Doing this required location the ignition wire in the box by ringing the wire as they are all the same wire. Once isolated I clearly marked it with a stripe using a black sharpie.
Also reduced the length of the accessories harness in the same fashion, reinstalling the original protective loom, shrink wrap sealed the 2 additional leads not used at this time and leaving slack on both so the cover OE cover can be removed with ease.


Pleased with the finished product, everything in protective loom and tied of safe from chafing and damage.

Dash location worked out nice as well.

Used a fuse tap to grab power out of the fuse box, drilling the hole so the wire is forced through to maintain a seal. Always use shrink wrap connectors and a second layer of shrink wrap for a solid life long splice. These fuse taps you place the removed fuse in the lower slot and the accessory fuse in the top slot for a tidy and safe steal of ignition power. Left plenty of slack for removal of cover.
Drilled the mounting pattern for the new accessories switch panel box in the cover and mounted studs for attaching. Sealed with a tin rubber washer on the inside and locked down on the outside with a locking flange nut.
I cut the power harness down (see earlier post for original form) and spliced the battery connection back on rather than roll it up for much cleaner installation. Doing this required location the ignition wire in the box by ringing the wire as they are all the same wire. Once isolated I clearly marked it with a stripe using a black sharpie.
Also reduced the length of the accessories harness in the same fashion, reinstalling the original protective loom, shrink wrap sealed the 2 additional leads not used at this time and leaving slack on both so the cover OE cover can be removed with ease.
Pleased with the finished product, everything in protective loom and tied of safe from chafing and damage.
Dash location worked out nice as well.
Last edited:
Aven2rus
7️⃣ Connoisseur
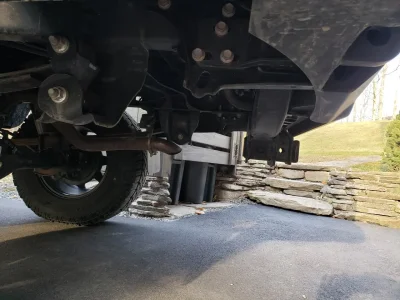
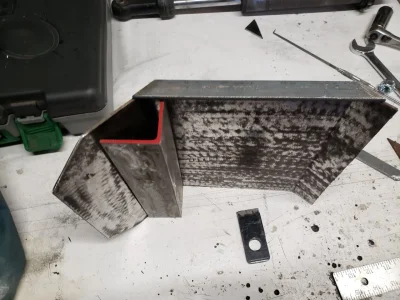
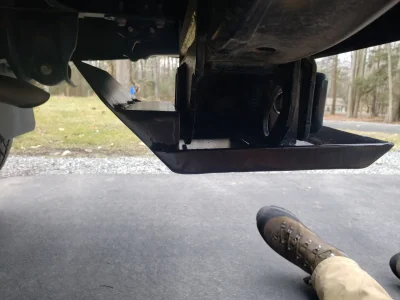
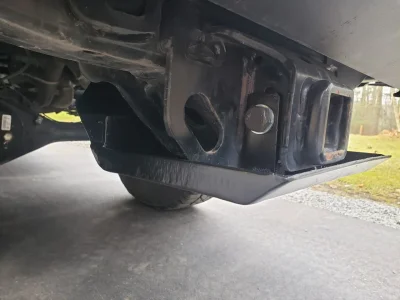
Going to be on some rocky trails here in the northeast in a couple months for a trail ride and wanted to address the hitch mount hanging up and getting trashed. Nothing I found addressed the forward motion and protected the entire assembly, so fabricated this over the weekend.
The 90 degree gusset (angle iron) is in direct contact with the assembly as well as the bottom plate so there is no movement or impact on the hardware once tightened in place.
I left the receiver open as I have a Factor 55 recover point I keep in place on the trails.
Going to go back and drill a hole in the base so water drains out and maybe a bit more time in smoothing out the grinding marks after I pick up a couple new sanding wheel for the grinder.