• Welcome to Tacoma3G.com, a free resource for 2016-2023 Toyota Tacoma owners!

    This website is the passion-project of a USMC veteran/mechanic, @Tyler. I created Tacoma3G.com to share my knowledge of this subject with others and to provide like-minded folks with a comfortable space to ask questions and create 'build threads' within our Tacoma Forums. Now, if the format of this website is confusing to navigate for you, or if you're interested in my full mission and T3G's history, check out the Help and About pages.

2021 Midnight Black SR build

Raceline 949G-7X, 17 x 8.5 x 0 Offset (4.75BS), Part # 949G-78560-00

Milestar Patagonia MT, 295 x 70 x 17, my tire calculator shows it as a 33.26 x 11.61

Going to rub in a tight turn at compression. I had anticipated this and had a Cab Mount Chop on the bench. So looks like that's next in line.

Bumpers arrive tomorrow but neglected to get a 30" light bar for the for the Fab Fours hidden winch and only doing that once so going to be put aside for now.

20201208_141618.jpg
20201208_141758.jpg
Resized_20201208_141546.jpeg
 
Last edited:
Cutting up the new truck. Hardest part was convincing myself. Completed with a 4.5" grinder using cutting wheels, then grind to precisely fit. Painted inside the mount as well, spraying in every direction I could lettings run out. 4 coats.

Finished it is flush with fender well. I tied the liner back out of the way rather than cut it an then heated and formed the raised areas flush with mount.
Resized_20201211_160818(4).jpeg
Resized_20201211_161333(1).jpeg
Resized_20201211_153141(6) (1).jpeg
 
Last edited:
Chopping away at the list... JLT Catch Can. Plan to keep this long enough to pay it of for a first so taking preventive/engine health care measures.


20201212_115001 (1).jpg
 
Last edited:
Meant to add this image of the catch can install. As a means to trigger checking the JLT catch can I drilled a hole in the far upper corner and placed the key chain they sent along with the kit. This will serve as a reminder to empty the can as a minimum at oil changes. Should hopefully even trigger the oil change service centers to ask a question.

Started with a very small bit and steep it up to the completed size. You have to be as deep in the corner as possible without breaking through to avoid exposing the cavity inside the cap.

20201214_150132 (2).jpg
 
Last edited:
Today's project AFE intake. Quality first and finish. Optional front scoop as well as maintaining the fender pick up for additional cool air.

Simple clean installation. Scoop does cover steering reservoir but easy to remove.
removed the scoop, thats like another $100, right, so you cant use it?
 
No Just stating it is easily removed if need to access the PS reservoir. Scoop is $140.

Intake
Scoop


From the site

Details:​


  • +17 HP / +19 lbs. x ft. Torque max gains
  • Outflows factory intake by up to 39%
  • High Quality One-Piece Roto-Molded Sealed Housing with Auxiliary Air Scoop
  • CAD-Designed Roto-Molded Intake Tube
  • Built-In Sight Window Provides Easy Inspection of Filter Without Disassembly
  • Unique (Patent Pending) Filter-to-Housing Interface for Easy Installation
  • Pro 5R oiled 5-Layer Progressively Finer Mesh Cotton Gauze Oiled Media for Maximum Performance
  • No Cutting or Drilling on Factory Parts for Faster Installation
  • Direct fit with optional Dynamic Air Scoop P/N: 54-76005-S (Sold Separately)
 
Last edited:
No Just stating it is easily removed if need to access the PS reservoir. Scoop is $140.

Intake
Scoop


From the site

Details:​


  • +17 HP / +19 lbs. x ft. Torque max gains
  • Outflows factory intake by up to 39%
  • High Quality One-Piece Roto-Molded Sealed Housing with Auxiliary Air Scoop
  • CAD-Designed Roto-Molded Intake Tube
  • Built-In Sight Window Provides Easy Inspection of Filter Without Disassembly
  • Unique (Patent Pending) Filter-to-Housing Interface for Easy Installation
  • Pro 5R oiled 5-Layer Progressively Finer Mesh Cotton Gauze Oiled Media for Maximum Performance
  • No Cutting or Drilling on Factory Parts for Faster Installation
  • Direct fit with optional Dynamic Air Scoop P/N: 54-76005-S (Sold Separately)
yes, I am buying for my birthday in January. Santa bought me a lift kit and tires, intake, exhaust, Prinso top all coming in January
 
Also Installing the exhaust. Defiantly loader than stock but not unbearable by any means and the fit was perfect. It is also tucked up out of the way from damage with exit at the rear so not in harms way like the stock exhaust.

Will get installed pic's when the snow stops. MACH Force-Xp 2-1/2" Stainless Steel Cat-Back Exhaust System

From the site

aFe power introduces the MACH Force-Xp cat-back exhaust system for the Toyota Tacoma with L4-2.7L & V6-3.5L engines. This cat-back exhaust is constructed out of 3" 100% MIG-welded, mandrel-bent, stainless steel tubing for maximum flow. The smooth transition bends and free-flow stainless steel muffler allow for low turbulence, increasing horsepower, torque and improved throttle response. In testing, the cat-back exhaust system resulted in gains up to +9 horsepower and +10 lbs. x ft. of torque, as measured on our in-house dyno. Finishing off this exhaust is a 4.5" diameter polished tip. The tip comes with a laser-cut aFe Power badge riveted on for an aggressive style.

Details:​


  • Features a Hi-Tuck design to provide maximum clearance
  • Constructed Out of 2-1/2" Mandrel-bent 409 Stainless Steel Tubing
  • Utilizes a High-flow 409 Stainless Steel Muffler
  • Attaches Using Bayonet Style Hangers for a Secure fit
  • Includes Heavy-duty Band Clamps
  • Hardware Included for a Hassle-free Installation
  • Single Rear Exit System
20201227_143300.jpg

20201221_160411 (1).jpg
 
Last edited:
Also Installing the exhaust. Defiantly loader than stock but not unbearable by any means and the fit was perfect. It is also tucked up out of the way from damage with exit at the rear so not in harms way like the stock exhaust.

Will get installed pic's when the snow stops. MACH Force-Xp 2-1/2" Stainless Steel Cat-Back Exhaust System

From the site

Details:​


  • Features a Hi-Tuck design to provide maximum clearance
  • Constructed Out of 2-1/2" Mandrel-bent 409 Stainless Steel Tubing
  • Utilizes a High-flow 409 Stainless Steel Muffler
  • Attaches Using Bayonet Style Hangers for a Secure fit
  • Includes Heavy-duty Band Clamps
  • Hardware Included for a Hassle-free Installation
  • Single Rear Exit System
yes, would like to do same pipes
 
THESE WERE REMOVED AFTER 3K MILES WHEN THE JOINTS WENT BAD AND BECAME NOISY!


Replaced the stock stabilizer link over the weekend with Mevotech Part numbers TXMS86850 & TXMS86849. I prefer them over stock for their enhanced sealing much stronger Sintered Metal pivot/bearing and that they can be maintained the presents of a grease fitting not found on OEM.

Not sure if Tacoma's see an issue but with Jeeps I saw these OEM nylon pivot/bearings pop when worn where from my experience sintered metal even if not maintained will get loose but stay together.

Purchased from Rock Auto, need to search by part number to find them. Had to assign an email to one of the part numbers to be notified when in stock and missed it once when I did not respond quick enough. So if your in the market use that option.

Info on their features and benefits here on Mevotech

20201227_121130.jpg

20201227_143228.jpg
 
Last edited:
Started with installation of a Skyjacker 3" Coilover kit with A-Arms and their 2" Rear Leaf Springs. Had this done at the Dealership before I picked it up. First kit i 30 years I did not do myself and I have done 40+ kits ranging from every Jeep to Tundra and Dodge 1500's. The dealership Koch 33 sells lifted Toyotas off the lot so worked a del to have them do the installation. Kit includes diff drop, sway bar drop, upper a-arms, M95 monotube rear shocks, Fox coilovers and Rear Leaf springs. I decided to swap in Fox rear shocks for no other reason than to match the front set-up. Much more to come as parts come in.

Wheels are here waiting on tires. Hard to look at on those stock steelies! This the bare bones Tacoma SR with only options being Door sill guards and door edge protectors.

626384296.jpg
626371451.jpg
626371476.jpg
Lund Flares (part # SX125S)
20201126_111049 (1).jpg
are a perfect fit and easy install. I like them for their smooth finish OEM look as well.
20201126_134055.jpg
20201126_134058.jpg
Nice! I install OEM trd offroad flares on my 2017 SR 4x4
Started with installation of a Skyjacker 3" Coilover kit with A-Arms and their 2" Rear Leaf Springs. Had this done at the Dealership before I picked it up. First kit i 30 years I did not do myself and I have done 40+ kits ranging from every Jeep to Tundra and Dodge 1500's. The dealership Koch 33 sells lifted Toyotas off the lot so worked a del to have them do the installation. Kit includes diff drop, sway bar drop, upper a-arms, M95 monotube rear shocks, Fox coilovers and Rear Leaf springs. I decided to swap in Fox rear shocks for no other reason than to match the front set-up. Much more to come as parts come in.

Wheels are here waiting on tires. Hard to look at on those stock steelies! This the bare bones Tacoma SR with only options being Door sill guards and door edge protectors.

626384296.jpg
626371451.jpg
626371476.jpg
282B9C1E-2099-42FF-8E03-F0D7EA1BE7DA.jpeg
Finally got some SR lovin in the house! 2017 SR
 
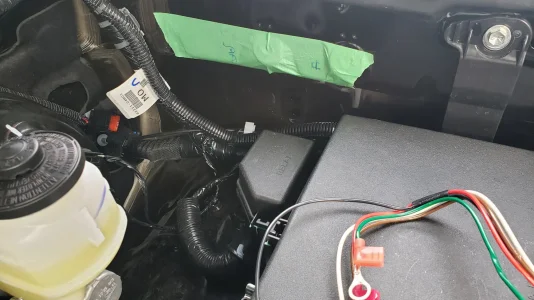
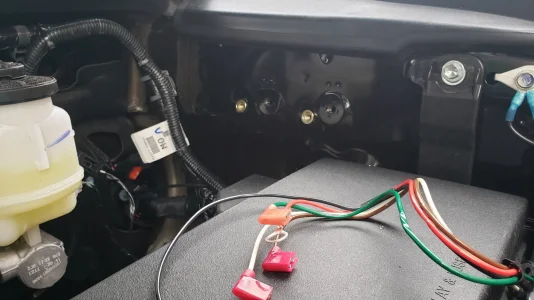
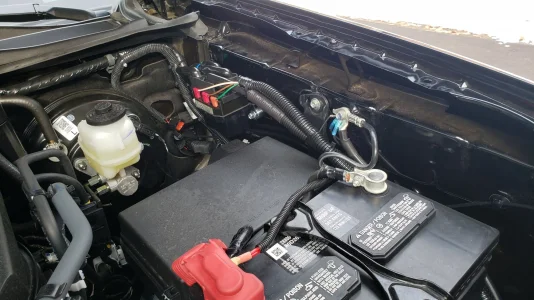
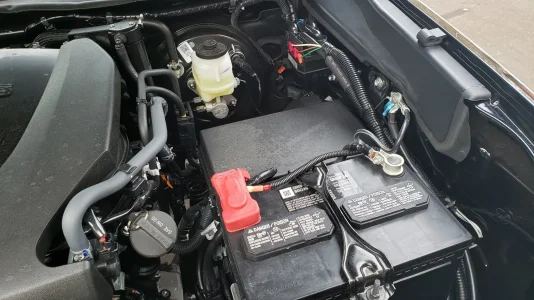
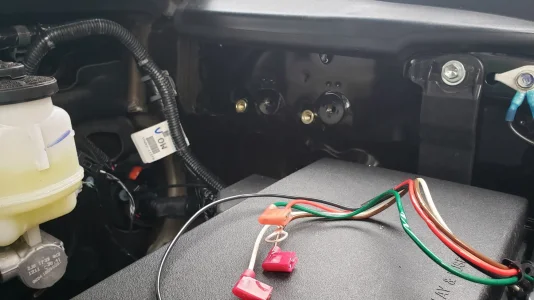
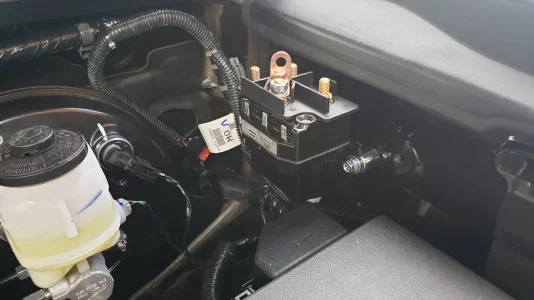
In preparation for the Warn ZEON 10-S Winch - 89611 installed the Control Pack Relocation Kit for ZEON Winches, 78" - 89960

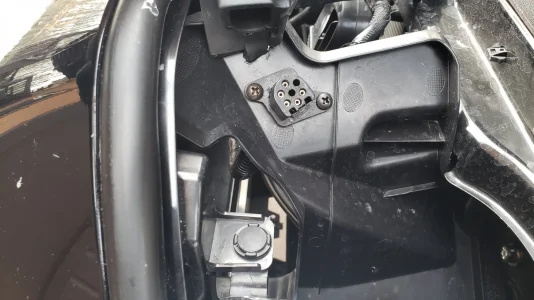
The installation instructions are straight forward and easy to follow. However you will need decide on location mounting and suggest building a longer harness for the controller plug as it is only 6" long (second image) as no mount is included.

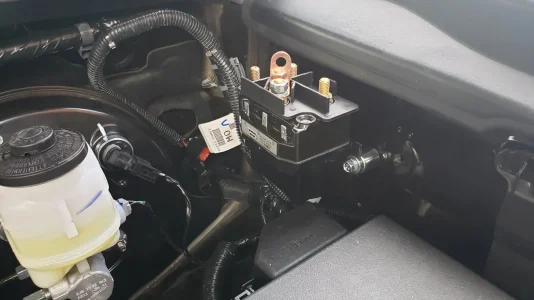
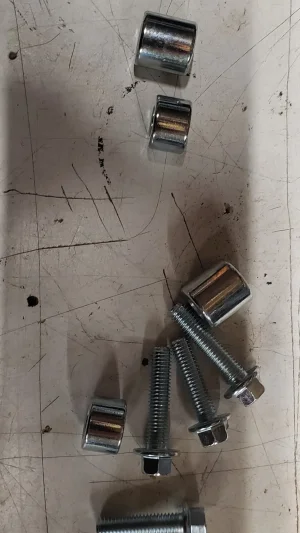
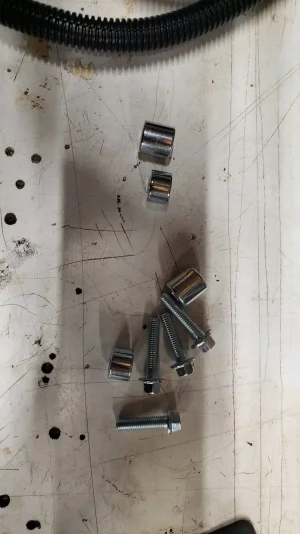
I went with the fender fire wall. Tapped it, marked it and installed blind rivets. If a blind rivet tool is not in your arsenal an offsetting bracket in those OE threaded hole (1/2" to narrow) would work nicely. I also purchased machine spacers and 8mm hardware for the local store to space it away from the plastic trim on the fender. Purchase a couple lengths to save running back and to keep as close to the sheet metal as possible to prevent leverage.

20210109_135606.jpg


20210109_142901.jpg


20210109_145246.jpg

20210109_134048 (2).jpg


As mentioned here is not bracket included for the 6" long controller connector harness so rather leave it hanging I built a longer wire color match harness in split loom and located to the front shroud. I also matched the winch mounting pattern in the shroud to allow use of the protective cover. Also use dielectric grease on all connection to protect from corrosion.

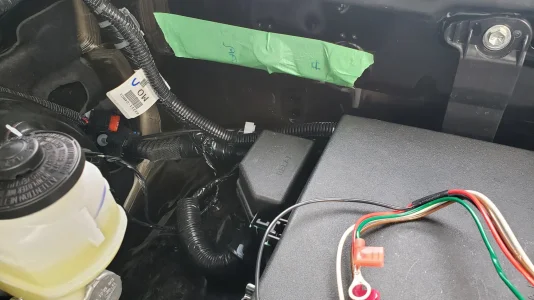
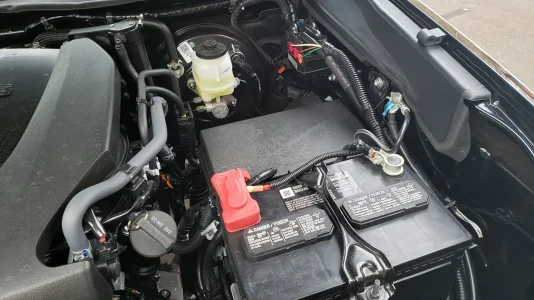
The ground connection was made at the OE fender location as the battery terminal was not an option without disturbing the OE terminations I preferred to leave be. Both cables were trimmed to the required length over hiding the extra. This will require you have ends on hand solder plugs to complete the connection in the same as Warn provided them.

I found after much struggle the provided boots for the connections were impossible to get over the terminations so removed and trimmed to get full coverage and ease of installation as shown in the image below. On to the bumpers.

Have the Warn Illuminated Dash Rocker Switch Kit - 99897 on the way to have an in cab option as well.

20210112_105216.jpg

20210112_104129.jpg

20210112_114709.jpg

20210109_154555 (2).jpg


20210111_092840.jpg

20210112_104257.jpg
 

Attachments

  • 20210109_135606.jpg
    20210109_135606.jpg
    387.5 KB · Views: 85
  • 20210109_142901.jpg
    20210109_142901.jpg
    339.4 KB · Views: 81
  • 20210112_104136.jpg
    20210112_104136.jpg
    440.8 KB · Views: 81
  • 20210112_114709.jpg
    20210112_114709.jpg
    478.2 KB · Views: 88
  • 20210112_105216.jpg
    20210112_105216.jpg
    348.8 KB · Views: 90
  • 20210109_145246.jpg
    20210109_145246.jpg
    279 KB · Views: 82
  • 20210109_135606.jpg
    20210109_135606.jpg
    387.5 KB · Views: 77
  • 20210109_142901.jpg
    20210109_142901.jpg
    339.4 KB · Views: 79
  • 20210109_145246.jpg
    20210109_145246.jpg
    279 KB · Views: 80
  • 20210109_134048 (2).jpg
    20210109_134048 (2).jpg
    320.3 KB · Views: 90
  • 20210112_114709.jpg
    20210112_114709.jpg
    478.2 KB · Views: 84
  • 20210109_134048.jpg
    20210109_134048.jpg
    330.3 KB · Views: 89
Last edited:
Fab Fours Hidden Winch with Warn Winch installation checked off the list. Instructions are straight forward and fit is perfect. The gap along the top is true end to end. Used an Air Saw with a fine tooth blade and the cut was clean and great control following the cut line.

I did place a C-clamp on the bottom 2 mounting locations to pull it in about 1/16 to get those bolts in. Also cut one vertical slat in the grill above the bumper second from the driver side to access the engagement lever on the winch. The Warn Zeon 10.5 is a wide winch and not able to access it through the holes at the recover point as they suggest. The one created looks super clean and perfect for excess.

IMG_20210130_210513_274.jpg
IMG_20210130_210513_285.jpg
 
Last edited:
Got the Timbren stops in. Rear worked out perfectly to protect the 6" lift shocks from damage and provide some cushion.

20210601_155959.jpg

20210601_155933.jpg
20210601_160426.jpg


Front has stopped that flare corner impact under hard cornering dips. Looks tight but with the angle of arm the outside distance closes faster so worked out great. Adds 1" over OE with the spacers and softer material so not as harsh an impact.

20210601_101037.jpg
20210601_142619.jpg
 
Got around to installing the rear breather kit. Was not comfortable with the cap on top in the rear and have a 3 day trip planned that will see some waters crossings.

This the ARB knock off on eBay, $35 and everything they include.

Mounted bed storage compartment.

I routed towards back and followed a harness across the back of bed above the bumper harness and back up frame to avoid the exhaust.
20210602_131337.jpg
20210602_140346.jpg
 
Last edited:
Install instruction are clear and well written as I have found with all Fab Fours products. I also like their products for the two stage powder coating, fit and finish. It is a must for these NE climates were they are dumping salt and chemicals on the road all winter. I have a Jeep bumper that was scratched on the rocks and it did not even bleed past the scratch after 3 years.

Only surprise was the trailer light harness was short for the new location and required lengthening. Took my time, tinned the wires shrink wrapped them. I keep a tube of dialectic grease handy anytime I work with plug in connectors and give everything a good coating. I was not in possession of #10 white o went with red.

20210603_131606.jpg


The Instruction call for drilling 4 hols in the receptacle under the plug covers to bolt the receptacle to the bumper as the new bumper is thicker and the clips would work in their current form.

I found with much patients grinding a little at a time off the curved end I was able to trim them to work.

20210603_093645.jpg


20210603_101143.jpg

20210604_162506.jpg
 
One step closer to being ready for my first adventure end of August with the installation of the Smittybilt Gen 2 Tent. I installed mine opening to the back so it shelters the tailgate as I will not be installing an awning and like the covered work space. Sets up in 5 minutes.

Very pleased with the quality of the product and ease of installation at this point. I will likely
do 3-4 events a year so for me this fit the budget and provided everything I felt I needed.

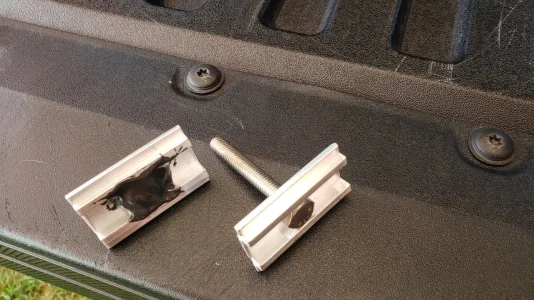
Installation was simple and the instructions were very clear. A helpful tip is to JB weld the bolt in place so it does not require placing something in the track to keep it from moving up.

20210723_100305.jpg


20210723_101033.jpg
20210724_074811.jpg
20210724_075224.jpg
20210723_102614.jpg
 

Attachments

  • 20210723_100305.jpg
    20210723_100305.jpg
    344 KB · Views: 86
Looking like good times ahead.
 
Back
Top