I recently bought a used Snugtop and when I got home I looked into setting up the brake light to work with my brakes. One of the key things is the new version of the Snugtop comes with a quick connect port that also houses two USB ports. I thought it would be cool to keep that functionality since it was included with the truck cap. My first attempt was a fail as the wiring was not properly lined up in the quick connect module. So here is a little write up on how I was able to get the brake light working. I'm hoping to wire up the usb ports next and will add to this post. This is just the brake light for now.
The quick connect wire harness with usb ports:

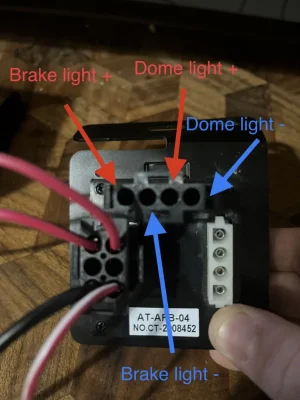
Back of the module, three wire harness ports shown. the black 4 pin port goes to the truck cap light. The one with 6 ports goes to the power sources. The white one with 4 ports goes to the USB ports.

Step 1: Asses your set up and get supplies needed. In my case I was missing one of the wiring harnesses, so I went to the local truck cap store and was able to buy one from them.
Step 2: Identify the snugtop quick connect module. On the back there are three quick connect ports. one goes to the Snugtop brake light, another to the usb ports, and the last one goes to a power source. All of which can be independently powered if wired as such and is how I set mine up.
When I wired mine up the first time, the wires were crossed on the Snugtop wires from the brake light to the quick connect plug and it was not working, so I needed to use the special wire terminal tool to remove the wire from the plug and into the correct port. I ended up using the voltage meter to identify the ports that connect to each other through the module. Then I could rewire the harness correctly.
use the 22ok ohm setting on the multimeter to create a current that will loop from the positive to negative. Then when you touch one terminal pin in the quick connect module, you can touch another terminal pin on a separate harness port on the module to see if the two terminals are connected. Then make sure your corresponding wires are going to the correct ports on your terminals.

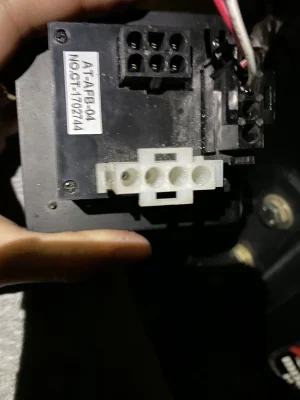
Brake light wire harness. I had to relocate the wires so they connected to the correct pins in the module.


Step 3: remove driver side tail light, identify 2 wires coming from the middle bulb there are 3 but you will need only the 2, the blue goes to positive brake and the black and white stripe is for the negative. you will be taping into these two wires. Mark these wires for later.

Step 4: Identify a location to drill a hole in your bed to feed the wire harness through. I chose the plastic part of the bed. The location I chose, I felt was discrete and did not interfere with how I plan to use the bed. Drill a hole and feed the wires from the harness through. You should be able to fish the wires out from the taillight area.


Step 5: Strip the blue (brake light) and white with black stripe (ground) tail light wires, (Do not cut the wires). connect the wires from the harness to the tail light wires. There are multiple ways to do this from t-clamp connects, to soldering, to wrapping. (Do what you feel will meets your needs). I plan to solder mine later, for now I wrapped the wires and used electrical tape. I also grounded the black wire shown on the wire harness to the metal inside the bed for good measure. I used a self drilling screw next to the existing hole where I feed the wire harness through.


Step 6: at this point everything should be connected. You can test your brake light. It should be working. Pat your self on the back and grab a beer.


The quick connect wire harness with usb ports:
Back of the module, three wire harness ports shown. the black 4 pin port goes to the truck cap light. The one with 6 ports goes to the power sources. The white one with 4 ports goes to the USB ports.
Step 1: Asses your set up and get supplies needed. In my case I was missing one of the wiring harnesses, so I went to the local truck cap store and was able to buy one from them.
- Wire strippers
- electrical tape
- Ratchet and sockets
- voltage meter - I found that a voltage meter was useful in making sure the current was passing through the right ports
- wire terminal tool - optional
Step 2: Identify the snugtop quick connect module. On the back there are three quick connect ports. one goes to the Snugtop brake light, another to the usb ports, and the last one goes to a power source. All of which can be independently powered if wired as such and is how I set mine up.
When I wired mine up the first time, the wires were crossed on the Snugtop wires from the brake light to the quick connect plug and it was not working, so I needed to use the special wire terminal tool to remove the wire from the plug and into the correct port. I ended up using the voltage meter to identify the ports that connect to each other through the module. Then I could rewire the harness correctly.
use the 22ok ohm setting on the multimeter to create a current that will loop from the positive to negative. Then when you touch one terminal pin in the quick connect module, you can touch another terminal pin on a separate harness port on the module to see if the two terminals are connected. Then make sure your corresponding wires are going to the correct ports on your terminals.
Brake light wire harness. I had to relocate the wires so they connected to the correct pins in the module.
Step 3: remove driver side tail light, identify 2 wires coming from the middle bulb there are 3 but you will need only the 2, the blue goes to positive brake and the black and white stripe is for the negative. you will be taping into these two wires. Mark these wires for later.
Step 4: Identify a location to drill a hole in your bed to feed the wire harness through. I chose the plastic part of the bed. The location I chose, I felt was discrete and did not interfere with how I plan to use the bed. Drill a hole and feed the wires from the harness through. You should be able to fish the wires out from the taillight area.
Step 5: Strip the blue (brake light) and white with black stripe (ground) tail light wires, (Do not cut the wires). connect the wires from the harness to the tail light wires. There are multiple ways to do this from t-clamp connects, to soldering, to wrapping. (Do what you feel will meets your needs). I plan to solder mine later, for now I wrapped the wires and used electrical tape. I also grounded the black wire shown on the wire harness to the metal inside the bed for good measure. I used a self drilling screw next to the existing hole where I feed the wire harness through.
Step 6: at this point everything should be connected. You can test your brake light. It should be working. Pat your self on the back and grab a beer.
Attachments
Last edited: