I've been working on this for two and a half years, so it's going to be quite long. I may need to do multiple posts due to image limits.
In the spirit of being prepared for anything I decided a few years ago I was going to buy a truck... which didn't happen until Fall of 2016. While researching and pining over the truck I kept running into expedition threads about m101a trailers and camping / offroading. I decided I really wanted one once I got a truck and started monitoring govplanet.com and Govliquidation.com and the local classifieds.
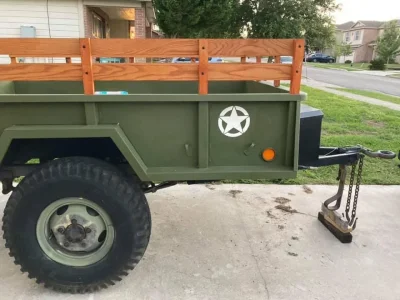
Well, one came up that I couldn't resist and had to go see for myself. After a few min I was on the phone with my father in law asking him to come by with his F-350 to help me take it home. This was fall of 2015 while I was still driving a Subaru Legacy GT. This is how it looked originally:


It tracked well, but needed work. First on the list was road-readiness. The tires were in horrible shape and the "tested converted lighting" caused errors on my father in law's dash. I planned out, prepped and designed a new wiring harness, replacing all wiring on the trailer with civilian 7 pin so that it could eventually have electronic brakes. I decided on submersible brake/turn/marking/license plate lights and bough two oval white lights for backup purposes. After measuring, planning, drilling and installation. I then realized that one drop of the tailgate and the backup lights would shatter. I realized that I could put bump stops in the triangular piece on each side in the back that already had holes drilled. Now when I drop the tailgate the stops buffer the momentum and stop the tailgate from hitting anything!
I originally did all the wiring with blade connectors so that I could easily convert between wire gauges and can pull out the lights and replace them at any time without having to redo the harness. When I checked them a month ago I realized my crimping back then sucked and ended up ripping out most of the wiring to put in a central wire box, and loomed everything.


I had my friend Jay come over and we pressure washed the trailer and then bedlined the entire tub, top rail and inside of the tailgate. He works at a local paint manufacturer and was excited with the custom tinting.


With the bed protected and the outside paint in pretty good shape I decided to renovate / rebuild the racks. Using a Dremel and about 25 cutting wheels I got all the rivets off, piled the lumber and lined up the hardware for prep.
Original shape:


An Engineer friend of mine referred me to the metal finishing company they use and I got a great deal on blast, zinc, and powder coat. Here's the finished hardware:


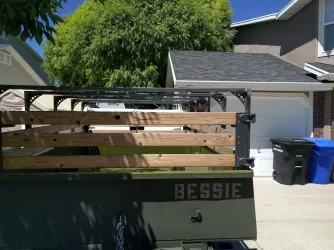
I bought a boatload of stainless t-nuts and along with stainless bolts to mount some western cedar planking. I didn't want to mess with rivets again, and like the idea that at least with t-nuts the inside-facing wood will have a consistent look. I ordered 1x4's and ran then through a planer, router, and sanded the crap out of them. I used this project as an excuse to buy a drill press, orbital sander, and a bunch of bits and had a lot of fun trying to figure out how to do things.


That's not all, just want to see how well this is received before posting more.
In the spirit of being prepared for anything I decided a few years ago I was going to buy a truck... which didn't happen until Fall of 2016. While researching and pining over the truck I kept running into expedition threads about m101a trailers and camping / offroading. I decided I really wanted one once I got a truck and started monitoring govplanet.com and Govliquidation.com and the local classifieds.
Well, one came up that I couldn't resist and had to go see for myself. After a few min I was on the phone with my father in law asking him to come by with his F-350 to help me take it home. This was fall of 2015 while I was still driving a Subaru Legacy GT. This is how it looked originally:
It tracked well, but needed work. First on the list was road-readiness. The tires were in horrible shape and the "tested converted lighting" caused errors on my father in law's dash. I planned out, prepped and designed a new wiring harness, replacing all wiring on the trailer with civilian 7 pin so that it could eventually have electronic brakes. I decided on submersible brake/turn/marking/license plate lights and bough two oval white lights for backup purposes. After measuring, planning, drilling and installation. I then realized that one drop of the tailgate and the backup lights would shatter. I realized that I could put bump stops in the triangular piece on each side in the back that already had holes drilled. Now when I drop the tailgate the stops buffer the momentum and stop the tailgate from hitting anything!
I originally did all the wiring with blade connectors so that I could easily convert between wire gauges and can pull out the lights and replace them at any time without having to redo the harness. When I checked them a month ago I realized my crimping back then sucked and ended up ripping out most of the wiring to put in a central wire box, and loomed everything.
I had my friend Jay come over and we pressure washed the trailer and then bedlined the entire tub, top rail and inside of the tailgate. He works at a local paint manufacturer and was excited with the custom tinting.
With the bed protected and the outside paint in pretty good shape I decided to renovate / rebuild the racks. Using a Dremel and about 25 cutting wheels I got all the rivets off, piled the lumber and lined up the hardware for prep.
Original shape:
An Engineer friend of mine referred me to the metal finishing company they use and I got a great deal on blast, zinc, and powder coat. Here's the finished hardware:
I bought a boatload of stainless t-nuts and along with stainless bolts to mount some western cedar planking. I didn't want to mess with rivets again, and like the idea that at least with t-nuts the inside-facing wood will have a consistent look. I ordered 1x4's and ran then through a planer, router, and sanded the crap out of them. I used this project as an excuse to buy a drill press, orbital sander, and a bunch of bits and had a lot of fun trying to figure out how to do things.
That's not all, just want to see how well this is received before posting more.