• Welcome to Tacoma3G.com, a free resource for 2016-2023 Toyota Tacoma owners!

    Tacoma3G is a beginner-friendly 3rd Generation Toyota Tacoma (2016-2023 model-years) forum. We are a community of people who are focused on good information and good vibes. T3G is the passion-project of a USMC/Toyota technician.

Rear differential breather reroute.

Sangi

5️⃣ Platinum
Rig of the Month
Tacoma3G Supporter
Tacoma3G O.G.
Hey everyone, I've been putting off a quick mod for a while now, rerouting the rear differential breather.
Figured I do a quick walkthrough and take pictures in case anyone else wanted to do it as well.
For those who don't know, there is a little knobbly looking thing on the left side of the top of the rear differential. That's the breather. Now, generally, everything is fine. But since most of us here like to offroad, we find ourselves traversing water. Or some of us (me included) just want to be safe. Basically a snorkel for your diff. So there's a quick, cheap and easy mod to move the breather up into the bed and nice and safe away from any pesky water.

What you'll need:
-Plug breather (part # 90930-03136)
-Union (part # 90404-51319)
-Fuel line (3/8ths) (I used about 8 feet)
-Two 3/8ths hose clamps

Tools
-Drill
-3/8ths bit
-12mm socket/wrench
-Flathead screwdriver


Not needed, but highly recommended, drop the spare. Gives you plenty of maneuvering room (especially if you're not lifted)
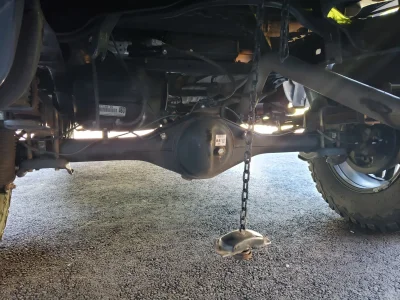
20190611_162818.jpg
20190611_163254.jpg
Clean around the breather.
Remove it with your 12mm.
Install the Union, and fit the fuel line over it.
Tighten down the hose clamp.
Don't cut it short, we'll do that later.
20190611_165905.jpg
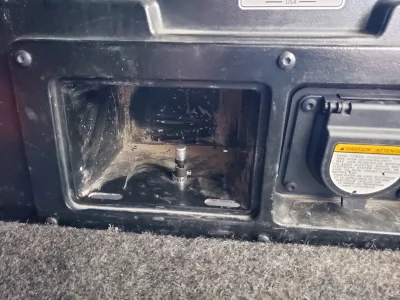
Next, to find a spot for the other end of the breather. Popular spots are the cubbyholes in the bed, and I used the smaller one on the right, as I eventually want to install an ARB compressor in the larger one. I debated widening the one of the two small holes in the rear in the cubbyhole, but decided to drill my own closer up. (It's up to you if you wanna remove the cubbyhole, I did, but it's not necessary)
20190611_171749.jpg
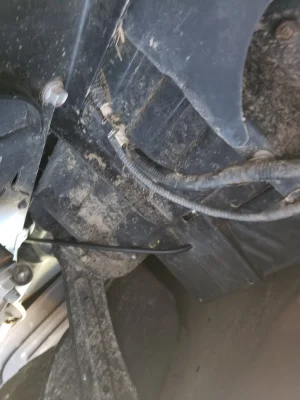
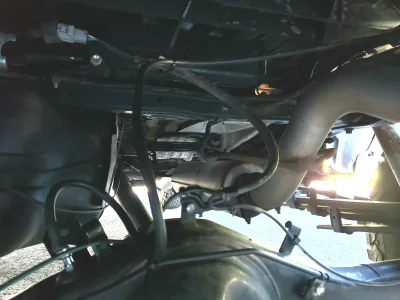
Next route the fuel line up and around towards the hole. I used zipties to hold it all in place. I had to go up and around to avoid the exhaust.
20190611_174025.jpg
20190611_173003.jpg
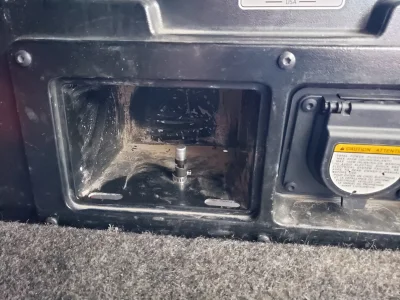
Now, lightly pull the fuel line through the hole. We want to leave enough slack to compensate for droop. When you're satisfied with the amount, cut it about 1-2 inches from inside the cubbyhole.
Put the other hose clamp over, put the plug breather on, tighten it down and you're done!
20190611_173515.jpg
Took me about 25 minutes cause I kept stopping to take pictures. Gives me a little more peace of mind when crossing water, even deep puddles while just driving.
 

Attachments

  • 20190611_162818.webp
    20190611_162818.webp
    507.3 KB · Views: 259
  • 20190611_173515.webp
    20190611_173515.webp
    346.6 KB · Views: 207
Hey everyone, I've been putting off a quick mod for a while now, rerouting the rear differential breather.
Figured I do a quick walkthrough and take pictures in case anyone else wanted to do it as well.
For those who don't know, there is a little knobbly looking thing on the left side of the top of the rear differential. That's the breather. Now, generally, everything is fine. But since most of us here like to offroad, we find ourselves traversing water. Or some of us (me included) just want to be safe. Basically a snorkel for your diff. So there's a quick, cheap and easy mod to move the breather up into the bed and nice and safe away from any pesky water.

What you'll need:
-Plug breather (part # 90930-03136)
-Union (part # 90404-51319)
-Fuel line (3/8ths) (I used about 8 feet)
-Two 3/8ths hose clamps

Tools
-Drill
-3/8ths bit
-12mm socket/wrench
-Flathead screwdriver


Not needed, but highly recommended, drop the spare. Gives you plenty of maneuvering room (especially if you're not lifted)
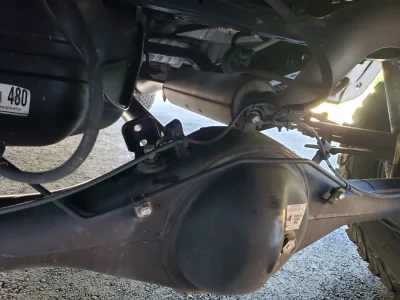
View attachment 13579
View attachment 13581
Clean around the breather.
Remove it with your 12mm.
Install the Union, and fit the fuel line over it.
Tighten down the hose clamp.
Don't cut it short, we'll do that later.
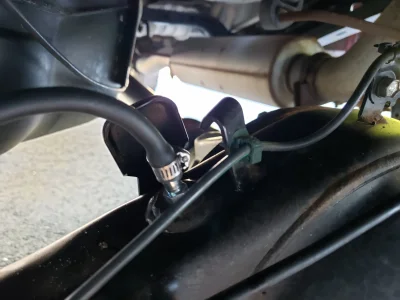
View attachment 13582
Next, to find a spot for the other end of the breather. Popular spots are the cubbyholes in the bed, and I used the smaller one on the right, as I eventually want to install an ARB compressor in the larger one. I debated widening the one of the two small holes in the rear in the cubbyhole, but decided to drill my own closer up. (It's up to you if you wanna remove the cubbyhole, I did, but it's not necessary)
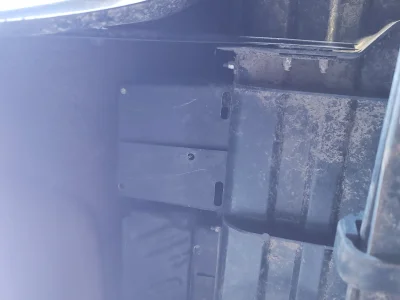
View attachment 13583
Next route the fuel line up and around towards the hole. I used zipties to hold it all in place. I had to go up and around to avoid the exhaust.
View attachment 13584
View attachment 13585
Now, lightly pull the fuel line through the hole. We want to leave enough slack to compensate for droop. When you're satisfied with the amount, cut it about 1-2 inches from inside the cubbyhole.
Put the other hose clamp over, put the plug breather on, tighten it down and you're done!
View attachment 13586
Took me about 25 minutes cause I kept stopping to take pictures. Gives me a little more peace of mind when crossing water, even deep puddles while just driving.

I need to get around doing this. Thanks for the photos and write up.
 
I need to get around doing this. Thanks for the photos and write up.
Me too. It's probably the oldest thing on my to-do list that I still haven't done. I'm honestly not even sure if I had water in my diff when I did the regear (I should've asked). Thanks for the write-up, Anthony.
 
I am going to install mine in the cavity behind the left rear taillight.
(Just take the light out secure the hose and breather to a body slot and put the light back in)

I am using the TOYOTA OEM 1/4" union (thread x hose) for the diff and the OEM hose breather they use 1/4" ID fuel hose.
This is the same connections (Breathers) used on the Transfer case - MT - Front Diff & Actuator from the factory.
  • Union (Toyota Part# 90404-51026)
  • Breather (Toyota Part# 90930-03136)
It will take 7-8 feet of the fuel line and some zip-ties.

The front diff and actuator breathers are in a fair spot in the engine bay on the driver's wheel well just above the tire. (Stock location)
The transfer and actuator as well as the MT are side by side on top the bell housing just where the firewall is behind the engine. (Stock location)
I figure I see water that high I will have other issues so I can live with those.

But the rear diff is like 18" above ground level (Stock location).
Not going to live with that one. If you launch a boat, you may cover it.

The engineers must have taken lunch when that one was stamped.
 
My dealer is the hook up, since I bought my truck there, I get a 10% discount on ALL parts and free shipping to me or I can drive to pick stuff up..
Ordered the union and breather yesterday online and both arrived today at the dealer. (the rest of the stuff I had in the shop)
"Black anodized" (y)
1692132699916.png
 
How have I still not done this? Okay, this fall I swear!
 
I like the left taillight idea,
Mount behind the taillight it on a factory hole and all the access holes for the hose are already there.
Well you do have to take out two bolts for the light,..... he picked out a great spot.
(red circles are marking the stationary pins)
1692135695687.png
1692135832226.png
 
I've had the parts for a year now, just haven't gotten to it yet. Probably should have before this on Sunday...
 

Attachments

  • Taco Mud.webp
    Taco Mud.webp
    369.1 KB · Views: 85
  • Blue Lake Washed Out Bridge.webp
    Blue Lake Washed Out Bridge.webp
    445 KB · Views: 90
Why did we all put this on our to-do list and put it off. Thanks for the reminder.
I bought this "kit" a while back on TW from blais03 or something. I wonder if the tube was long enough to get to the taillight area. This has like 5'. Guess I could just buy everything again and just sell this one. Lol.

15977B45-7B0F-4180-AE19-3450F0A82A8E.jpg
C7AC7B08-1DBF-4C43-8BCB-C5D3D53EC017.jpg
 
Why did we all put this on our to-do list and put it off. Thanks for the reminder.
I bought this "kit" a while back on TW from blais03 or something. I wonder if the tube was long enough to get to the taillight area. This has like 5'. Guess I could just buy everything again and just sell this one. Lol.

View attachment 63183View attachment 63182
5' would be tight, you want to put in a slack loop at the diff for axle travel.
I pretty much used all 7 to 8' when running high along the frame to mount away from brush snags.
 
I got the ARB Breather kit and installed it in the DS storage compartment in the bed with my tiedown supply, rear diff only for now, front diff is next after I put in the Locker and 5.29 gears, clean install and easy to check/clean.
1708456530747.webp
 
I got the ARB Breather kit and installed it in the DS storage compartment in the bed with my tiedown supply, rear diff only for now, front diff is next after I put in the Locker and 5.29 gears, clean install and easy to check/clean.
View attachment 63845
Does anyone make a front kit? I only ever see people doing the rear.
 
Does anyone make a front kit? I only ever see people doing the rear.
This ARB unit has two ports, one for the front and one for the rear, the front is hard to get to, I am regearing and installing a air locker in the front this week and will install the vent line, then route the line to this vent, it can be done without taking everything apart, but it is hard to get to.
 
Does anyone make a front kit? I only ever see people doing the rear.
The front stock location (diff and actuator lines) are mounted side by side on the drivers fender just above the drivers side tire.
Seems like a fair location in height, so I left mine alone.
The transfer case and manual transmission lines are on top of the bell housing just behind the firewall.
They are close to the same elevation as the front lines are.

You could simply extend them using couplings higher if needed.
 
Back
Top