Yep. Normal.I should have asked this a while ago. Is the bottom part of the doors suppose to feel “rough”
-
Welcome to Tacoma3G.com, a free resource for 2016-2023 Toyota Tacoma owners!
Tacoma3G is a beginner-friendly 3rd Generation Toyota Tacoma forum (2016-2023 model-year specific). We are a small community of people who are focused on good information and good vibes. More about us....
You are using an out of date browser. It may not display this or other websites correctly.
You should upgrade or use an alternative browser.
You should upgrade or use an alternative browser.
Reference Ask a beginner question, get a serious answer!
- Thread starter Tyler
- Start date
Where can I find top hats for 2021 off road Tacoma ? What’s the price on a set ?
Wellspring
3️⃣ Silver
I have an Element E100 extinguisher mounted on the bed rail.I have never kept a fire extinguisher in my personal vehicles, looking to get one for the Taco, what does anyone recommend?

Element - Fire Extinguishers
80% smaller & has 5x the discharge time of a traditional fire extinguisher. Makes no mess, requires no service and will not cause additional damage to any of your possessions.
 elementfire.com
Same here, velcro'd to the inside of the glove box door.I have an Element E100 extinguisher mounted on the bed rail.
Element - Fire Extinguishers
80% smaller & has 5x the discharge time of a traditional fire extinguisher. Makes no mess, requires no service and will not cause additional damage to any of your possessions.
I'm guessing you already got this taken care of since you did the install?Where can I find top hats for 2021 off road Tacoma ? What’s the price on a set ?
If not, any auto parts store. I think Amazon was the cheapest. Most of the stores don't keep them in stock. Would take a few days to ship.
I think KYB's were the most preferred. About $30/each.
Yes we found a set online. ThanksI'm guessing you already got this taken care of since you did the install?
If not, any auto parts store. I think Amazon was the cheapest. Most of the stores don't keep them in stock. Would take a few days to ship.
I think KYB's were the most preferred. About $30/each.
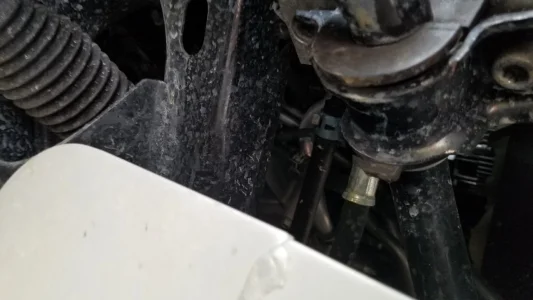
I installed a diff breather and wanted to make sure I left plenty of slack. I am concerned that maybe I left too much?
Since the bed moves should I be concerned about the placement of the tubing in image below?
I tried to keep it away from anything that would interfere, but the curl of the slack puts it close to the bottom of the bed.


Since the bed moves should I be concerned about the placement of the tubing in image below?
I tried to keep it away from anything that would interfere, but the curl of the slack puts it close to the bottom of the bed.
That looks pretty good. I am about to do mine as well. You might want to gently zip tie the slack loop if you haven't already. Where did you route the dif breather hose to? Taillight or bed cubby? I'm going to seal the useless bed cubby and put it in there.
I'd take out enough slack to get rid of the loop. Should be easy to slide it forward and trim at the level of the filter.I installed a diff breather and wanted to make sure I left plenty of slack. I am concerned that maybe I left too much?
Since the bed moves should I be concerned about the placement of the tubing in image below?
I tried to keep it away from anything that would interfere, but the curl of the slack puts it close to the bottom of the bed.
I routed mine to follow the brake lines off the axle, then down the frame and up to behind the taillight. I can get some pictures in a bit, but that's the general idea.I installed a diff breather and wanted to make sure I left plenty of slack. I am concerned that maybe I left too much?
Since the bed moves should I be concerned about the placement of the tubing in image below?
I tried to keep it away from anything that would interfere, but the curl of the slack puts it close to the bottom of the bed.


I just realize I haven't installed mine yet. Is that the Blaise Bros one or another kit?
lol, just realized I forgot the clamps. But the hose holds those fittings pretty tightly.
Yep. I went DIY before I realized there's a kit. I just looked that kit up and it looks like nearly identical parts, plus you get a sticker. Certainly easier than tracking everything down individuallyNow I have to go and look at my kit. Is yours an automatic?
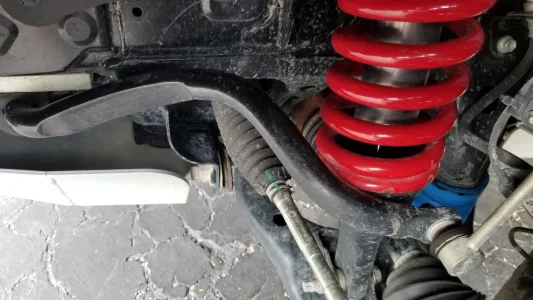
Any thoughts on what I can do with this?
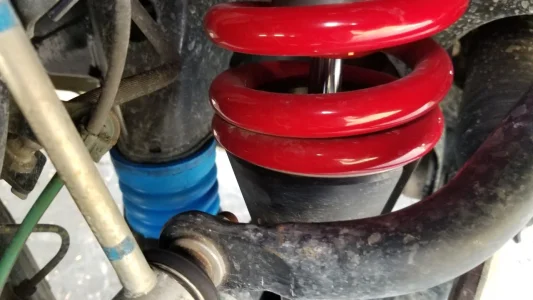
Noticed a bit of noise in the front driver side of suspension and found that my Toytec Aluma coils are rubbing on the sway bar. The relocation brackets are installed and came from Toytec. Not sure what else I can do. Removing the sway bar is not an option for me since 95% of driving is on the highway. Not happening on the passenger side.
Noticed a bit of noise in the front driver side of suspension and found that my Toytec Aluma coils are rubbing on the sway bar. The relocation brackets are installed and came from Toytec. Not sure what else I can do. Removing the sway bar is not an option for me since 95% of driving is on the highway. Not happening on the passenger side.
Attachments
Is it possible to shift the sway bar over to the drivers side maybe 1/8" inch? You look to have plenty of room on the pass side. Just spitballing hereAny thoughts on what I can do with this?
Noticed a bit of noise in the front driver side of suspension and found that my Toytec Aluma coils are rubbing on the sway bar. The relocation brackets are installed and came from Toytec. Not sure what else I can do. Removing the sway bar is not an option for me since 95% of driving is on the highway. Not happening on the passenger side.
It was worse than that. The idiot shop that installed my lift put my sway bar brackets on backwards. The pic is hard to see but that is the one with a big "L" on it and it was on the passenger side. When I crawled under there to loosen the brackets up, I noticed the open side of the bracket was facing to the back of the truck and thought "that's not right". Once I removed and swapped the brackets putting the "L" on the drive side and "R" on the passenger side the sway bar sat back in with equal space on each side. Unbelievable. I guess I am the idiot who didn't check it after the lift was done.Is it possible to shift the sway bar over to the drivers side maybe 1/8" inch? You look to have plenty of room on the pass side. Just spitballing here
Attachments
That's tough. I suppose you could shave a bit of sway bar off where it is rubbing, but that might compromise the sway bar.It was worse than that. The idiot shop that installed my lift put my sway bar brackets on backwards. The pic is hard to see but that is the one with a big "L" on it and it was on the passenger side. When I crawled under there to loosen the brackets up, I noticed the open side of the bracket was facing to the back of the truck and thought "that's not right". Once I removed and swapped the brackets putting the "L" on the drive side and "R" on the passenger side the sway bar sat back in with equal space on each side. Unbelievable. I guess I am the idiot who didn't check it after the lift was done.
How about a longer bracket (sway bar quick disconnect kind of thing) that would lift the sway bar away from the spring a bit?
Also check to make sure the brackets arent moving the sway bar toward the rear, they are meant to push it forward about an inch, which should provide plenty of clearanceIt was worse than that. The idiot shop that installed my lift put my sway bar brackets on backwards. The pic is hard to see but that is the one with a big "L" on it and it was on the passenger side. When I crawled under there to loosen the brackets up, I noticed the open side of the bracket was facing to the back of the truck and thought "that's not right". Once I removed and swapped the brackets putting the "L" on the drive side and "R" on the passenger side the sway bar sat back in with equal space on each side. Unbelievable. I guess I am the idiot who didn't check it after the lift was done.
Depending on the stiffness of the Toytec, you could possible remove the sways.Any thoughts on what I can do with this?
Noticed a bit of noise in the front driver side of suspension and found that my Toytec Aluma coils are rubbing on the sway bar. The relocation brackets are installed and came from Toytec. Not sure what else I can do. Removing the sway bar is not an option for me since 95% of driving is on the highway. Not happening on the passenger side.
Glad you got it figured out.
Last edited:
Hello
Any recommendations for a security camera for my taco? Something that won’t break the bank
Any recommendations for a security camera for my taco? Something that won’t break the bank
Jacket4256
2️⃣ Bronze
I am wanting to do a lift for my daily, it will see some light off-roading.
I’m lost on what to do, I was just going to do billstein leveling in the front which I already have, but if I’m taking them out should I just throw some better springs on the front as well ?
Then just add some 0.5-1 inch blocks in the rear with matching shocks ?
I’d like to get best bang for my buck but also wanna do it right the first time.
Jacket4256
Eibach springs are great. If you are not planning to add a heavy front bumper and winch a set of 600 pound springs will do. They will not sag over time and hold up well.
They have rear shocks that are great for 0-2” of lift. I’m running the stage 1 setup on my 2021 off road and I’m very happy with that setup
Last edited:
If you've already got the leveling kit, use it! Part of messing with your truck is learning it, growing with it, and that really requires working through gear.I am wanting to do a lift for my daily, it will see some light off-roading.
I’m lost on what to do, I was just going to do billstein leveling in the front which I already have, but if I’m taking them out should I just throw some better springs on the front as well ?
Then just add some 0.5-1 inch blocks in the rear with matching shocks ?
I’d like to get best bang for my buck but also wanna do it right the first time.
I think you're set up well already with your leveling kit and some blocks in the back.
Hey @Johnnytwotimes My last dashcam was a BlackVue DR650X 2CH. They're not cheap but they have many different options now and I liked the fact that they can have multiple cameras linked to one recording device. You can set it up to automatically upload the video files when you're within your wifi network. You can also view the videos on their phone and PC apps. May not be what you're looking for, but here's the link for your perusal.Hello
Any recommendations for a security camera for my taco? Something that won’t break the bank
M
Mike_570
possibly a ghost :(
Hey guys!
This may be a bit of a different question than most of them here - but it's worth a shot!
Have any of you had experience with paint less dent removal? I got a quote today for 60 bucks to fix a tiny dent in my rear passenger door right below the window. Good reviews with this guy, several hundred with a total of 4.9 stars, so that's not my concern.
My concern comes in with how it will be done. Due to where it is, they will put the tool down through the window channel and "roll it out". My concern with this is whether or not this will bend or warp the window channel due to the pressure.
Kind of reminds me of a scenario similar to when someone gets their keys locked in the car and they use those airbags to pump up and create a gap in the door. I don't believe the door ever seals properly after that, and I don't want to run into that scenario if I do paint less dent removal.
Worked at my dad's car dealership for years, saw this many times. Typically works pretty well with no residual problems.Hey guys!
This may be a bit of a different question than most of them here - but it's worth a shot!
Have any of you had experience with paint less dent removal? I got a quote today for 60 bucks to fix a tiny dent in my rear passenger door right below the window. Good reviews with this guy, several hundred with a total of 4.9 stars, so that's not my concern.
My concern comes in with how it will be done. Due to where it is, they will put the tool down through the window channel and "roll it out". My concern with this is whether or not this will bend or warp the window channel due to the pressure.
Kind of reminds me of a scenario similar to when someone gets their keys locked in the car and they use those airbags to pump up and create a gap in the door. I don't believe the door ever seals properly after that, and I don't want to run into that scenario if I do paint less dent removal.
Has anyone or does anyone know someone who's done brake pad comparison? Might be time for me to change mine and just want to know if there's difference between OEM and what some companies may call "performance" or "offroad" or "towing/offroad" brake pads.
TIA.
TIA.