Ground down just a bit to create a gap, plus flexed the lines a touch more. We’ll see if it stays off the bolt head.
-
Welcome to Tacoma3G.com, a free resource for 2016-2023 Toyota Tacoma owners!
Tacoma3G is a beginner-friendly 3rd Generation Toyota Tacoma forum (2016-2023 model-year specific). We are a small community of people who are focused on good information and good vibes. More about us....
You are using an out of date browser. It may not display this or other websites correctly.
You should upgrade or use an alternative browser.
You should upgrade or use an alternative browser.
UnpavedPreferred’s 20 OR Build
- Thread starter UnpavedPreferred
- Start date
-
- Tags
- build thread
Original link: https://youtu.be/gtBG77IaGWk
"Brief" video from wheeling and taking the bump on the rock slider.
More importantly: Happy Birthday Marines.
Ha. I checked it before posting but since I'm the owner, I had full access. Set to unlisted, so it should be good to go now. Thanks for letting me know.Link says "This video is private."
New gusseted legs arrived today. Feels like 5 degrees outside and some snow. Perfect timing. I'll have to put these in the closet until warmer weather arrives. Also looks like these don't have the wire zip tie points on them. I'll figure something out.

Last edited:
Husky bin for holding tool bag, VIAIR compressor, strap, soft shackles, and 3lb adjuster.

FuelPax (3.5 gal), modified brackets to fit below the edge of the bed rail to clear the diamondback cover. To keep things from sliding around, stall mat from Tractor Supply.

FuelPax (3.5 gal), modified brackets to fit below the edge of the bed rail to clear the diamondback cover. To keep things from sliding around, stall mat from Tractor Supply.
Last edited:
Interior Additions/Updates:
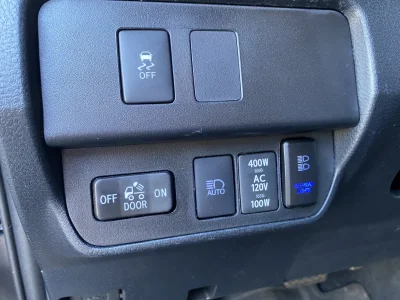
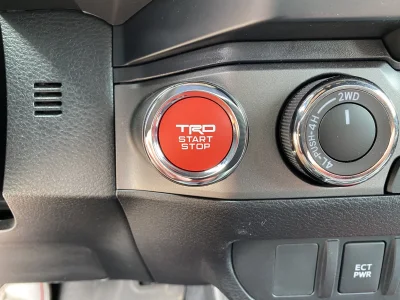
Wired up the rock slider lights for the Victory4x4 Blitz Sliders. Swapped the start stop button with something proper to gain more followers </sarcasm>.


Tacoma overlay and tailgate insert. I like it but I can see why people don't.


RCI skids arrived in total. 3 boxes all arrived on different days.


Wired up the rock slider lights for the Victory4x4 Blitz Sliders. Swapped the start stop button with something proper to gain more followers </sarcasm>.
Tacoma overlay and tailgate insert. I like it but I can see why people don't.
RCI skids arrived in total. 3 boxes all arrived on different days.
Attachments
Added some weight to the front end. Dang it changed the way it drives on those stock coilovers.
Victory4x4 Blitz bumper:

Bent tab. I got it straightened out but had to paint it since some powder coating flaked off.

Rough Country 20" light bar and X20 winch that I picked up at 4WP on the other side of the Twin Cities.

Random picture during the day of installing.

Winch wired to the battery. Light bar wired to a switch similar to the rock slider lights.

Overall thoughts:
I continue to be confused by some manufacturer instructions:
With the winch, I'm not too keen on the setup as it is. With the hook end on the shackle. The hook is not removable, except if you go and cut it off or figure out how to splice the synthetic cable. I'd rather have something that sits flush on the fairlead and that road leads to a factor 55.
Victory4x4 Blitz bumper:
Bent tab. I got it straightened out but had to paint it since some powder coating flaked off.
Rough Country 20" light bar and X20 winch that I picked up at 4WP on the other side of the Twin Cities.
Random picture during the day of installing.
Winch wired to the battery. Light bar wired to a switch similar to the rock slider lights.
Overall thoughts:
I continue to be confused by some manufacturer instructions:
Hardware given: (2) 1/2" bolts, (2) 1/2" flange nuts, (2) 5/16" button head bolts, (2) 5/16" hex head bolts, (4) 5/16" flange nuts, and 3 brackets to set back the steering cooler.
The half inch setup is for the underside of the bumper, where the ends you remove. Per the instructions you take a bolt, washer and flange nut and install on each side. Washers not provided, luckily I had some on hand from the rock slider install.
For the steering cooler on the passenger side frame rail, you take a button head bolt, flange nut, and a bracket. In the front the instructions say to take a button head bolt, brackets, and flange nut for 2 places. So I have 1 button head bolt and 2 hex head bolts to use on those 2 brackets. Was slightly confused until I read farther into the instructions.
Under the bumper, you are to drill holes in the plastic part of the bumper (under the fog lights) to secure that plastic to the steel bumper. In that area of the instructions, once again I'm to use button head bolts. So I have 5 places to use button head bolts (3) on the steering cooler relocation brackets and (2) on the underside of the bumper. Yet I'm given (2) button head bolts and (2) hex head bolts.
With the winch, I'm not too keen on the setup as it is. With the hook end on the shackle. The hook is not removable, except if you go and cut it off or figure out how to splice the synthetic cable. I'd rather have something that sits flush on the fairlead and that road leads to a factor 55.
The resulting paralysis via analysis from thinking about sPOD or Switch-Pros or a number of cheaper versions led me to the following:
I knew I was going to wire in the rock slider lights. I knew I was going to fill the front bumper with a 20" light bar.
I ended up getting 2 Tacoma style switches for the panel on the lower left of the dash. 1 large and 1 small. The light bar I bought came with a harness that includes a relay. There were 3 wires running to the included generic switch. Figuring out that white is hot, black is ground and blue triggers the relay. I wired in that light bar with the following diagram, don't knock my lack of diagram software skills and let's be glad it isn't MS Paint.

Then for the rock sliders I had picked up a 4 pin relay. Taking the 2 leads from the lights (red/black) I ran the ground and wired in the positive side to the relay. Wiring the ground to the relay. Adding in the positive with an inline fuse from the battery. Finally running a single wire into the cab to trigger the relay. Inside wiring in the 4 wire switch was the same. Green sends power to the switch (source), Red1 (next to green) sends power to the relay to trigger on the lights, Red2 turns on the LED on the switch to illuminate with the tail lights, and finally ground. I fuse tapped the TAIL fuse under the dash for the dash lights (Red2) and POUTLET1 for the source. POUTLET1 is the 12v outlet in the center console. If the truck is on, that is powered. Just want I wanted for the lights.

Cost: the light bar had a harness with a relay. A 4 pin Bosch relay was about $12. Each Tacoma style switch was about $14. A couple boxes of male and female connectors in 22-16 and 16-14 gauge: maybe $12 total. 24 ft of red and black 16 gauge wire: $12 for the pair. Mastic tape for water resistant connections: $10
Maybe someone will find this helpful.
I knew I was going to wire in the rock slider lights. I knew I was going to fill the front bumper with a 20" light bar.
I ended up getting 2 Tacoma style switches for the panel on the lower left of the dash. 1 large and 1 small. The light bar I bought came with a harness that includes a relay. There were 3 wires running to the included generic switch. Figuring out that white is hot, black is ground and blue triggers the relay. I wired in that light bar with the following diagram, don't knock my lack of diagram software skills and let's be glad it isn't MS Paint.
Then for the rock sliders I had picked up a 4 pin relay. Taking the 2 leads from the lights (red/black) I ran the ground and wired in the positive side to the relay. Wiring the ground to the relay. Adding in the positive with an inline fuse from the battery. Finally running a single wire into the cab to trigger the relay. Inside wiring in the 4 wire switch was the same. Green sends power to the switch (source), Red1 (next to green) sends power to the relay to trigger on the lights, Red2 turns on the LED on the switch to illuminate with the tail lights, and finally ground. I fuse tapped the TAIL fuse under the dash for the dash lights (Red2) and POUTLET1 for the source. POUTLET1 is the 12v outlet in the center console. If the truck is on, that is powered. Just want I wanted for the lights.
Cost: the light bar had a harness with a relay. A 4 pin Bosch relay was about $12. Each Tacoma style switch was about $14. A couple boxes of male and female connectors in 22-16 and 16-14 gauge: maybe $12 total. 24 ft of red and black 16 gauge wire: $12 for the pair. Mastic tape for water resistant connections: $10
Maybe someone will find this helpful.
sycamore089
2️⃣ Bronze
Impressive build you've done there.
Thanks. It's a work in process, much like myself.Impressive build you've done there.
This weekend's accomplishment:


I need to get an alignment but also was told my daughter's brakes are squeaking on the Mazda.
I need to get an alignment but also was told my daughter's brakes are squeaking on the Mazda.
-
About us
Tacoma3G.com is a forum for 3rd Generation Toyota Tacoma enthusiasts (2016-2024 model-years).
- Quick navigation
- User menu