Purchased: 2/23/2018
Miles: 9,103 (rental)
Silver, short bed, double cab 4WD with Technology Package
6 speed AT, 6 Cyl.
Santa Barbara, California
Purchased my truck via text message while at pizza shop in Beverly Hills with some friends.
Why I bought a Truck / Tacoma
I've never owned a truck. My current daily driver is a 2012 Chevy Volt. Mostly because my office is 60 miles from my home. I've reached a point in my life that I can afford another vehicle. I've always liked Tacoma's. Wasn't interested in full size trucks, just too big. I started by looking for a used 2006 Tacoma. I watched endless hours of YouTube to learn different features, modifications, etc. My search evolved to 2014-2015 and then to 3rd gen. Silver was my first choice but I was unsure about the length of the bed. For awhile I wanted a 2WD, long bed, Sport. Then thought, if I'm buying a truck, get a truck. So I changed to TRD 4WD Off Road. Ultimately I changed to short bed because I thought it looked better. A must have was heated seats. I liked the idea of the power sliding window (2017 only).
Truck and Pizza
Once everything was narrowed down, I went to Autotrader, Ebay, Car Gurus, Cars.com, etc. to find my truck. No luck. Everytime I would find a truck, it sold out from underneath me before I could get there. I test drove a few as well. One had a 6" lift and Fuel wheels with M/T tires. All I could hear on the test drive were the tires. Pass. I looked down in San Diego, up to San Francisco, Utah, and Arizona. I was actually hard to find a truck that fit my criteria. Then on a Thursday, I found a 2017 used gray TRD OR in Santa Barbara. After talking to the dealership, they said it sold just a few hours earlier. Agh! Then while I'm at a pizza joint complaining to my friends my first world struggles, the dealer called me back. He took his last 2017 TRD OR out of the rental fleet and offered to sell it to me. After back and forth questions, verification of options, mileage, pictures all around, and haggling price while sharing with my friends we settled on a price. I told him I'd be there the next morning. I firmed up my financing with my bank while on a four hour Amtrak ride to Goleta. It was sitting out front super shiny waiting for me. Test drive was awesome! The dealer threw in a bed mat for me. Total time at the dealership was about 2 hours. Which put my first drive from Goleta to North Orange County on a Friday mid afternoon. Read: 5.5 hour drive home.
Will it fit?
With the truck home, I now have to figure where to park it. I have a two car garage with a killer workbench (amateur gun smith, plastic model building). The workbench is L-shaped so one of the two stalls is taken. I spent quite a effort designing my workbench from the foot rests to the view from my Snap On stool. My house sits at the end of a cul-de-sac on a straight street. Off in the distance I have few of the Orange County side of Chino Hills and Santa Ana Canyon. I prefer to keep my only stall empty. So the truck wasn't going in my garage (wouldn't fit anyway). My tiny driveway (Southern California living) allows for only 2 vehicles - my new truck and my wife's SUV. So the Chevy Volt goes in the street in front of the house.
Look at ME
Gotta say, first few weeks of driving the truck I feel like that teenage kid driving his dads cool truck. Thinking my truck (stock remind you) is hot shit and the coolest out there. I drive slow, wide turns as if I'm an 18 wheeler. Now I notice other Tacomas out there, modified, lifted. I start thinking, what can I do to mine? I start learning about tire sizes and backspace. What size lift will fit. Patches. Cabs and bumpers. So much to learn. So I started following several Facebook groups to learn more, opened up an Instagram account and followed several there as well. This helped a lot.
What's next
I figured the most expensive modification would be the lift, wheels and tires. There are many trucks out there that have given me ideas. Some were mild, some were over the top - to each his own. For me, I'm honestly not sure what I want exactly. I do know I want lift and cool wheels. For me, I like the overland trip idea more than crawling over boulders. Something about F'ing up my truck or having it fall backwards is not high on my list of things to accomplish.
That said, for tires I selected BF Goodrich KO2's (285/70R17). I know the brand (remember, I'm a new guy) and they looked good. I'm sure they'll hold up for the basic things I want to do. For wheels, that was MUCH harder. What I wanted was SCS Ray10's in gunmetal gray. But NOOO! They are not available, EVER! And I'm not the guy to stand in line at the Apple store for the newest release of iPhone WHICHEVER. So I'm not stalking SCS in the hopes I get what I want. I looked at Fuel, KD, Helo, etc. All very pretty. When I first looked at Method, I thought, eh, basic. That's after I thought Fuel's Lethal wheels looked pretty. I wanted gunmetal NV's but, NOPE. So I went with NV Matte Black Machine face. I honestly think they'll look awesome.
On to the lift. Holy crap. This stuff is expensive! Originally when I looked at lift kits, I saw $3,000, $4,000, $5,000. (insert throw up here...). I thought, "I'll get a 6-inch lift, yea!" Until I read that geometry matters. Scratch 6-inch. I heard about 4-inch lifts, until I saw the guy on YouTube hacking his frame apart. Yea...no. I looked at Bilstein, ToyTec, Rough Country, King, Icon, BDS, and ProComp. I had NO idea what I was doing. After watching 98,387 hours of YouTube, I was still lost. So I went to Tacoma World. After reading 98,387 posts, I was still lost. So I went to Yelp. Looking up "reputable" 4x4 shops, I thought, I'll go ask those guys. My first visit was to 4 Wheel Parts. Walking in, I knew I was going to get taken. Lots of shiny parts on the wall, and 10 people working there. I talked to two employees and left overwhelmed. I then visited a well known off-road shop in Orange. They had these trucks in their parking lot that looked like they could climb trees. I later learned they are called Trophy Trucks. SQUIRREL! I spent the next several weeks learning about BJ Baldwin, the Baja 1000, the Mint 400, and the world of Trophy Trucks. Sweet.... OK, back to being overwhelmed. I walked into the well known off-road shop and stood around with my d*** in my hand wondering when someone was going to help me. Oh, yea, forgot to tell you - I don't have $300,000 to drop on a trophy truck, so I'm 'small fry'. Left that place.
I tried a few others places. The real difference was the person at the shop. Other differences were labor costs to install, and the price of the alignment. So in the end, my evaluation process was 1) am I confident the shop is giving it to my straight and will they do a good job, and 2) overall price.
At this point (April 27, 2018), I'll hold off on further details until the lift is installed. Should be done in a week.
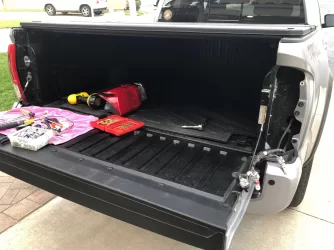
Here are pictures of what my truck looked like the day I picked in up in Santa Barbara.
Last edited:

