• Welcome to Tacoma3G.com, a free resource for 2016-2023 Toyota Tacoma owners!

    Tacoma3G is a beginner-friendly 3rd Generation Toyota Tacoma (2016-2023 model-years) forum. We are a community of people who are focused on good information and good vibes.

Tabroma | TRD OR MGM DCSB Build

whoistyler

3️⃣ Silver
Tacoma3G O.G.
Hey dudes,

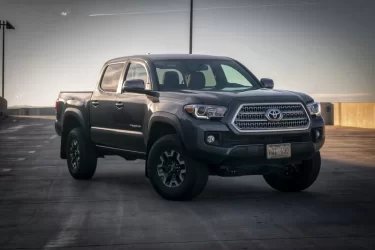
This truck is my daily driver, so it won't be too gnarly of a build, but more so a practical rig capable of taking me just about anywhere I want to go in my home state of beautiful Colorado and the annual Moab trip.

That being said, here is my truck, what I’ve done so far, and what I plan to do.
 
Last edited:
Where she sits as of now:


The day after I picked her up from the dealership:
242E8AA3-CEE7-4224-BB7E-E4688B0C5CBE.webp


Favorite photos:
D6B20024-AF29-4F58-96C3-C3EDC97D8FB3.webp

8FAFEF1A-B452-4DDE-8E58-8F4680CBE46C.webp

D7559F45-369C-499F-831F-386766F44017.webp
5BFD8EB5-D096-45A1-907A-F1E6264C6D05.webp


Latest mod:
5AA69E4F-455C-4082-B311-3A0150776028.webp
 

Attachments

  • 79F25ABF-2235-4178-8C02-07B9B21372DC.webp
    79F25ABF-2235-4178-8C02-07B9B21372DC.webp
    33.3 KB · Views: 299
Last edited:
Completed Mods:
-K&N High Flow Air Filter
-WeatherTech Floor Liners
-LCA Hole Plugs
-OxGord Smoke Tinted License Plate Covers
-GoPro Hardwire
-Covercraft Sun Sheild
-Badge Inlay Decal Set
-PlastiColor Mud Guards
-Tailgate Reflective Decal Inserts
-MBRP T409 Stainless Steel 3" Turn Down Exhaust
-CBoy808 Bedside Decals
-OEM Tonneau Cover
-Toyota Front Grille Badge TRD Logo
-CURT Tow Strap Mount
-ARB 2-3/8" x 30' Recovery Strap - 17500 lbs
-Redline Tuning Hood QuickLIFT PLUS System
-Vehicle OCD™ Center Console Tray
-Vehicle OCD™ Center Console Organizer
-Avid Off-Road Sliders
-Pro Comp Series 7032-6883, 16x8
-BFGoodrich KO2 265/75R16
-Painted Rear Bumper Caps (Black Truck Bed Liner)
-TRD PRO Grille

Ordered / Pending Installation:
-AVS In-Channel Vent-visors (waiting until I get tint)

Future Mod List:
-Exhaust Reroute (around transfer case)
-Genuine Subaru Tweeter Kit
-SolarCeramic Window Tint
-Southern Style Offroad Slimline Hybrid Bumper w/ light bar
-Mictuning Truck Bed LED Lighting
-Engine Bay Lighting
-Old Man Emu 2" Medium Lift Kit
-Blue Ridge Overland Gear Tool Bag
-Genuine Toyota Bed Mat
-RCI Rear Bumper
-Blue Sea Systems ST Blade ATO/ATC Fuse Blocks
-Cali Rised 32” Slim Bumper LED Light Bar
 
Last edited by a moderator:
The day before my truck arrived at the dealership, I went ahead and ordered some basics; a K&N High Flow Air Filter and WeatherTech floor liners.

The stock air filter would probable do just fine driving around town, but i do t plan on just driving this rig in town and I have put a K&N air filter on every car I have ever owned, so why stop now. Honestly, I have never noticed a change in performance/mpg in the past and since I swapped this out right away on this truck, I wouldn't be able to tell you if there was any.

Comparison:
1FA219B4-FFC5-4522-9D90-BE5BC99B2086.webp


Installed:
E2025B4E-F1C2-47D6-8DDE-E0A8F46ED00F.webp
 
Last edited:
I was super excited about getting the WeatherTech Floor Liners, mostly because I just bought a $40k truck and the last thing I wanted to do was fark up the carpet. The OEM all-weather mats have decent protection, but the WeatherTechs provide superior coverage and most of all, peace of mind.

They have since saved the carpet many times. After getting caught in a rain storm in Telluride, I had a pair of soaking wet camping chairs slowly drip dry onto the floor. Water pooled up and I just simply pulled them out and drained the mats. Going snowboarding, the dirt lots always turn into a mud pit at one time or another throughout the season. The list god in and on.

Before:
DD2AAA29-AD0E-4D47-A2F0-BF016CDD9372.webp


After:
E3C1AB6F-0E91-4862-9A27-811180AF6B73.webp
 
Last edited:
After enjoying making up excuses to drive my new truck around, I did start to notice this howl/whistle sound. So what every car enthusiast would do, I took to the forums. After some searching and figuring out the correct verbiage, I came across another user's post on a forum that will remain unnamed that fixed the problem.
I hopped in the truck and headed straight to Lowes to picked me up the two sizes of nylon plugs required to fill the holes in the LCAs (lower control arms). 9/16" & 11/16"

In a matter of 2.5 minutes, I walked out with a bag of plugs, headed back to the truck, crawled under and installed them on each of the LCAs. Easiest fix to a minor nuisance I have ever come across.

Holes plugged, FTW:
02C2D97A-7CBC-4EBC-9359-B851F0F0FCD2.webp
 
Last edited:
Next up, I wanted to take advantage of the GoPro mount and be able to record extended time lapse videos. The only problem was that my GoPro's battery would die off relatively quickly depending on the quality of video. With the help of another member oba forum that will remain unnamed (lol), I was able to come up with a GoPro hard wire solution.

I followed his setup exactly, for the most part, except instead of using the supplied 12V accessory car plug, I used a Hardwire Mini USB Right Angle Connector for GoPro kit in addition to the HitCar Add-A-Circuit. This was especially nice because of three reasons: 1) the output voltage(5V) is exactly the voltage required by the GoPro, 2) the cable length is 3.5m, which is more than enough to route wherever desired, and 3) if for any reason the GoPro is still pulling energy when the engine is off, this cable is equipt with a low voltage protection system that will cut the power if the unit measures a voltage supply lower than 11.6V. Now that last one is nice to have, however, it is not entirely necessary and is a bonous safety factor for my setup. I wired the cable to the fuse box under the dash and into the fuse that powers the windshield wipers, which is only powered when the car is fully on.

To route the cable, I unmounted the Crawl Control unit, the driver and passenger sun visors, and the front of the headliner, routed the cable above the headliner and down the driver side a-pillar. The only visible part of the cable now is an ~3in section at the GoPro mount on the windshield.

From inside:
5F6A6412-24ED-439E-826C-CBFDFB99B6B9.webp


From the front:
4ED1A7DA-BF3E-410E-9142-D3A34C1DEAF4.webp
 
Last edited:
After some researching and a referral from a friend, I finally decided on a sunshade. The Covercraft UVS100 Sun Shield is a top notch sunshade, if I do say so myself. It's not like the ones made of foil that eventually start falling apart and leave little bits of dust on your dash, seats and floor. This one is thick and fits the windscreen perfectly(about a quarter inch gab on left and right). Couldn't be happier.

Pretty much a perfect fit:
F28CA6B8-ADF2-4488-8E37-FC81807D01EF.webp
 
Last edited:
After getting my badge decals in place, I thought I would quick slap my PlastiColor Mountain Peak Mud Guards (11x19") on.. I was wrong about quick. For some reason it took me a while to figure out exactly how I wanted them to be positioned.

I started at the back passenger wheel and once I figured out the position, I drilled out three pilot holes(3/16") in the guard that coincided with the three existing screws on the inside of the wheel well and installed. Unfortunately, it didn't look right; the guard was sticking out at a funky angle and I ended up drilling holes two more times. The third times a charm I guess, nailed it.

After I got the first mud guard installed and looking good, the other three went on relatively quickly. All said and done, it probably took me about 45 minutes to complete. Some people may think that my guards are offset out too much, but I did this on purpose in preparation for when I get new rims and tires.

From the back:
1C1B70B0-5450-4F57-83E7-0739666E2CE3.webp


From the right:
5DA1A14B-7A3E-4133-AFC3-8CB95185C7C2.webp


From the front:
3F10939B-28D1-4067-8ADF-8295EC4B272E.webp
 
Last edited:
I was finally able to inlay the Tailgate Reflective Decal Inserts by rrentrop. Super easy to inlay, as long as you use a liberal amount of soupy water and have a good eye.

Turned out pretty well. I like how subtle they are until light reflects.

Without/With/Reflecting:
592E64ED-920A-4FF5-AFAC-3C986D7E09AD.webp
 
Last edited:
The sound of the Tacoma is alright, but I was looking for something a little throatier. I browsed a while online looking for a system that appealed to me and ended up landing on the MBRP T409 Stainless Steel 3" Turn Down Exhaust System. What I particularly like about this system is the turn down portion and how it literally turns down just before the rear axle; I don't need a flashy pipe sticking out the side of my truck. This did, however, have an effect on the cabin noise; check out the video below.

Installation was very simple; MBRP gives you directions with everything that you need to know. A bit of WD-40 accompanied by some elbow grease and the stock exhaust was out. Now since I have a short bed, I need to trim the portion between the y-junction and the muffler. Again, the directions tell you everything you need to know and I ended up cutting off the recommended 13.25" after loosely installing everything to make sure that measurement was correct (measure twice; cut once). I reassembled by tightening all the provided fittings and was ready to start her up, but first I started my dads '16 Tacoma as a control since he was there watching me install. After listening to his and revving the engine a bit I stated up mine and was very pleased. The difference was amazing. There is a bit of a drone when driving at cruising speeds and when you give it the beans it is quite loud, but that's what I wanted right?

Whole system:
D70A7A07-C190-4388-820A-4D66315F4C4A.webp


Turn Down portion:
C68A2076-9775-45B2-8597-B11EDCB57A22.webp


Comparison Video:
 
Last edited:
I finally had some time to get my bedside decals on. I searched through the many different versions of decals in CBoy808's thread and decided on the one that I thought was really slick. Subtle, yet very cool (at least in my opinion). I started out by quickly cleaning the surface of the old decal and the area around it before taping off the bottom to have a reference horizontal line. Next I took a hairdryer and focused on the end that I was going to start peeling. After it was nice and warm I just took my fingernail and started peeling it up. As more and more of the decal was lifting, I followed with the hairdryer. Eventually, the whole decal was off and the only thing left was to clean the remaining bit of adhesive. I just used rubbing alcohol and my finger to rub the adhesive off. Next, I followed the same directions supplied with rrentrop's tailgate letter inlay set. And just like that, done.

Removal:
13E2DB5C-1274-4ACF-B8ED-DEF7B5AE45BC.webp


Finished:
79B83FD6-6C23-443E-AE60-C6B397304744.webp
 
Last edited:
Installed my QuickLIFT PLUS System by Redline Tuning. Very easy install which only took about an hour or so. A little nerve racking when drilling into a new truck, but with focus it proved to be very simple. Other than the self lifting aspect of the gas springs, I really like how the lower bracket sits under the fender trim piece. It's the small details in products that I really appreciate.

751F11C4-3BD1-4000-83E8-286372308497.webp

22164982-1D69-4421-AC2E-39ECB8538CC5.webp

BBB6A0BD-1478-4378-85C7-F749A8501E1D.webp
 
Last edited:
I finally decided to get some bolt-on Avid Offroad Rock Sliders without the kick-out after a Moab trip last year. Got a little dent on the passengers runner and was like nope! Gotta get some protection.
 
Last edited:
Well, I decided it was time to do away with the chrome bumper caps. I, personally, am not a fan of chrome on an off-road vehicle, albeit there are certain scenarios where it looks good. Anyways, I first removed the caps, which was a real pain in the ass to do. Then I did a quick wash and sand with a scotch bright pad. Just enough to allow the new paint something to adhere to.

2568E54D-67A3-4408-B99D-F33F22D2F7D2.webp

(Left) not sanded, (right) sanded.

After both were sanded up, I applied several coats of Dupli-Color Bed Armor black. I used this stuff on my rock sliders and really like out it turned out and holds up.

Before:
6ABCBB5F-59B2-43BE-9053-C4FEFC5626BE.webp

After:
3613DDBA-7FF5-4BD2-8ABD-F92B00AAAF9D.webp

823BC5C1-1A2E-4A25-BC6E-3911243B7BED.webp

5A1F7C7A-D389-49E1-86C2-17372C9BD44F.webp
 
Last edited:
Finally got rid of the cheese grader braces of a grille. Picked up a TRD Pro grille up from amazon. Yeah, yeah, yeah, it’s not OEM, it’s faux, but I just couldn’t bare to spend $400 on a grille. $159 for a fake one and if it brakes somehow, I can go buy a second one and still pay less than I would have for one OEM grille.

A064F4E8-C564-497C-AB1C-09B616803BE2.webp

(will update with better pics when I get the chance)
 
Last edited:
@whoistyler Great build and write up. Love everything you've done with the truck. Almost everything I want to do but haven't made the time. Schedule is tight with an active family. Look forward to the updated post. Summers coming so I will be switching my tint to ceramics as well.
 
@whoistyler Great build and write up. Love everything you've done with the truck. Almost everything I want to do but haven't made the time. Schedule is tight with an active family. Look forward to the updated post. Summers coming so I will be switching my tint to ceramics as well.
Thanks brotha, appreciate it. I’ll keep an eye out for some pics of your tint. Interested in what % you decide to go with.
 
Thanks brotha, appreciate it. I’ll keep an eye out for some pics of your tint. Interested in what % you decide to go with.

I may decide to just do 15% ceramic all the way around. Right now I’ve got 15% driver/passenger and 5% the rest of truck plus windshield strip. It’s dark. I’m getting older so would like to be safer especially offroad where streetlights are non existent. Lol
C13A4C9B-FC46-4952-9007-44EF00FE50B5.webp
 
Completed Mods:
-K&N High Flow Air Filter
-WeatherTech Floor Liners
-LCA Hole Plugs
-OxGord Smoke Tinted License Plate Covers
-GoPro Hardwire
-Covercraft Sun Sheild
-Badge Inlay Decal Set
-PlastiColor Mud Guards
-Tailgate Reflective Decal Inserts
-MBRP T409 Stainless Steel 3" Turn Down Exhaust
-CBoy808 Bedside Decals
-OEM Tonneau Cover
-Toyota Front Grille Badge TRD Logo
-CURT Tow Strap Mount
-ARB 2-3/8" x 30' Recovery Strap - 17500 lbs
-Redline Tuning Hood QuickLIFT PLUS System
-Vehicle OCD™ Center Console Tray
-Vehicle OCD™ Center Console Organizer
-Avid Off-Road Sliders
-Pro Comp Series 7032-6883, 16x8
-BFGoodrich KO2 265/75R16
-Painted Rear Bumper Caps (Black Truck Bed Liner)
-TRD PRO Grille

Ordered / Pending Installation:
-AVS In-Channel Vent-visors (waiting until I get tint)

Future Mod List:
-Exhaust Reroute (around transfer case)
-Genuine Subaru Tweeter Kit
-SolarCeramic Window Tint
-Southern Style Offroad Slimline Hybrid Bumper w/ light bar
-Mictuning Truck Bed LED Lighting
-Engine Bay Lighting
-Old Man Emu 2" Medium Lift Kit
-Blue Ridge Overland Gear Tool Bag
-Genuine Toyota Bed Mat
-RCI Rear Bumper
-Blue Sea Systems ST Blade ATO/ATC Fuse Blocks
-Cali Rised 32” Slim Bumper LED Light Bar

How did you like the BFGoodrich KO2 265/75R16 on the stock wheels? any issues? what about when you upgraded to the Pro Comps? (I'm assuming both setups were ran on a stock suspension)
 
Last edited by a moderator:
How did you like the BFGoodrich KO2 265/75R16 on the stock wheels? any issues? what about when you upgraded to the Pro Comps? (I'm assuming both setups were ran on a stock suspension)
I never actually ran the KO2s on the stock rims. And yes, I’m still running stock suspension with no issues. I believe the tires are only 1 inch bigger than stock tires
 
Back
Top