-
Welcome to Tacoma3G.com, a free resource for 2016-2023 Toyota Tacoma owners!
Tacoma3G is a beginner-friendly 3rd Generation Toyota Tacoma Forum (2016-2023 model-years). We are a community of people who are focused on good information and good vibes.
You are using an out of date browser. It may not display this or other websites correctly.
You should upgrade or use an alternative browser.
You should upgrade or use an alternative browser.
Switch pro install
- Thread starter Taco_primo
- Start date
- Replies 41
- Views 24K
- overland gear
Sweet! Good to have installs coming in. I’ll link it in the navigation bar when it’s done.
Sounds good.
Ok, I have possession of the switch pro. Hope to get it installed this weekend if I don’t have to work.


Ok, well here it goes. It’s not complete......I am going to do some under hood clean up soon, this is it for now though.
First off, due to me having crawl control, the SDHQ Mount needed a bit of modification. The highlighted area needed to be removed


I used a file to do some metal cleanup after.
Here you can see the right clearance after trimming.

Here it is mounted.

Next I prepped the dash
start by removing the kick panel on the left by removing this plastic nut with your fingers, then pop off the first door sill and the kick panel.

That will expose the 3 screws you will need to remove 10mm socket works great.


gently pop this lower panel out after removing the 3 screws.
Now this part will only apply if you are doing the SDHQ dash mount.

Screw in the 4 threaded studs supplied with the Switch-Pros mounting hardware and then put on the small plastic plate.

Next you will install the larger clear backing plate and install the 4 provided screws

Ok so next I routed the blue ignition wire into the cab through the firewall in the harness grommet.
You’ll have to cut a slit in the grommet.
 This is on the drivers side next to the brake master.
I just got a metal coat hangar and straightened it out. From inside the cab, push the hangar through the hole you created and tape the wire to the end, after it’s nice and taped on, you will pull the hangar back into the cab and the wire should follow. You will have to do this with the switch harness as well, that’s how controller will hook up. I also took some of the braided look and heat shrink and covered the wire for protection.

Now for an ignition source, I just got out my multimeter and started poking on plugs of the same gauge wire until I found one.
Under the kick panel on the left you will see this plug and there is a lime green wire, I just cut back some of the shielding and tapped into this wire.

Next I had to hook up the white wire to a light source, I chose to tap into my head lights, this way when my headlights are on the panel will dim.
It’s the red wire on your low beam plug.

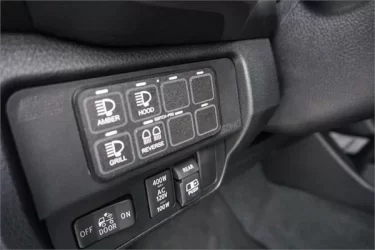
Now i hooked everything up and made sure I got power to the panel and it was on and functional.

Now that you have everything installed and functional, it’s time to wire your accessories. I am running a rough country 30” light bar, Baja designs squadron pro fogs for ditch lights and a ARB dual compressor.

Now it’s actually really easy. For my light bar, I cut out the relay harness and got it down to just the 2 wires. Switch 1 is a brown wire, you connect the brown to the power wire from the light bar(i soldered it) you can use butt connectors if you want. You will have to crimp on a eyelet connector to the ground wire and then just ground to a body ground.
Feel free to ask questions and I’ll do my best to answer.
Oh and this is the mess that I still have to clean up

Just waiting on a busbar and distribution block to clean it all up.
First off, due to me having crawl control, the SDHQ Mount needed a bit of modification. The highlighted area needed to be removed
I used a file to do some metal cleanup after.
Here you can see the right clearance after trimming.
Here it is mounted.
Next I prepped the dash
start by removing the kick panel on the left by removing this plastic nut with your fingers, then pop off the first door sill and the kick panel.
That will expose the 3 screws you will need to remove 10mm socket works great.
gently pop this lower panel out after removing the 3 screws.
Now this part will only apply if you are doing the SDHQ dash mount.
Screw in the 4 threaded studs supplied with the Switch-Pros mounting hardware and then put on the small plastic plate.
Next you will install the larger clear backing plate and install the 4 provided screws
Ok so next I routed the blue ignition wire into the cab through the firewall in the harness grommet.
You’ll have to cut a slit in the grommet.
I just got a metal coat hangar and straightened it out. From inside the cab, push the hangar through the hole you created and tape the wire to the end, after it’s nice and taped on, you will pull the hangar back into the cab and the wire should follow. You will have to do this with the switch harness as well, that’s how controller will hook up. I also took some of the braided look and heat shrink and covered the wire for protection.
Now for an ignition source, I just got out my multimeter and started poking on plugs of the same gauge wire until I found one.
Under the kick panel on the left you will see this plug and there is a lime green wire, I just cut back some of the shielding and tapped into this wire.
Next I had to hook up the white wire to a light source, I chose to tap into my head lights, this way when my headlights are on the panel will dim.
It’s the red wire on your low beam plug.
Now i hooked everything up and made sure I got power to the panel and it was on and functional.
Now that you have everything installed and functional, it’s time to wire your accessories. I am running a rough country 30” light bar, Baja designs squadron pro fogs for ditch lights and a ARB dual compressor.
Now it’s actually really easy. For my light bar, I cut out the relay harness and got it down to just the 2 wires. Switch 1 is a brown wire, you connect the brown to the power wire from the light bar(i soldered it) you can use butt connectors if you want. You will have to crimp on a eyelet connector to the ground wire and then just ground to a body ground.
Feel free to ask questions and I’ll do my best to answer.
Oh and this is the mess that I still have to clean up
Just waiting on a busbar and distribution block to clean it all up.
Last edited:
Great write-up!! Gonna add it to the tutorial bar at the top of the site.
Thank you. Ok sounds good.
Damn Good write up. I didn’t think of trimming the mount when I installed mine because of the harness on the fender. Good idea. But I wired mine differently. I hooked the blue ignition wire to the ac fuse, and the white wire to the high beam fuse. That because I’m using the white wire as a trigger for the light bar to turn on with the light bar and the pink trigger wire for the reverse pods on the back.
Damn Good write up. I didn’t think of trimming the mount when I installed mine because of the harness on the fender. Good idea. But I wired mine differently. I hooked the blue ignition wire to the ac fuse, and the white wire to the high beam fuse. That because I’m using the white wire as a trigger for the light bar to turn on with the light bar and the pink trigger wire for the reverse pods on the back.
Yeah I had already had that under dash wire tapped for the ARB compressor, so I just went ahead and used it again lol
Ok so I hate sloppy installs......so I can’t leave well enough alone. Started making my template and just waiting on my sheet of aluminum. Let the cutting and bending commence.....hopefully soon.

Thank you! I'll be using this in the near future ??
Step 2 complete. Now to do some filing and sanding and it will be almost ready. Gotta find some fasteners and then the install will commence. Made out of 5052 H32 aluminum 1/8” thick.

Step 2 complete. Now to do some filing and sanding and it will be almost ready. Gotta find some fasteners and then the install will commence. Made out of 5052 H32 aluminum 1/8” thick.
Looking good
")
Hodakaguy
Ok, I have possession of the switch pro. Hope to get it installed this weekend if I don’t have to work.
That sdhq mount is over 100$ for that small piece of plastic. I have a hard time swallowing that price point.
That sdhq mount is over 100$ for that small piece of plastic. I have a hard time swallowing that price point.
Yeah, it’s not cheap, there are other ways to mount it as well. I just went for the package deal.
The install is finally complete
From this

To this


The bracket isn’t perfect, but for bending in a vise and only having a jig saw and files.....not bad I think.
From this
To this
The bracket isn’t perfect, but for bending in a vise and only having a jig saw and files.....not bad I think.
This is a silly question it with this setup you no longer need relays and fuses?Ok, well here it goes. It’s not complete......I am going to do some under hood clean up soon, this is it for now though.
First off, due to me having crawl control, the SDHQ Mount needed a bit of modification. The highlighted area needed to be removed
I used a file to do some metal cleanup after.
Here you can see the right clearance after trimming.
Here it is mounted.
Next I prepped the dash
start by removing the kick panel on the left by removing this plastic nut with your fingers, then pop off the first door sill and the kick panel.
That will expose the 3 screws you will need to remove 10mm socket works great.
gently pop this lower panel out after removing the 3 screws.
Now this part will only apply if you are doing the SDHQ dash mount.
Screw in the 4 threaded studs supplied with the Switch-Pros mounting hardware and then put on the small plastic plate.
Next you will install the larger clear backing plate and install the 4 provided screws
Ok so next I routed the blue ignition wire into the cab through the firewall in the harness grommet.
You’ll have to cut a slit in the grommet.
This is on the drivers side next to the brake master.
I just got a metal coat hangar and straightened it out. From inside the cab, push the hangar through the hole you created and tape the wire to the end, after it’s nice and taped on, you will pull the hangar back into the cab and the wire should follow. You will have to do this with the switch harness as well, that’s how controller will hook up. I also took some of the braided look and heat shrink and covered the wire for protection.
Now for an ignition source, I just got out my multimeter and started poking on plugs of the same gauge wire until I found one.
Under the kick panel on the left you will see this plug and there is a lime green wire, I just cut back some of the shielding and tapped into this wire.
Next I had to hook up the white wire to a light source, I chose to tap into my head lights, this way when my headlights are on the panel will dim.
It’s the red wire on your low beam plug.
Now i hooked everything up and made sure I got power to the panel and it was on and functional.
Now that you have everything installed and functional, it’s time to wire your accessories. I am running a rough country 30” light bar, Baja designs squadron pro fogs for ditch lights and a ARB dual compressor.
Now it’s actually really easy. For my light bar, I cut out the relay harness and got it down to just the 2 wires. Switch 1 is a brown wire, you connect the brown to the power wire from the light bar(i soldered it) you can use butt connectors if you want. You will have to crimp on a eyelet connector to the ground wire and then just ground to a body ground.
Feel free to ask questions and I’ll do my best to answer.
Oh and this is the mess that I still have to clean up
Just waiting on a busbar and distribution block to clean it all up.
This is a silly question it with this setup you no longer need relays and fuses?
Correct
This is a silly question it with this setup you no longer need relays and fuses?
Like @solscooter, yes you are correct.
The Switch-Pros is a solid state fused processor. No need for any relays unless you go over the max 35amps on the heavy load switches, then you would use a relay to drop amps to 35 or below.
Got my power tray purchased. There on back order for several weeks though. Plan is to install it like solscooter with bus bar etc so its nice and clean. Will post final pics up. Those trays are frickin expensive. 100+$$
Yeah, they are expensive! That’s why I made my own lol. Just used a jigsaw, a vise and some files.
$13 is all it cost me to make it. Amazon just ordered 1/8” aluminum in a 12x12 sheet.
Not a sexy as a power tray, but she works.
D
Deleted member 643
possibly a ghost :(
Great write up. I need to have documented my past few installs a little better but I've done 2 in the past few weeks, each getting better than the last and am gonna do a refresh for another buddy with some ideas I have. I'll be sure to document the process but heres a finished pic of the latest one. I've been making custom harnesses for all accessories, using TechFlex, weatherproof heat shrink and weatherpack connectors. Makes for a clean factory looking install

Looks good! Well done. It’s not always easy doing a write up. I had planned on doing a detailed write up on the install of my CBI hidden winch bumper......then I was on a time crunch and I didn’t take any pictures.Great write up. I need to have documented my past few installs a little better but I've done 2 in the past few weeks, each getting better than the last and am gonna do a refresh for another buddy with some ideas I have. I'll be sure to document the process but heres a finished pic of the latest one. I've been making custom harnesses for all accessories, using TechFlex, weatherproof heat shrink and weatherpack connectors. Makes for a clean factory looking install
D
Deleted member 643
possibly a ghost :(
I hear that. This particular install was part of a 2 day thrash to do a pretty in depth build for a buddy and while we had fun and sorta took our time, we didnt take a ton of pics. But over the course of about 10 working hours, we did front and rear suspension (fox 2.5's, camburg uppers and deaver u402 leafs) switchpro 9100 on sdhq mounts, ditch and chase lights on sdhq mounts (baha designs squadron pro and sport), 30" OnyX6 hi-power on sdhq behind grill mount, sdhq sliders, prinsu rack and an alignmentLooks good! Well done. It’s not always easy doing a write up. I had planned on doing a detailed write up on the install of my CBI hidden winch bumper......then I was on a time crunch and I didn’t take any pictures.
I hear that. This particular install was part of a 2 day thrash to do a pretty in depth build for a buddy and while we had fun and sorta took our time, we didnt take a ton of pics. But over the course of about 10 working hours, we did front and rear suspension (fox 2.5's, camburg uppers and deaver u402 leafs) switchpro 9100 on sdhq mounts, ditch and chase lights on sdhq mounts (baha designs squadron pro and sport), 30" OnyX6 hi-power on sdhq behind grill mount, sdhq sliders, prinsu rack and an alignment
MONEY!!!!! That’s awesome

D
Deleted member 643
possibly a ghost :(
Lol. Many of the parts were swapped from a previous truck but definitely some money spent! These trucks can certainly be that way, ask me how I know!MONEY!!!!! That’s awesome
Lol. Many of the parts were swapped from a previous truck but definitely some money spent! These trucks can certainly be that way, ask me how I know!
Oh yeah, I know. I have an issue with not buying cheap stuff
 I normally go by the motto by once, cry once. I wish I would have gone with the BP-51’s but live and learn. Guess I just have to spend more.