StuckBuck
3️⃣ Silver
Hey all! I'm sure some of you have seen my build thread over on tw. A member over there (catfish21) recommended I check this forum out so here I am. I used to be really active on cherokee forum but a couple weeks ago I bought my first taco so I'm switching gears. I guess I decided that someday I wont wanna be single anymore so I better get out of the jeep game while I can! I've noticed TW doesn't have as much interaction between members as CF did so I'm hoping over here will be a little different.
So far I havent done anything crazy to the truck. Before I did any mods I wanted to feel what the truck could do stock so I took it out right away and got the first paint scratches over with.


Hit 100 miles in 4lo. Like it's supposed to be.

First thing I did was auxbeam f16s for hi beams lo beams and fogs. Now I'm that guy with the unnecessarily bright lights that blinds you when you meat him on a hill.


Then I ordered a bunch of goodies.
-cali raised hidden bumper light bar bracket and their light bar in the spot beam.
-caliraised ditch light brackets
-baja designs squad pros for ditch lights
-rigid ignites for reverse lights
-cali raised oem switches and cubby switch panel
-caliraised relay bracket
-ome bp51 kit and SPC UCAs from headstrong offroad


Started with the bumper light bar:


Then the relay bracket:

Then the ditch lights:

That was all I could get done that day.

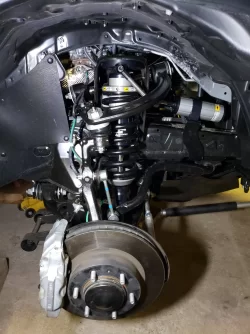
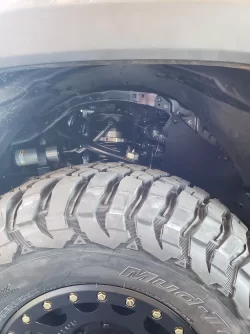
The next weekend I started on my suspension. Started with the rears:


Out with the old, in with the new


Everything went smooth except for the shocks. Man they were a pain to get lined up to were I could get the all the bolts in. Do not attempt to install this kit without multiple prybars and a nice dead blow hammer lol
And that's where I'm at. It's now Sunday night so I have to get outta toyota land and go back to my plumber life. Hopefully tomorrow evening I will have time to tear into the front end and start working on the coils. I also need to go order wheels and tires so I guess I'll have to wait and see how work goes to decide what I'm gunna do next. I'll keep you updated.
So far I havent done anything crazy to the truck. Before I did any mods I wanted to feel what the truck could do stock so I took it out right away and got the first paint scratches over with.
Hit 100 miles in 4lo. Like it's supposed to be.
First thing I did was auxbeam f16s for hi beams lo beams and fogs. Now I'm that guy with the unnecessarily bright lights that blinds you when you meat him on a hill.
Then I ordered a bunch of goodies.
-cali raised hidden bumper light bar bracket and their light bar in the spot beam.
-caliraised ditch light brackets
-baja designs squad pros for ditch lights
-rigid ignites for reverse lights
-cali raised oem switches and cubby switch panel
-caliraised relay bracket
-ome bp51 kit and SPC UCAs from headstrong offroad
Started with the bumper light bar:
Then the relay bracket:
Then the ditch lights:
That was all I could get done that day.
The next weekend I started on my suspension. Started with the rears:
Out with the old, in with the new
Everything went smooth except for the shocks. Man they were a pain to get lined up to were I could get the all the bolts in. Do not attempt to install this kit without multiple prybars and a nice dead blow hammer lol
And that's where I'm at. It's now Sunday night so I have to get outta toyota land and go back to my plumber life. Hopefully tomorrow evening I will have time to tear into the front end and start working on the coils. I also need to go order wheels and tires so I guess I'll have to wait and see how work goes to decide what I'm gunna do next. I'll keep you updated.

")