Hopefully I've put this in the right category. Chose General Discussion since it's not really Tacoma specific. @Tyler please advise or correct me if I need to move this thread elsewhere within the forum.
This thread is going to cover my portable air conditioner project that I undertook and completed last summer. I have a bed shell and keep my dogs in the bed within the shell. They usually poke their heads out the windows and get fresh circulating air that way, although it may not always be cool air because of our hot El Paso weather, and every now and then it's hot and sandy and stormy all at once. It literally rains mud when we get our famous El Paso sandstorms at the same time as some rain. So during times like that it's not always ideal to leave those back windows open for them. Furthermore, if I'm going along the highway and there's a super strong crosswind, all that air just gets collected in the bed within the shell and creates a ton of drag, and perhaps I'm being too dog-conscious here but I could swear it's kind of brutal on one of my dog's ears. He's got these massive radars for ears and they're pretty sensitive. So, I researched the principles behind turning a cooler/ice chest into a portable air conditioner to help keep my dogs cool and comfortable and have my solution outlined below.
First off, I experimented with an old beat up cooler that I already had. I basically wanted to test the basic design and ensure I was on the right track. This involved cutting a hole for an old desk fan and putting a plastic angled vent cover over another hole, dumping ice in there, and verifying that I had air flow. Photos below; please bear with me, these photos appear small because I just pulled them from instagram since I no longer have the originals, so they're chopped sorta. I will include links to the items I purchased online, although some of the stuff doesn't really require a link or I purchased at local stores.
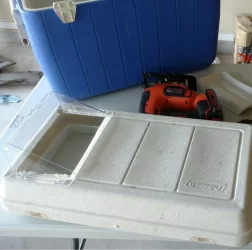
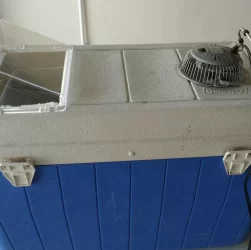
Next step was choosing an appropriately sized cooler for my needs. You don't want to fill the cooler with too little ice for obvious reasons, but you also don't want to overfill it. This is because with too much mass in the way of the air, turbulence is created and the air can't efficiently move through the open space within the cooler and then out of the vent. This results in very little air flow as well as the air that does escape is not cooled. The cool circulating air within the cooler of ice before it exits can actually help you delay the melting time a bit, enough so that with my design, I filled it up with ice, drove with my dogs 2 hours to the lake, spent a couple hours there, and drove those 2 hours back and the ice was maybe half melted. That watery slush in there was actually cool enough to continue working effectively. So I'm getting ahead of myself here, but aim to have your cooler filled with ice up to perhaps two-thirds full. Eyeball it, test it out for yourself (that's what I did with the final design: sat in the bed/shell with a buddy for about 20 mins while running the cooler), and get a feel for how much open space to leave to avoid too much air current turbulence.
So, moving on. I set to work. I ordered high output usb powered computer fans and found a pencil case at Office Depot, and put in that case an extra portable battery pack that I had lying around. It's got a 22k mAh battery and based off my calculations using the info about the fans, should be capable of powering the fans for anywhere between 15-20 hours depending on ambient heat and age of the battery itself, much longer than most people would need to rely on.
Once I had the items I needed, I set to work on measuring my future cuts and outlining my intended design.
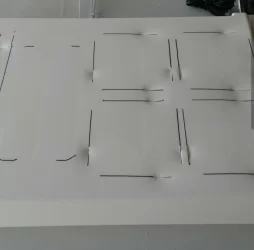
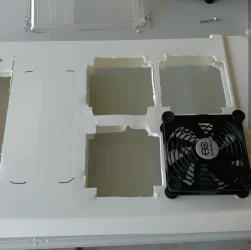
I used a powered jigsaw as well as, believe it or not, my wife's Kabar. That damn blade comes in handy for seriously everything I do it seems. Whenever I don't have the right tool for cutting or what I do have can't quite reach, etc, that damn knife is what always comes in clutch. Anyway, I outlined my design and set to work, as you see above. I traced the sides of a fan for those cutouts and left room for the screws on the corners to mount them.
This part is kind of tricky, and it's an important step. Yes, yes, it's important to measure properly and all that stuff, but remember that we're dealing with air currents here. If you place your fans too far from the side where you're drawing in outside air to be cooled, it will want to move in that direction because it's an available path for it. You want to make an effort to only allow the air to move in the direction you want it to, which is down to the ice and over to the other side where you have your vent. In addition, if your fans are spaced too far apart, you may end up with a similar effect, or you'll create turbulence in the space directly beneath the fans without a means for that air to travel in the intended direction since other currents from the other fans are preventing that. Now, I did discover that the cuts I made and then the pressure exerted from screwing down the fans did weaken the integrity of the lid to which they're mounted, but I rectified this somewhat by pulling upwards/outwards on the pieces to fix the inward bowing I was seeing. This worked and they haven't fallen back in on themselves.
From there, it was just mounting the pieces. I screwed in the vent, taking care to ensure the plastic was flush with the lid and well outside of the opening I had cut so that air would not escape out in a direction that I did not want it to go, I laid down Velcro for the pencil case holding the battery (has 3M tape on one side which attaches to whatever surface you're putting it on, and the same thing goes for the other surface/object you're attaching, and then the two Velcro pieces do their thing), and I cut a hole in the side of the case so that the cable from the fans could enter the case and be plugged into the battery. This allows the battery to be easily removed for charging as well as providing a clean design I think. The fans (ordered in sets of 2) can daisy chain off of each other, so both in-line controllers are in the on position, but ultimately only one cable goes to the battery for power. They're super quiet when all 4 are on and at high power, just a low hum.
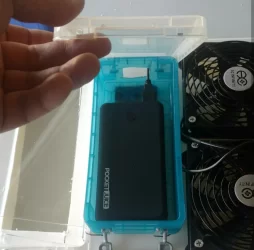
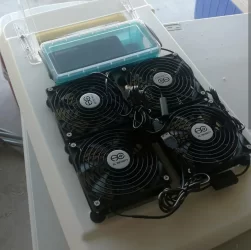
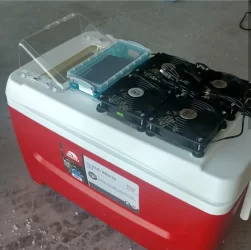
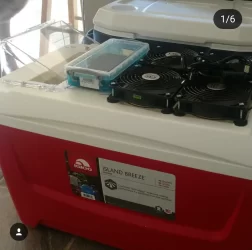
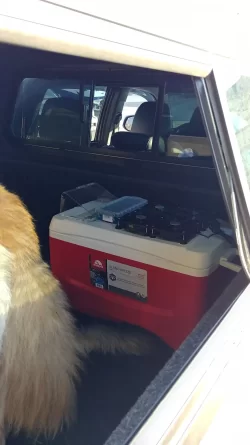
Lastly, all that needed to be done was secure it in the bed. I simply used a fat zip tie and anchored a handle to one of the bed tie down points and it was good to go. Being filled with 3 bags of ice meant it wasn't going anywhere, and I even confirmed this after blasting through the sand at the lake through somewhat washboard terrain at over 40mph.
Links for some of the items I used:
Portable Charger: https://www.amazon.com/gp/product/B01G1XH46M/?tag=tacoma3g-20
USB Fans: https://www.amazon.com/gp/product/B00JLV4BWC/?tag=tacoma3g-20
The other items like the cooler, air vent, and case I picked up at Wal-Mart, Lowe's, and Office Depot respectively. Hopefully this write up has been useful and worth your time, and I would be very interested in hearing of anyone else's similar projects. If you have any questions don't hesitate to ask.


This thread is going to cover my portable air conditioner project that I undertook and completed last summer. I have a bed shell and keep my dogs in the bed within the shell. They usually poke their heads out the windows and get fresh circulating air that way, although it may not always be cool air because of our hot El Paso weather, and every now and then it's hot and sandy and stormy all at once. It literally rains mud when we get our famous El Paso sandstorms at the same time as some rain. So during times like that it's not always ideal to leave those back windows open for them. Furthermore, if I'm going along the highway and there's a super strong crosswind, all that air just gets collected in the bed within the shell and creates a ton of drag, and perhaps I'm being too dog-conscious here but I could swear it's kind of brutal on one of my dog's ears. He's got these massive radars for ears and they're pretty sensitive. So, I researched the principles behind turning a cooler/ice chest into a portable air conditioner to help keep my dogs cool and comfortable and have my solution outlined below.
First off, I experimented with an old beat up cooler that I already had. I basically wanted to test the basic design and ensure I was on the right track. This involved cutting a hole for an old desk fan and putting a plastic angled vent cover over another hole, dumping ice in there, and verifying that I had air flow. Photos below; please bear with me, these photos appear small because I just pulled them from instagram since I no longer have the originals, so they're chopped sorta. I will include links to the items I purchased online, although some of the stuff doesn't really require a link or I purchased at local stores.


Next step was choosing an appropriately sized cooler for my needs. You don't want to fill the cooler with too little ice for obvious reasons, but you also don't want to overfill it. This is because with too much mass in the way of the air, turbulence is created and the air can't efficiently move through the open space within the cooler and then out of the vent. This results in very little air flow as well as the air that does escape is not cooled. The cool circulating air within the cooler of ice before it exits can actually help you delay the melting time a bit, enough so that with my design, I filled it up with ice, drove with my dogs 2 hours to the lake, spent a couple hours there, and drove those 2 hours back and the ice was maybe half melted. That watery slush in there was actually cool enough to continue working effectively. So I'm getting ahead of myself here, but aim to have your cooler filled with ice up to perhaps two-thirds full. Eyeball it, test it out for yourself (that's what I did with the final design: sat in the bed/shell with a buddy for about 20 mins while running the cooler), and get a feel for how much open space to leave to avoid too much air current turbulence.
So, moving on. I set to work. I ordered high output usb powered computer fans and found a pencil case at Office Depot, and put in that case an extra portable battery pack that I had lying around. It's got a 22k mAh battery and based off my calculations using the info about the fans, should be capable of powering the fans for anywhere between 15-20 hours depending on ambient heat and age of the battery itself, much longer than most people would need to rely on.
Once I had the items I needed, I set to work on measuring my future cuts and outlining my intended design.


I used a powered jigsaw as well as, believe it or not, my wife's Kabar. That damn blade comes in handy for seriously everything I do it seems. Whenever I don't have the right tool for cutting or what I do have can't quite reach, etc, that damn knife is what always comes in clutch. Anyway, I outlined my design and set to work, as you see above. I traced the sides of a fan for those cutouts and left room for the screws on the corners to mount them.
This part is kind of tricky, and it's an important step. Yes, yes, it's important to measure properly and all that stuff, but remember that we're dealing with air currents here. If you place your fans too far from the side where you're drawing in outside air to be cooled, it will want to move in that direction because it's an available path for it. You want to make an effort to only allow the air to move in the direction you want it to, which is down to the ice and over to the other side where you have your vent. In addition, if your fans are spaced too far apart, you may end up with a similar effect, or you'll create turbulence in the space directly beneath the fans without a means for that air to travel in the intended direction since other currents from the other fans are preventing that. Now, I did discover that the cuts I made and then the pressure exerted from screwing down the fans did weaken the integrity of the lid to which they're mounted, but I rectified this somewhat by pulling upwards/outwards on the pieces to fix the inward bowing I was seeing. This worked and they haven't fallen back in on themselves.
From there, it was just mounting the pieces. I screwed in the vent, taking care to ensure the plastic was flush with the lid and well outside of the opening I had cut so that air would not escape out in a direction that I did not want it to go, I laid down Velcro for the pencil case holding the battery (has 3M tape on one side which attaches to whatever surface you're putting it on, and the same thing goes for the other surface/object you're attaching, and then the two Velcro pieces do their thing), and I cut a hole in the side of the case so that the cable from the fans could enter the case and be plugged into the battery. This allows the battery to be easily removed for charging as well as providing a clean design I think. The fans (ordered in sets of 2) can daisy chain off of each other, so both in-line controllers are in the on position, but ultimately only one cable goes to the battery for power. They're super quiet when all 4 are on and at high power, just a low hum.


Lastly, all that needed to be done was secure it in the bed. I simply used a fat zip tie and anchored a handle to one of the bed tie down points and it was good to go. Being filled with 3 bags of ice meant it wasn't going anywhere, and I even confirmed this after blasting through the sand at the lake through somewhat washboard terrain at over 40mph.
Links for some of the items I used:
Portable Charger: https://www.amazon.com/gp/product/B01G1XH46M/?tag=tacoma3g-20
USB Fans: https://www.amazon.com/gp/product/B00JLV4BWC/?tag=tacoma3g-20
The other items like the cooler, air vent, and case I picked up at Wal-Mart, Lowe's, and Office Depot respectively. Hopefully this write up has been useful and worth your time, and I would be very interested in hearing of anyone else's similar projects. If you have any questions don't hesitate to ask.


Last edited:
