Sub
-
Welcome to Tacoma3G.com, a free resource for 2016-2023 Toyota Tacoma owners!
Tacoma3G is a beginner-friendly 3rd Generation Toyota Tacoma Forum (2016-2023 model-years). We are a community of people who are focused on good information and good vibes.
You are using an out of date browser. It may not display this or other websites correctly.
You should upgrade or use an alternative browser.
You should upgrade or use an alternative browser.
Lord Humongous's home brew deep woods glamper build
- Thread starter Lord Humongous
- Start date
- Replies 52
- Views 7K
- build thread
I have some lofty goals for this trailer but am confident I can achieve them. The first post will end up being more about the finished product where as this post will be more about the vision. We shall see how close I can get lol.
Overall size of the cargo area will be 10' X 4.5'. That's bigger than most expo or rock crawler trailers but this isn't really going to be either. Plans are to have a super tough glamping rig that will provide lots of comfort in remote areas for an extended period. Big enough to carry 60+gallons of water, 80 liter fridge, water heater, pellet smoker, ect and still be tough and maneuverable to handle moderate offroading.
Overall size of the cargo area will be 10' X 4.5'. That's bigger than most expo or rock crawler trailers but this isn't really going to be either. Plans are to have a super tough glamping rig that will provide lots of comfort in remote areas for an extended period. Big enough to carry 60+gallons of water, 80 liter fridge, water heater, pellet smoker, ect and still be tough and maneuverable to handle moderate offroading.
Last edited:
Finally! Off and running on the new trailer build! I was able to put in about 5 hours of work on the chasis today. It was slow going but I'm happy with the progress. I really took my time making sure the 45 degree cuts were perfect and mocking up the suspension.
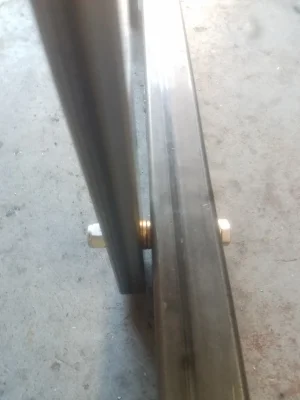
I decided to mark and drill the main beams for the Timbren axle-less suspension prior to welding anything together. Much easier since I could use the drill press.

I have the rear portion of chassis cut, squared up and ready for welding tomorrow. I measured with a tape measure about fifty times and was spinning around with a builder's square like a mad man. I can confirm it is SQUARE.
The main beams and rear cross member are .120 wall. The other crossmember is beefy 1/4". I went extra overkill there because it will be the crossmember between the suspension pieces. I also have another 11' piece 1/4 "that will tie into that and extend to the front to become the tounge. Those will be the only 2 pieces of 1/4". Stuff is heavy!


I decided to mark and drill the main beams for the Timbren axle-less suspension prior to welding anything together. Much easier since I could use the drill press.
I have the rear portion of chassis cut, squared up and ready for welding tomorrow. I measured with a tape measure about fifty times and was spinning around with a builder's square like a mad man. I can confirm it is SQUARE.
The main beams and rear cross member are .120 wall. The other crossmember is beefy 1/4". I went extra overkill there because it will be the crossmember between the suspension pieces. I also have another 11' piece 1/4 "that will tie into that and extend to the front to become the tounge. Those will be the only 2 pieces of 1/4". Stuff is heavy!
Day 2 of the trailer build was very productive. I partially welded the portions I had clamped in place yesterday as well as the front crossmember pieces.
On top of that I did A LOT of cutting. All the cross members are cut including the corner and tounge braces.
Off to work tomorrow, when I get back home the next step will be degreasing and prepping the steel for welding. This thing looks like it's going to be bomb proof!


On top of that I did A LOT of cutting. All the cross members are cut including the corner and tounge braces.
Off to work tomorrow, when I get back home the next step will be degreasing and prepping the steel for welding. This thing looks like it's going to be bomb proof!
Last edited:
Frame is looking awesome! Super heavy duty!! Ive used timbren's axleless suspension before on a couple trailers and your gonna love it!!!!Day 2 of the trailer build was very productive. I partially welded the portions I had clamped in place yesterday as well as the front crossmember pieces.
On top of that I did ALLOT of cutting. All the cross members are cut including the corner and tounge braces.
Off to work tomorrow, when I get back home the next step will be degreasing and prepping the steel for welding. This thing looks like it's going to be bomb proof!
Thanks man! The frame might he a little overkill lol. Just wanna make sure its sturdy while dragging around all our glamping gear. Suprisingly I can still lift it and roll it over on its side with all partially welded together. Flipping tractor tires has finally paid off!Frame is looking awesome! Super heavy duty!! Ive used timbren's axleless suspension before on a couple trailers and your gonna love it!!!!
Not a lot done on the trailer in the last couple days but at least I did get to a stopping point until the adjustable channel coupler mount shows up for the front. Mainly a lot of metal prep and welded the tops and bottoms of the cross members members in place.
Oh and stayed safe from the coronas.

Oh and stayed safe from the coronas.
Last edited:
I did "pimp my press" today. I ordered the SWAG offroad HD finger brake kit. I've been wanting it for a while and this was a good time since I can use it to build some gussets on the frame where the doors will go. I figure they will be high stress areas and could benifit from some reinforcement.
Before it shows up I went ahead and put some castor wheels on the HF 20 ton press and went pneumatic on the jack.

Before it shows up I went ahead and put some castor wheels on the HF 20 ton press and went pneumatic on the jack.
Last edited:
Got a little more work done today but I didn't plan out this weekend very well. I ran out of shielding gas after welding about half of the frame together. All the welding shops near me are closed on weekends....
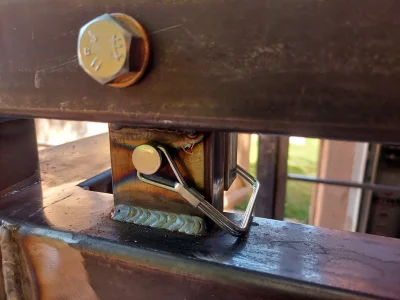
I did get the bulldog C channel adjustable height coupler mount welded on and made some supporting pieces with some left over .25".

I Hope I measured right and put this in the right place because its NOT coming off now!

I'm going with the Lock N' Roll coupler but the C channel mount can easily convert to a standard ball or pintle if needed.

I did get the bulldog C channel adjustable height coupler mount welded on and made some supporting pieces with some left over .25".
I Hope I measured right and put this in the right place because its NOT coming off now!
I'm going with the Lock N' Roll coupler but the C channel mount can easily convert to a standard ball or pintle if needed.
Been a long day. I left work this morning after an all nighter and went straight to Vern Lewis for fresh tank of shielding gas. I welded up the SWAG metal brake then got to welding on the trailer frame. Its completely welded solid now excluding a couple gussets I'm going to make tomorrow. I measured from the center of the coupler to each rear corner and it was 186.5" exactly both sides. I gotta say I'm pretty proud of myself for getting it that precise .
.

My welds are starting to look decent!

.My welds are starting to look decent!
Last edited:
Few more hours of work today. Plasma cut some quarter inch plate and bent it for some extra bracing around all four corners. The frame is officially done! Next day off I plane to install suspension and get some tires on this thing.


Awesome! Definitely keeping an eye out for this one ??
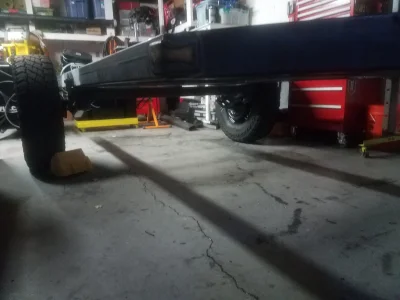
Today I installed the Timbren suspension, built the hubs and brakes, welded in a suspension crossmember and installed tires. Tires are the 255 85r16 Cooper ST Maxx that were previously on my truck.
Terrible pictures but was too beat to do any better tonight.


Love the Timbrens. 23" of ground clearance with 33" tires!
Terrible pictures but was too beat to do any better tonight.
Love the Timbrens. 23" of ground clearance with 33" tires!
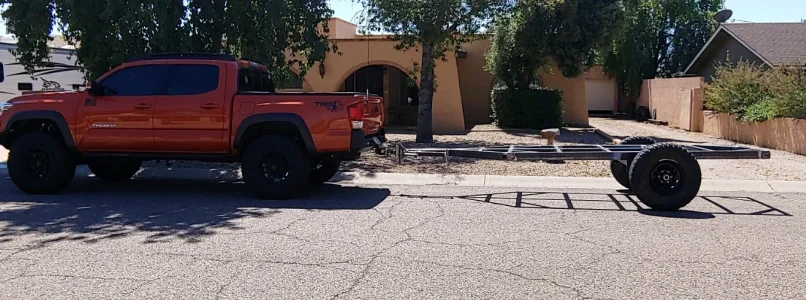
Did a little more work this morning.
I welded on the front pipe mount for the tounge stabilizer jack. I have 2 more of the same jacks I plan to use for each rear corner that will stabilize the entire trailer but need to finalize how I plan to build the fenders and side shelves before those go on.


Also hitched it up and went for a drive around the block. It pulled straight and didn't do anything crazy like flip over or fall apart so that's a good sign!


Next up I need to order some more steel and start building the supports for the enclosure and fenders. I plan to use thin aluminum diamond plate for the skin and thinking about composite deck boards or maybe marine plywood coated in herculiner for the decking? Open to suggestions on the deck.
I welded on the front pipe mount for the tounge stabilizer jack. I have 2 more of the same jacks I plan to use for each rear corner that will stabilize the entire trailer but need to finalize how I plan to build the fenders and side shelves before those go on.
Also hitched it up and went for a drive around the block. It pulled straight and didn't do anything crazy like flip over or fall apart so that's a good sign!
Next up I need to order some more steel and start building the supports for the enclosure and fenders. I plan to use thin aluminum diamond plate for the skin and thinking about composite deck boards or maybe marine plywood coated in herculiner for the decking? Open to suggestions on the deck.
Attachments
Last edited:
So I wasn't 100 percent confident with the way I had the Timbrens mounted. The Timbren instructions state you either use a 2x3" quarter inch crossmember or fabricate an inside mounting bracket. I went with a crossmember thinking having the suspension tied together would create less frame twisting. The problem I had was torquing the the 5/8 bolts to the reccomend 200 ft lbs. The 1/8" inch frame rails started to deform a little so I was hesitant to take the bolts all the way to 200. With that said I fabricated the inside mounting brackets out of quarter inch plate today. No problem torquing the bolts now. Also leaving the crossmember in since I already welded it. No need to slow down for bumps now 

Since I had the plasma cutter fired up I also made a fish plate out of quarter inch where to tounge supports come together. I was debating on doing this before but figured it was just overkill....Overkill seemed like the theme of the day so I went with it...

Since I had the plasma cutter fired up I also made a fish plate out of quarter inch where to tounge supports come together. I was debating on doing this before but figured it was just overkill....Overkill seemed like the theme of the day so I went with it...
Last edited:
Minor update.
So had I had a little problem I didn't plan on. With the CVT Mt Rainer tent being 72" long folded I realized that the tent would extend out and over the tire/fender. Not a huge deal but it will take some functional space out of the annex. With that said I've spent the last few days designing and researching parts (bearings, bushings ect) for a adjustable height tent rack. The rack will work similar to how a motorcycle jack works but on a larger scale and use gas struts to keep the weight neutral. This will not only raise the tent by about a foot but also move it forward away from fender.
Also picking up more metal on Monday. If you're bored in quarantine steel yards and welding suppliers are considered essential services")
So had I had a little problem I didn't plan on. With the CVT Mt Rainer tent being 72" long folded I realized that the tent would extend out and over the tire/fender. Not a huge deal but it will take some functional space out of the annex. With that said I've spent the last few days designing and researching parts (bearings, bushings ect) for a adjustable height tent rack. The rack will work similar to how a motorcycle jack works but on a larger scale and use gas struts to keep the weight neutral. This will not only raise the tent by about a foot but also move it forward away from fender.
Also picking up more metal on Monday. If you're bored in quarantine steel yards and welding suppliers are considered essential services
Taking shape.

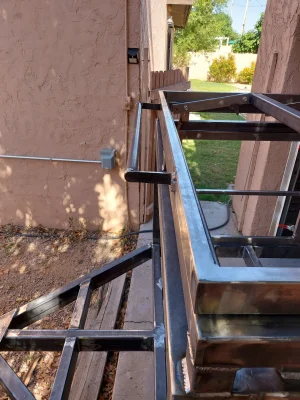
This morning we picked up some more metal and got to work on the body. I welded the uprights together and balanced them on the frame so I could visualize what this thing is going to look like. Simple box shape...I thought about adding some fancy curves to make it look cooler but that would just reduce functional storage space.
The uprights are built out of 2x4 rectangle tube. Initially these were going to be 2x2 but I had a substantial amount of 2x4 left over after building the frame. I did the math and using 2x4 instead of 2x2 added about 51lbs to the build. Not too terrible and it should add allot of added strength for supporting the tent.
Also ordered a 48 gallon water tank and did some research on batteries. We're laning hard towards lithium. Supposedly 1 lithium battery is equivalent to 3 AGMs due to the ability to cycle to near 100 percent of its capacity. Also way lighter, 30lbs vs 180lbs. Aaannndd they dont off gas so I can put it inside the box above the water tank and leave the deck completely open. It's a bigger initial cost though. Wish I knew somebody with one before taking the plunge.
Back at it. I took a week off due to getting sick. Hope it wasn't the coronas?
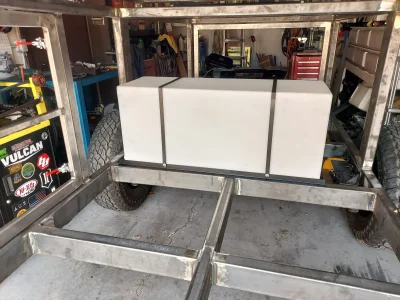
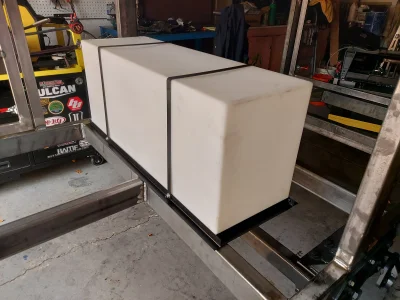
Anyway I spent past several days welding on the uprights and crossmember that make up body of the trailer. The water tank also showed up so we sat it in the trailer approximately where it will be permanently mounted.

I have also almost finished the roof rack. This has been a time consuming project. Lots of time spent measuring and making sure all the pieces would work smoothly together. I'm pretty proud of the way this turned out. Lateral stability is solid when raised and it operates super smooth due the oil impregnated bronze flange bushings used at all the pivot points. Gas struts should lift the tent no problem.


Total of 48 bronze flange bushings used

4 spring loaded quick lock pins will keep the rack in the upright position. I will add a stop so the rack doesnt rotate too far when I add the tent mounting crossmembers.

Anyway I spent past several days welding on the uprights and crossmember that make up body of the trailer. The water tank also showed up so we sat it in the trailer approximately where it will be permanently mounted.
I have also almost finished the roof rack. This has been a time consuming project. Lots of time spent measuring and making sure all the pieces would work smoothly together. I'm pretty proud of the way this turned out. Lateral stability is solid when raised and it operates super smooth due the oil impregnated bronze flange bushings used at all the pivot points. Gas struts should lift the tent no problem.
Total of 48 bronze flange bushings used
4 spring loaded quick lock pins will keep the rack in the upright position. I will add a stop so the rack doesnt rotate too far when I add the tent mounting crossmembers.
Attachments
Excellent work man 
Figure I'd give a little update about about the trailer or the lack thereof. My 2 next tasks are to build doors and fenders. I had heavy duty dump door hinges I was planning to use but realised they don't work well in a side swinging configuration. I ordered some heavy duty continuously hinge which should work much better.
I also ordered a powertank 20lb propane tank bracket that will hold a 20 or 30 lb standard BBQ tank on the fender. I like this size because it does hold more but more importantly I don't have find somewhere to refill it. I can easily exchange the cylinder for a full tank at most convenience or hardware stores.
I like to have parts in hand before I start building just to make sure everything fits appropriately. The covid is definitely killing shipping times on some of these parts but should hopefully have them soon.
I also keep changing my mind on how I want to skin the trailer. I was thinking using HDPE plastic sheet because its light and strong (they use it to make hockey rinks) but realised its subject to thermal expansion and don't want to be popping rivets every summer. Now debating between a "poor mans fiberglass" or aluminum diamond plate.
One of the 2 hinges showed up so I was able to build out the frame of the rear kitchen door. I still need to build the jambs and add a support for the rear fold down counterop but waiting on the brackets and rubber seals....
Also I'm like 99 percent sure I'm going to skin this thing in aluminum diamond plate. Thinking about coating it with a forest green bed liner.


Also I'm like 99 percent sure I'm going to skin this thing in aluminum diamond plate. Thinking about coating it with a forest green bed liner.
The second piece of continuous hinge showed up so I was able to work on the side cargo door today.


I went ahead and welded the roof rack into position. While I was at it I added a stop to keep the rack from coming too far forward and a handle to aid in pulling it up. I also decided to ditch the spring loaded T handle pull pins for simple hitch pins. The spring loaded T handles were high speed low drag but I was concerned about the overall reliability and went with a simpler solution.

I used a ruff stuff 90° gusset but a piece of angle would've been equally effective.


I really like the way the rack works. It will provide me headroom so I won't have to duck under the tent and it moves the tent a foot forward so the annex will clear the tires. Its solid when upright as you can see here.
Original link: https://youtu.be/5TDlPdmQRjI
I used a ruff stuff 90° gusset but a piece of angle would've been equally effective.
I really like the way the rack works. It will provide me headroom so I won't have to duck under the tent and it moves the tent a foot forward so the annex will clear the tires. Its solid when upright as you can see here.
Original link: https://youtu.be/5TDlPdmQRjI
Attachments

Where can I order mine? Great job!!!
The mounting bracket for the water tank is done and I started to work on the jambs for the doors. The rubber seals should be here later today so I can gauge their squishyness and weld the jambs in at the right depth.


All the little projects are starting to add up on this build. Initially I was hoping to have this done by Overland Expo West. If it weren't for covid delaying it till July there's no way I'd be done! Still hope!
All the little projects are starting to add up on this build. Initially I was hoping to have this done by Overland Expo West. If it weren't for covid delaying it till July there's no way I'd be done! Still hope!
Attachments
A few more little things....
I built a spare tire mount using a Ruff Stuff industries mounting plate. The mount will bolt to a structural member with the aluminum skin sandwiched between. Should he solid.


I did a little more work on the rear door. I used some threaded insert rivets to bolt the brackets for the drop down countertop.

Also started adding pieces that will give support to the decking. I used 16 gage angle which is as lightweight as I could find. I figure we'll never be walking on the deck or keeping anything crazy heavy in there so that should be plenty. I added some 1x2 crossmembers as well so I can bolt the slide system and water tank to something sturdy.

I built a spare tire mount using a Ruff Stuff industries mounting plate. The mount will bolt to a structural member with the aluminum skin sandwiched between. Should he solid.
I did a little more work on the rear door. I used some threaded insert rivets to bolt the brackets for the drop down countertop.
Also started adding pieces that will give support to the decking. I used 16 gage angle which is as lightweight as I could find. I figure we'll never be walking on the deck or keeping anything crazy heavy in there so that should be plenty. I added some 1x2 crossmembers as well so I can bolt the slide system and water tank to something sturdy.
The phoenix heat is killing the progress on this build right now.
I did add a few more pieces to mount the propane tank bracket and hot water heater.
Luckily it looks like we're going to going to have a few days under a 100 degrees. Plan to take advantage of it and hopefully get some work done.

I did add a few more pieces to mount the propane tank bracket and hot water heater.
Luckily it looks like we're going to going to have a few days under a 100 degrees. Plan to take advantage of it and hopefully get some work done.
looking awesome