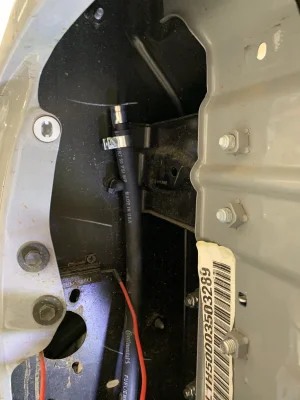
Yesterday I re-did my diff breather mod because I wasn't happy with it being relocated inside of the bed storage cubby. This time I mounted it behind the driver's side tail light using all pre-existing holes in the body and frame. Installation is extremely simple and the end result is much cleaner than putting it inside the bed box or fuel filler door. The way this is routed positions the breather in a well-protected area as high as possible on the truck and eliminates the need for any zip ties or drilling.
Why you should do this:
The front differential's breather on 4WD trucks is already remotely located so you don't need to worry about it. However, Toyota puts a basic 1-way breather right on the diff in the rear for some reason. It is highly susceptible to clogging with dirt and/or sucking in water if submerged. Water inside the diff can destroy your rear end, and a clogged breather can cause pressure to build that can blow out your seals. The OEM breather you will be replacing your stock one with is a superior 2-way breather and it will be positioned well out of harm's way. If water reaches your breather now, you have much, much bigger problems.
What you'll need:
Admin edit by @Tyler:
- Toyota Part Number 90930-03136 (Breather)
- 7ft of 3/8" vacuum or fuel line (depending on your lift, etc. you may end up trimming off 6-12")
- 3/8" ID hose clamp
- 3/8" ID insulated clamp
- 14mm and 10mm wrenches
- Teflon tape
- Bolt, nut & washers (1-1/2" bolt is enough, lock nut or lock washers preferred... use blue LocTite if unavailable)
Note: The Toyota union isn't pictured here, nor is the hose. The Toyota part numbers will work for all Tacoma rear ends regardless of Tacoma diff size with or without e-locker. Disregard the LEDs in the pic... unless you want to upgrade your bulbs at the same time while the tail lights are out.

Step 1:
a) Lower the tailgate.
b) Using a 10mm socket or wrench, remove the top and bottom screws retaining the driver's side tail light.
c) Once the screws are removed, pull on the tail light straight to the rear. It will pop out of the clips with some force.
c) Set tail light housing aside on the tailgate... no need to un-plug anything, the wires are long enough to reach.
Step 2:
b) Locate the factory diff breather on top of the rear diff housing and remove it with a 14mm wrench. Be careful not to knock any dirt or debris into the hole.
c) Wrap the threads of the new Toyota Union in Teflon tape and tighten it down firmly in place of the factory breather, but don't go too nuts on the torque.
d) Slip hose clamp on to one end of your fuel or vacuum line, push line down over the nipple of the union, and tighten the hose clamp. Again, don't go nuts on the torque.
e) Route the loose end of your hose through the oval hole in the frame behind the shock mount from the inside out. Leave yourself enough slack so that the hose will not get pulled tight when the suspension is at full droop.

f) Continue routing the loose end of the hose up from the hole in the frame to the circular cutout behind the tail light. If you don't have a helper, you should be able to get it to stay put long enough to get out from under the truck to proceed to Step 3.

Step 3:
a) Locate support bracket with unused pre-existing hole as shown below.
b) Insert nipple of new breather into the hose.
c) Slip insulated clamp over the hose and nipple. You are going to use this in place of a second hose clamp because the insulated clamp can pinch the line shut if not installed over the portion of the hose being reinforced by the nipple.
d) Install nut/bolt/washers through the insulated clamp and hole in the truck's support bracket. Tighten down, but don't go crazy with the torque. If you are not using a lock nut or lock washers, apply some blue LocTite to the threads.
e) Re-install tail light.

Why you should do this:
The front differential's breather on 4WD trucks is already remotely located so you don't need to worry about it. However, Toyota puts a basic 1-way breather right on the diff in the rear for some reason. It is highly susceptible to clogging with dirt and/or sucking in water if submerged. Water inside the diff can destroy your rear end, and a clogged breather can cause pressure to build that can blow out your seals. The OEM breather you will be replacing your stock one with is a superior 2-way breather and it will be positioned well out of harm's way. If water reaches your breather now, you have much, much bigger problems.
What you'll need:
Admin edit by @Tyler:
- Toyota Part Number 90404-51026 (Union)The 90404-51026 (Union) PN in this thread is wrong. That union is much too small to use 3/8" tubing. You need 90404-51319 to be compatible. Luckily, I caught this before leaving the dealership and was able to return the smaller union and get the correct PN on order.
- Toyota Part Number 90930-03136 (Breather)
- 7ft of 3/8" vacuum or fuel line (depending on your lift, etc. you may end up trimming off 6-12")
- 3/8" ID hose clamp
- 3/8" ID insulated clamp
- 14mm and 10mm wrenches
- Teflon tape
- Bolt, nut & washers (1-1/2" bolt is enough, lock nut or lock washers preferred... use blue LocTite if unavailable)
Note: The Toyota union isn't pictured here, nor is the hose. The Toyota part numbers will work for all Tacoma rear ends regardless of Tacoma diff size with or without e-locker. Disregard the LEDs in the pic... unless you want to upgrade your bulbs at the same time while the tail lights are out.
Step 1:
a) Lower the tailgate.
b) Using a 10mm socket or wrench, remove the top and bottom screws retaining the driver's side tail light.
c) Once the screws are removed, pull on the tail light straight to the rear. It will pop out of the clips with some force.
c) Set tail light housing aside on the tailgate... no need to un-plug anything, the wires are long enough to reach.
Step 2:
b) Locate the factory diff breather on top of the rear diff housing and remove it with a 14mm wrench. Be careful not to knock any dirt or debris into the hole.
c) Wrap the threads of the new Toyota Union in Teflon tape and tighten it down firmly in place of the factory breather, but don't go too nuts on the torque.
d) Slip hose clamp on to one end of your fuel or vacuum line, push line down over the nipple of the union, and tighten the hose clamp. Again, don't go nuts on the torque.
e) Route the loose end of your hose through the oval hole in the frame behind the shock mount from the inside out. Leave yourself enough slack so that the hose will not get pulled tight when the suspension is at full droop.
f) Continue routing the loose end of the hose up from the hole in the frame to the circular cutout behind the tail light. If you don't have a helper, you should be able to get it to stay put long enough to get out from under the truck to proceed to Step 3.
Step 3:
a) Locate support bracket with unused pre-existing hole as shown below.
b) Insert nipple of new breather into the hose.
c) Slip insulated clamp over the hose and nipple. You are going to use this in place of a second hose clamp because the insulated clamp can pinch the line shut if not installed over the portion of the hose being reinforced by the nipple.
d) Install nut/bolt/washers through the insulated clamp and hole in the truck's support bracket. Tighten down, but don't go crazy with the torque. If you are not using a lock nut or lock washers, apply some blue LocTite to the threads.
e) Re-install tail light.
Last edited by a moderator:


