To be honest I liked the chrome look, something about it is classic, but I finally decided to go for the no chrome look. Blacked out emblems and bumper. I looked into getting replacements, but for $60 - $120 a pop I figured I could achieve the same if not better by painting the ones I already have. So, I set off on the project.
Supplies needed:
Step One:
Start with a clean truck, that helps. You will be removing the bumper caps. Start by locating the clips that hold the bumper in place. There are 6 clips on each side, 4 on the bottom and two on the outer side.

Lift up on the top plastic part that's used as a step. It will separate from the main bumper allowing better access to the bumper covers. Do this in the order in the image.

next pull out and down on the bumper covers, you will be popping off two clips on each side. They should come off pretty easy. There where two little metal clips on on each side that i did not reuse.
Step Two:
Prep the bumper covers for paint. Begin by washing the covers with soap and then dry. Clean good. Then you will sand each cover with the 400 grit until the reflection is flat and foggy. Finally wash and clean them again and I used an air tool to blow them dry faster.

Step Three:
Prep and paint. You should find something to set the bumper covers on and select a location to paint. Try and prep the covers so they are elevated off the ground. Use wood blocks or something and use a tarp or cardboard to spray on. This way you don't have to touch or move them around as you are painting. once you have them in a good spot you can begin to paint with the primer. I did three coats.

I gave it like 15 minutes between coats.

Step Four:
Finally, you can begin to paint using the bed liner. Optional: After primer is dry, sand the primer with 400 - 800 grit and wash then dry. I opted not to do this, but it may give you better adhesion results. Begin to spray the bed liner per the directions on the can. I did two coats and I was painting in the dark. I got a little run on the second coat. I waiting about 25 minutes between coats. I felt I was a bit heavy on the second coat, but not bad. So be careful with distance and keep it even.


I'd let them dry for at least 48 hours before trying to install them but 72 hours is ideal. Install following step one directions in reverse.
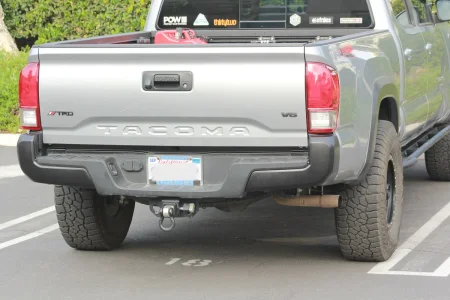
I think they turned out pretty solid and I hoping they last a long time like this. I did a bunch of paint research before doing this and though I am no paint expert, I learned from this and would not recommend painting in ill lit work areas. The coating came out solid, but the runs on the side bug me a little. Not sure if I can fix it or should even try. It is bed liner, so sanding it would be tough. I figure over time it will wear in with dirt and what not. I'll post the final install photos tomorrow.
Supplies needed:
- 400 Grit Sandpaper
- Primer for plastic (Spray can)
- Bed Liner (Spray Can)
- Beer
Step One:
Start with a clean truck, that helps. You will be removing the bumper caps. Start by locating the clips that hold the bumper in place. There are 6 clips on each side, 4 on the bottom and two on the outer side.
Lift up on the top plastic part that's used as a step. It will separate from the main bumper allowing better access to the bumper covers. Do this in the order in the image.
next pull out and down on the bumper covers, you will be popping off two clips on each side. They should come off pretty easy. There where two little metal clips on on each side that i did not reuse.
Step Two:
Prep the bumper covers for paint. Begin by washing the covers with soap and then dry. Clean good. Then you will sand each cover with the 400 grit until the reflection is flat and foggy. Finally wash and clean them again and I used an air tool to blow them dry faster.
Step Three:
Prep and paint. You should find something to set the bumper covers on and select a location to paint. Try and prep the covers so they are elevated off the ground. Use wood blocks or something and use a tarp or cardboard to spray on. This way you don't have to touch or move them around as you are painting. once you have them in a good spot you can begin to paint with the primer. I did three coats.
I gave it like 15 minutes between coats.
Step Four:
Finally, you can begin to paint using the bed liner. Optional: After primer is dry, sand the primer with 400 - 800 grit and wash then dry. I opted not to do this, but it may give you better adhesion results. Begin to spray the bed liner per the directions on the can. I did two coats and I was painting in the dark. I got a little run on the second coat. I waiting about 25 minutes between coats. I felt I was a bit heavy on the second coat, but not bad. So be careful with distance and keep it even.
I'd let them dry for at least 48 hours before trying to install them but 72 hours is ideal. Install following step one directions in reverse.
I think they turned out pretty solid and I hoping they last a long time like this. I did a bunch of paint research before doing this and though I am no paint expert, I learned from this and would not recommend painting in ill lit work areas. The coating came out solid, but the runs on the side bug me a little. Not sure if I can fix it or should even try. It is bed liner, so sanding it would be tough. I figure over time it will wear in with dirt and what not. I'll post the final install photos tomorrow.