• Welcome to Tacoma3G.com, a free resource for 2016-2023 Toyota Tacoma owners!

    Tacoma3G is a beginner-friendly 3rd Generation Toyota Tacoma Forum (2016-2023 model-years). We are a community of people who are focused on good information and good vibes.

Lower Dashboard Mod - thought it would be easy...

Camrod67

3️⃣ Silver
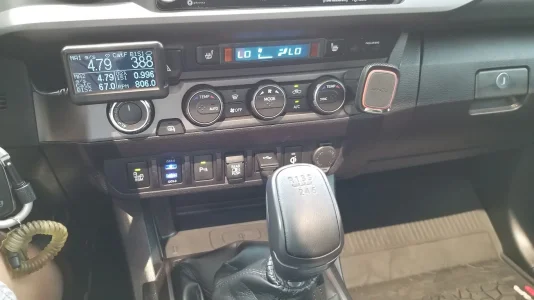
Anyone have any good tips for getting at the switch panel below the temp controls? I thought it would be a bit easier to access than it's turning out to be.
I want to replace the power outlet (cigarette lighter???) with a USB and voltmeter unit. It looks like I'm going to have to remove the center console, the wireless charger area to get to it. Not sure it's worth it to locate there.
I've tried looking for videos, others experiences. Anyone done this before? It can't be as hard as I'm making it...

PXL_20210418_204337025.webp
PXL_20210418_204342735.webp
 
You can get in from the top. Take bezel off, loosen radio bolts and remove climate control box and you should have enough room to access from behind. I put in a QC 3.0 on my blank and tapped into the 12v so it is accessible. I watched a few of the 3tpam installs showing the power tap as a how to.

I do like your idea. If you get it done, please share some pics.
 

Attachments

  • Center stack mods.webp
    Center stack mods.webp
    112.6 KB · Views: 641
You can get in from the top. Take bezel off, loosen radio bolts and remove climate control box and you should have enough room to access from behind. I put in a QC 3.0 on my blank and tapped into the 12v so it is accessible. I watched a few of the 3tpam installs showing the power tap as a how to.

I do like your idea. If you get it done, please share some pics.
If I can get it done I'll be sure to post a few pics.
What's that digital display you've got going there??
 
Almost every single piece of the dash is connected to that center lower console piece. Also, you will want to make sure the USB charger you purchased will fit the cig lighter hole. Sometimes they can be just a hair to big. Once you have the connection off the back of the cig lighter you can cut the plastic piece length wise down the middle to separate the wiring. You should be able to use the same stock connection for the new USB charger once you cut it. The prongs should fit. I removed mine to install the Meso lower switch panel.


Here is a solid write up on removing the panel, this is a good step by step.


Here is the install video incase you want to watch that.

Original link: https://youtu.be/VpELpmOJu9Y
Awesome info. And badass roof rack by the way. I have the bravo version on order. Hopefully arriving in another week or two.
 
Just the outlet is easy.


I basically crushed the metal inside and pulled it out. There is a connector there, pull it off and stick it on the new one. Reach down from the top and spin the locking ring. Don't have to take it all apart for just the outlet.
 
If you pull the radio out you can reach down and unplug the old 12v port and push it out for the new one! Thats how I did mine :p Haha no need to take the whole dashboard apart
The thread's a bit old, but I thought I would confirm that this worked for me. I put in a couple of switches for heated seats and was even able to move some of the existing switches. No need to take out the dash or center console. It only takes a couple of minutes to pull the radio and most of that time is unplugging the radio harness wires.
 
Last edited:
Where do you get that switch panel? I've been looking for one of these but can't find them Idk why

Don't know of others. Have to wait for him to open it up or find someone letting one go.


I can also confirm you don't have to take it apart entirely. Just the head unit.
I took some pliers and a pick to remove the insert. Just pull the tabs and everything inward. I just caved it all in and destroyed it out of frustration.
There is a proper way to remove it without damage. I gave up.
Then you can just pull the entire socket out. The socket will have a L shaped connector. You can just pull that off and plug the new one right in.
I had to shave a little to make the opening on the panel bigger to fit the new outlet. The threads make the outlet slightly larger. Don't take off too much. Just shave a little at a time. Install the new charger. As long as you weren't corn-fed, you can reach down to the opening and put the threaded collar/nut on. Just remember it's wire through collar/nut (inside), panel, outlet (outside). This is also a good time to chain off that plug and add a socket behind everything.

1650654617156.png

1650654078750.png

1650654517770.png


1650655035530.webp
 
Last edited:
Back
Top