
-
Welcome to Tacoma3G.com, a free resource for 2016-2023 Toyota Tacoma owners!
This website is the passion-project of a USMC veteran/mechanic, @Tyler. I created Tacoma3G.com to share my knowledge of this subject with others and to provide like-minded folks with a comfortable space to ask questions and create 'build threads' within our Tacoma Forums. Now, if the format of this website is confusing to navigate for you, or if you're interested in my full mission and T3G's history, check out the Help and About pages.
Search results for query: *
- Users: Mr Hushwing
- Order by date
-
PXL_20210605_151954462.jpg
- Mr Hushwing
- Media item
- Comments: 0
- Category: Members' Build Thread Photos
-
PXL_20210604_200034580.jpg
- Mr Hushwing
- Media item
- Comments: 0
- Category: Members' Build Thread Photos
-

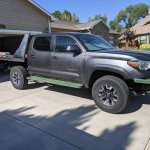
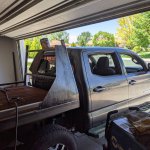
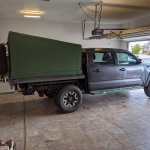
Lets Get Committed
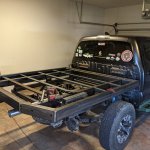
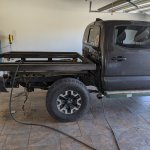
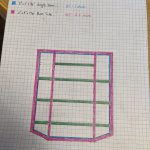
Finally got around to fabricating the headache rack up a bit. Chase trucks have always been cool looking to me, and was something i wanted to slightly incorporate into the headache rack. Still lots of work to finish it up, but its made the bed take on a whole new use. Hopefully, time will find...- Mr Hushwing
- Post #36
- Forum: Introductions & Build Threads
-
Cement Taco.. eat it, you'll sh*t bricks.
Awesome upgrade, but the photos are even better! Keep them coming- Mr Hushwing
- Post #33
- Forum: Introductions & Build Threads
-
-
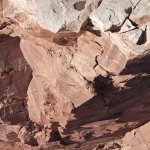
Photo_1080295647_DJI_223_jpg_21672877_0_2021417171958_photo_original~2.jpg
- Mr Hushwing
- Media item
- Comments: 0
- Category: Members' Build Thread Photos
-
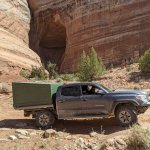
Lets Get Committed
This trip landed us in Moab at the Top of The World waiting in line oddly enough for our photo op. I kept it a safe distance, as I struggle with heights capable of certain death from a simple mistake.- Mr Hushwing
- Post #34
- Forum: Introductions & Build Threads
-

2021_0417_17273200.jpg
- Mr Hushwing
- Media item
- Comments: 0
- Category: Members' Build Thread Photos
-
Lets Get Committed
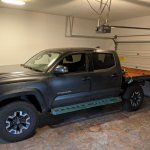
And "Bob's your uncle" i was suddenly ready for the Australian Outback lol Yes, i know. I ended up using ratchet straps as i was in a rush to meet up with our group the following morning to suck the rear suspension down enough to sneak it out of the garage. Airing down would've taken too long...- Mr Hushwing
- Post #33
- Forum: Introductions & Build Threads
-
PXL_20210417_173051117.jpg
- Mr Hushwing
- Media item
- Comments: 0
- Category: Members' Build Thread Photos
-
PXL_20210415_222546640.jpg
- Mr Hushwing
- Media item
- Comments: 0
- Category: Members' Build Thread Photos
-
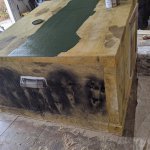
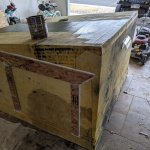
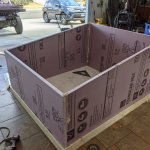
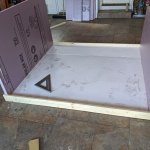
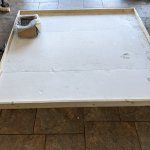
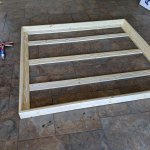
Lets Get Committed
This is kind of crazy looking back now, but I realized i had built a flatbed and the following project in a meer three days. I understand this project is not a direct 3G Tacoma thing, but it played such an important role on this flatbed adventure, that I think its justifiable enough to share...- Mr Hushwing
- Post #32
- Forum: Introductions & Build Threads
-
PXL_20210415_160635332.jpg
- Mr Hushwing
- Media item
- Comments: 0
- Category: Members' Build Thread Photos
-
PXL_20210415_160625225.jpg
- Mr Hushwing
- Media item
- Comments: 0
- Category: Members' Build Thread Photos
-

PXL_20210414_232835103.jpg
- Mr Hushwing
- Media item
- Comments: 0
- Category: Members' Build Thread Photos
-

PXL_20210414_203636480.jpg
- Mr Hushwing
- Media item
- Comments: 0
- Category: Members' Build Thread Photos
-
PXL_20210414_201912925.jpg
- Mr Hushwing
- Media item
- Comments: 0
- Category: Members' Build Thread Photos
-
PXL_20210414_164101850.jpg
- Mr Hushwing
- Media item
- Comments: 0
- Category: Members' Build Thread Photos
-
PXL_20210414_160724000.jpg
- Mr Hushwing
- Media item
- Comments: 0
- Category: Members' Build Thread Photos
-
PXL_20210414_151419972.jpg
- Mr Hushwing
- Media item
- Comments: 0
- Category: Members' Build Thread Photos
-
PXL_20210414_145211055.jpg
- Mr Hushwing
- Media item
- Comments: 0
- Category: Members' Build Thread Photos
-
PXL_20210414_142839727.jpg
- Mr Hushwing
- Media item
- Comments: 0
- Category: Members' Build Thread Photos
-
PXL_20210414_134856729.jpg
- Mr Hushwing
- Media item
- Comments: 0
- Category: Members' Build Thread Photos
-
PXL_20210414_134845679.jpg
- Mr Hushwing
- Media item
- Comments: 0
- Category: Members' Build Thread Photos
-
Lets Get Committed
Since the rear factory bumper is null and void, i thought id recycle a few things. First i cut out the bumpers metal formed trailer plug mounting as i liked the way it clips in. I moved it to a point that should work up high under the flatbed and welded it on. Too, i found an opportunity to re...- Mr Hushwing
- Post #31
- Forum: Introductions & Build Threads
-
PXL_20210430_230217313.MP.jpg
- Mr Hushwing
- Media item
- Comments: 0
- Category: Members' Build Thread Photos
-
Lets Get Committed
Right! I completely agree, and its nice to know im not the only one to think like this. Thanks for the comments and support. Im trying to currently decide on headache rack design and ideas on tie down anchor points using recessed stuff possibly.- Mr Hushwing
- Post #30
- Forum: Introductions & Build Threads
-
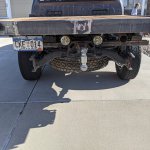
Lets Get Committed
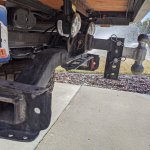
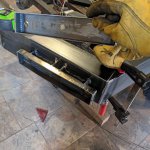
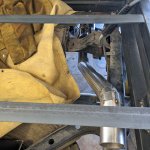
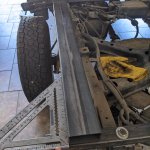
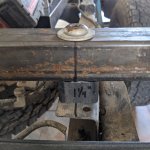
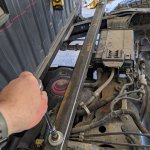
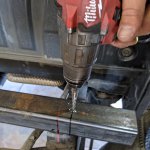
Bolted each side up to the truck frame real loose like. Allowed enough slop to slip the upside down receiver back in. Once i tightened frame mounts up i welded it back in place where the factory had welded before. This was so nice of a change for departures and not dragging or leaving my mark...- Mr Hushwing
- Post #28
- Forum: Introductions & Build Threads
-
PXL_20210430_230227109.jpg
- Mr Hushwing
- Media item
- Comments: 0
- Category: Members' Build Thread Photos
-
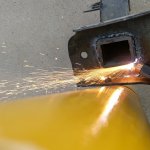
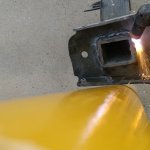
Lets Get Committed
Towing. Its important to me and keeping the factory setup was worth a try. More or less, i am after increased clearance for departure angle. I have lost count the number of times ive drug the thing across something, and at times loose momentum when crawling. So lets get committed here with a bit...- Mr Hushwing
- Post #27
- Forum: Introductions & Build Threads
-
PXL_20210413_231435428_exported_38066.jpg
- Mr Hushwing
- Media item
- Comments: 0
- Category: Members' Build Thread Photos
-
PXL_20210413_231435428_exported_15333.jpg
- Mr Hushwing
- Media item
- Comments: 0
- Category: Members' Build Thread Photos
-
PXL_20210413_231435428_exported_3866.jpg
- Mr Hushwing
- Media item
- Comments: 0
- Category: Members' Build Thread Photos
-
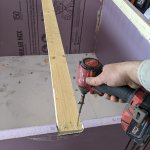
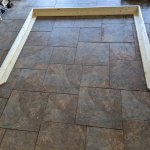
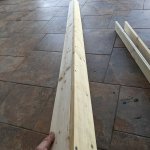
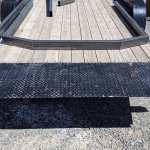
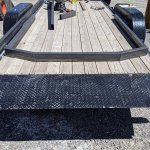
Lets Get Committed
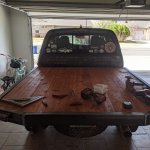
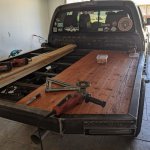
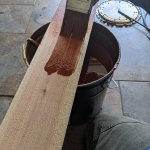
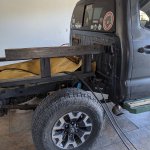
Finally able to cover this flatbed with cedar after a run to Home Depot. Got the factory bumper and receiver hitch removed, but strapped down the receiver as its going to get massaged over in the next step.- Mr Hushwing
- Post #24
- Forum: Introductions & Build Threads
-
PXL_20210413_012148301.MP.jpg
- Mr Hushwing
- Media item
- Comments: 0
- Category: Members' Build Thread Photos
-
PXL_20210412_230740322.jpg
- Mr Hushwing
- Media item
- Comments: 0
- Category: Members' Build Thread Photos
-
PXL_20210412_214805897.jpg
- Mr Hushwing
- Media item
- Comments: 0
- Category: Members' Build Thread Photos
-
PXL_20210412_214753769.jpg
- Mr Hushwing
- Media item
- Comments: 0
- Category: Members' Build Thread Photos
-
Lets Get Committed
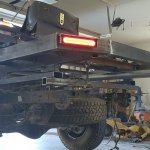
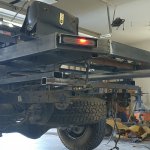
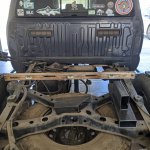
I ordered these tail lights off of Amazon. They are bolt on and perform all functions in one light aside from reverse lights. I was hoping to recess them in, but went a whole other direction as i began building the light bucket from some 16 ga 2x2 square tubing. I welded up caps on each end and...- Mr Hushwing
- Post #23
- Forum: Introductions & Build Threads
-
PXL_20210412_172536957_exported_3232.jpg
- Mr Hushwing
- Media item
- Comments: 0
- Category: Members' Build Thread Photos
-

PXL_20210412_172536957_exported_16226.jpg
- Mr Hushwing
- Media item
- Comments: 0
- Category: Members' Build Thread Photos
-
PXL_20210412_172536957_exported_13993.jpg
- Mr Hushwing
- Media item
- Comments: 0
- Category: Members' Build Thread Photos
-

PXL_20210412_151522991.jpg
- Mr Hushwing
- Media item
- Comments: 0
- Category: Members' Build Thread Photos
-
PXL_20210412_151451824.jpg
- Mr Hushwing
- Media item
- Comments: 0
- Category: Members' Build Thread Photos
-
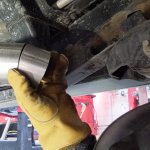
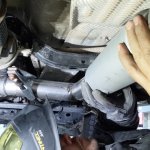
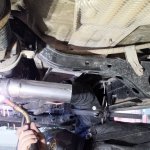
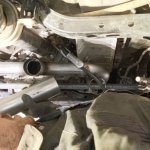
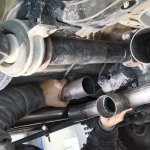
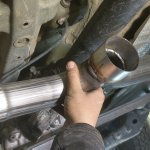
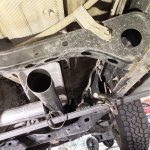
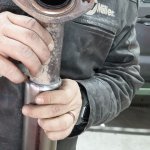
Lets Get Committed
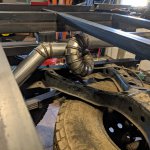
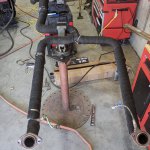
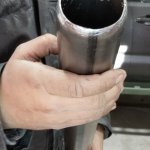
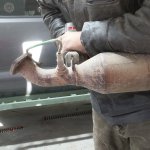
Finally, i can re route the exhaust out the back and make my first attempt at getting the exhaust under control. Shooting here to introduce some back pressure in an effort to move the powerband back down lower and maybe quiet it a bit. First i needed to bring it up from under the truck. And...- Mr Hushwing
- Post #22
- Forum: Introductions & Build Threads
-
PXL_20210412_005659909.jpg
- Mr Hushwing
- Media item
- Comments: 0
- Category: Members' Build Thread Photos
-
PXL_20210412_005650262.jpg
- Mr Hushwing
- Media item
- Comments: 0
- Category: Members' Build Thread Photos
-
PXL_20210411_213213399.jpg
- Mr Hushwing
- Media item
- Comments: 0
- Category: Members' Build Thread Photos
-
PXL_20210411_211103971.jpg
- Mr Hushwing
- Media item
- Comments: 0
- Category: Members' Build Thread Photos
-
PXL_20210411_210927996.jpg
- Mr Hushwing
- Media item
- Comments: 0
- Category: Members' Build Thread Photos
-
PXL_20210411_210908729.jpg
- Mr Hushwing
- Media item
- Comments: 0
- Category: Members' Build Thread Photos
-
Lets Get Committed
With input from trusted folks I rely on, I played it safe and lowered it 5 inches. Plus my wife, had weighed in and I tend to listen at times when she holds her ground on how rediculous some of my intentions are. Especially since she was being so wonderful in supporting me doing such a crazy...- Mr Hushwing
- Post #21
- Forum: Introductions & Build Threads
-
PXL_20210411_192328625.jpg
- Mr Hushwing
- Media item
- Comments: 0
- Category: Members' Build Thread Photos
-

PXL_20210411_184448882.MP.jpg
- Mr Hushwing
- Media item
- Comments: 0
- Category: Members' Build Thread Photos
-
PXL_20210411_162042340.jpg
- Mr Hushwing
- Media item
- Comments: 0
- Category: Members' Build Thread Photos
-
PXL_20210411_161955413.jpg
- Mr Hushwing
- Media item
- Comments: 0
- Category: Members' Build Thread Photos
-
Lets Get Committed
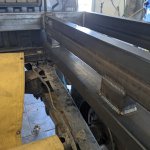
Centering proved difficult. At least for me. Just looking at the truck frame alone, as its design isn't a clear square, plus the rear axle is offset slightly to the right. I landed on using the rear of the cab to help get me started with a laser. The cab has those formed extrusions and the...- Mr Hushwing
- Post #20
- Forum: Introductions & Build Threads
-
PXL_20210410_220207623.jpg
- Mr Hushwing
- Media item
- Comments: 0
- Category: Members' Build Thread Photos
-
PXL_20210410_220410640.jpg
- Mr Hushwing
- Media item
- Comments: 0
- Category: Members' Build Thread Photos
-
PXL_20210410_200942659.jpg
- Mr Hushwing
- Media item
- Comments: 0
- Category: Members' Build Thread Photos
-
PXL_20210410_194546598.jpg
- Mr Hushwing
- Media item
- Comments: 0
- Category: Members' Build Thread Photos
-
PXL_20210410_192213089.MP.jpg
- Mr Hushwing
- Media item
- Comments: 0
- Category: Members' Build Thread Photos
-
PXL_20210410_183304062.jpg
- Mr Hushwing
- Media item
- Comments: 0
- Category: Members' Build Thread Photos
-
PXL_20210410_182505060.MP.jpg
- Mr Hushwing
- Media item
- Comments: 0
- Category: Members' Build Thread Photos
-
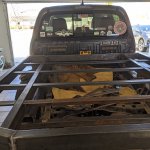
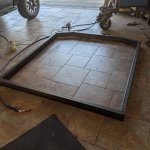
Lets Get Committed
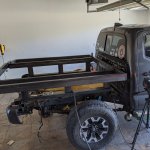
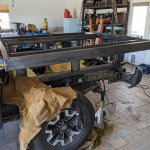
A few hundred bucks later, i had fresh steel and began cutting based off my drawing. Since i both like my wheelbase and hate my 5 foot bed length, i decided the new flatbed would max out in length at 6 feet. This may prove to be great for utility, while suffering in the appearances department...- Mr Hushwing
- Post #18
- Forum: Introductions & Build Threads
-
PXL_20210410_175429763.jpg
- Mr Hushwing
- Media item
- Comments: 0
- Category: Members' Build Thread Photos
-
PXL_20210410_175422281.jpg
- Mr Hushwing
- Media item
- Comments: 0
- Category: Members' Build Thread Photos
-
PXL_20210409_182305621.jpg
- Mr Hushwing
- Media item
- Comments: 0
- Category: Members' Build Thread Photos
-
PXL_20210408_200308012.jpg
- Mr Hushwing
- Media item
- Comments: 0
- Category: Members' Build Thread Photos
-
PXL_20210408_200305860.jpg
- Mr Hushwing
- Media item
- Comments: 0
- Category: Members' Build Thread Photos
-
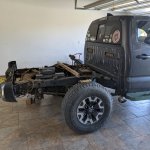
Lets Get Committed
In my ongoing efforts to gain clearance, while making my Tacoma more functional in simple ways like just carrying things to the house from Home Depot, it seemed a natural next step for me..... A few measurements from the truck later and i drew up a flatbed in a width that wouldn't look...- Mr Hushwing
- Post #17
- Forum: Introductions & Build Threads
-
PXL_20210407_145756649.jpg
- Mr Hushwing
- Media item
- Comments: 0
- Category: Members' Build Thread Photos
-
Lets Get Committed
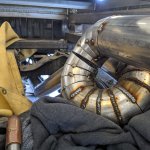
Once the exhaust was all tacked together and exhaust hangers were installed, i removed the system from the truck and fully welded everything. Since the newly routed exhaust is spending time next to brake lines, fuel lines and transfercase, it also got wrapped and I added a few heat shields for...- Mr Hushwing
- Post #16
- Forum: Introductions & Build Threads
-
PXL_20210401_210403954.MP.jpg
- Mr Hushwing
- Media item
- Comments: 0
- Category: Members' Build Thread Photos
-
PXL_20210401_180730195_exported_6933.jpg
- Mr Hushwing
- Media item
- Comments: 0
- Category: Members' Build Thread Photos
-
PXL_20210401_170142176_exported_76833.jpg
- Mr Hushwing
- Media item
- Comments: 0
- Category: Members' Build Thread Photos
-
PXL_20210401_170142176_exported_5500.jpg
- Mr Hushwing
- Media item
- Comments: 0
- Category: Members' Build Thread Photos
-
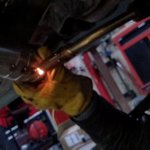
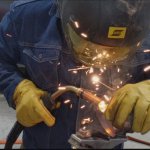
Lets Get Committed
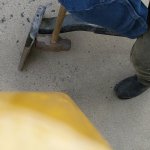
Because i don't have access to a lift or exhaust jacks, I'm left to work from the floor like the rest of us. So you should he able to identify with the struggles. Everything is tack welded here. Once i like it, i tack it really well to prevent movent during removal for final weld up. I wanted to...- Mr Hushwing
- Post #15
- Forum: Introductions & Build Threads
-
PXL_20210401_163203212_exported_32100.jpg
- Mr Hushwing
- Media item
- Comments: 0
- Category: Members' Build Thread Photos
-
PXL_20210401_161632810_exported_49100.jpg
- Mr Hushwing
- Media item
- Comments: 0
- Category: Members' Build Thread Photos
-
PXL_20210401_160822459_exported_16000.jpg
- Mr Hushwing
- Media item
- Comments: 0
- Category: Members' Build Thread Photos
-
PXL_20210401_150812589_exported_12166.jpg
- Mr Hushwing
- Media item
- Comments: 0
- Category: Members' Build Thread Photos
-
PXL_20210401_150416626_exported_25429.jpg
- Mr Hushwing
- Media item
- Comments: 0
- Category: Members' Build Thread Photos
-
PXL_20210401_151439862_exported_157333.jpg
- Mr Hushwing
- Media item
- Comments: 0
- Category: Members' Build Thread Photos
-

PXL_20210401_150416626_exported_599.jpg
- Mr Hushwing
- Media item
- Comments: 0
- Category: Members' Build Thread Photos
-
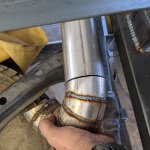
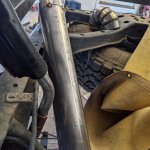
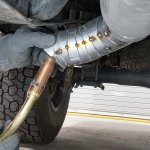
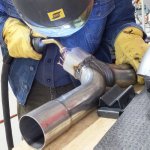
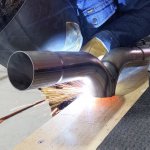
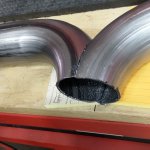
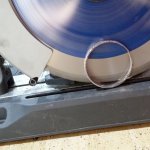
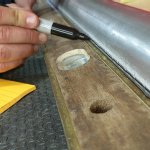
Lets Get Committed
Pie cuts... Dont have any experience making them. So after some youtube i dove right in as my tight spacing had me feeling like it was the best way to go about running this exhaust system. Plus it would have to be routed out the side where i could kind of play around with them since it wouldn't...- Mr Hushwing
- Post #14
- Forum: Introductions & Build Threads
-
PXL_20210401_143017862_exported_71641.jpg
- Mr Hushwing
- Media item
- Comments: 0
- Category: Members' Build Thread Photos
-
PXL_20210401_143017862_exported_63045.jpg
- Mr Hushwing
- Media item
- Comments: 0
- Category: Members' Build Thread Photos
-
PXL_20210401_141550808_exported_33629.jpg
- Mr Hushwing
- Media item
- Comments: 0
- Category: Members' Build Thread Photos
-
PXL_20210331_184809229_exported_59666.jpg
- Mr Hushwing
- Media item
- Comments: 0
- Category: Members' Build Thread Photos
-
PXL_20210331_183555514_exported_78700.jpg
- Mr Hushwing
- Media item
- Comments: 0
- Category: Members' Build Thread Photos
-
PXL_20210331_183433351_exported_43079.jpg
- Mr Hushwing
- Media item
- Comments: 0
- Category: Members' Build Thread Photos
-
PXL_20210331_175931763_exported_289874.jpg
- Mr Hushwing
- Media item
- Comments: 0
- Category: Members' Build Thread Photos
-
PXL_20210331_154224172_exported_25066.jpg
- Mr Hushwing
- Media item
- Comments: 0
- Category: Members' Build Thread Photos
-
PXL_20210331_144813609_exported_16966.jpg
- Mr Hushwing
- Media item
- Comments: 0
- Category: Members' Build Thread Photos
-
PXL_20210331_135447535_exported_96061.jpg
- Mr Hushwing
- Media item
- Comments: 0
- Category: Members' Build Thread Photos
-
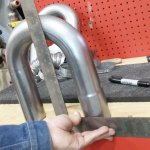
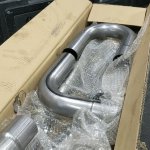
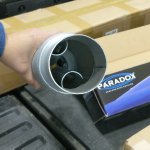
Lets Get Committed
Lets dive into the parts i got delivered for this exhaust project. Im doing this because as we all know, the factory crossover is really..... really ......dumb. So, parts were ordered off of eBay and summit. Actually, Summit was used for the 3" stick of exhaust tube and the rest being the 2.5"...- Mr Hushwing
- Post #13
- Forum: Introductions & Build Threads
-
PXL_20210331_132326689_exported_423503.jpg
- Mr Hushwing
- Media item
- Comments: 0
- Category: Members' Build Thread Photos
-
PXL_20210331_132326689_exported_273863.jpg
- Mr Hushwing
- Media item
- Comments: 0
- Category: Members' Build Thread Photos
-
Lets Get Committed
I know that feeling OzarkLander. These trucks are incredibly simple thankfully, despite modern circuit boards running everything. Hopefully i can inspire folks to get out there and fabricate more after watching my mistakes, or seeing my approach. I think for me out of all honesty, was the sheer...- Mr Hushwing
- Post #12
- Forum: Introductions & Build Threads